Pip came round last night for dinner, drinks, holiday food exchange (French cheese from me and Greek nougat from her!), and her final fitting on her bridesmaid dress.
If you cast your mind back to April and May, her gown is the long, purple, silk jersey Gant exclusive design gown from the Sept 2008 Burda magazine.
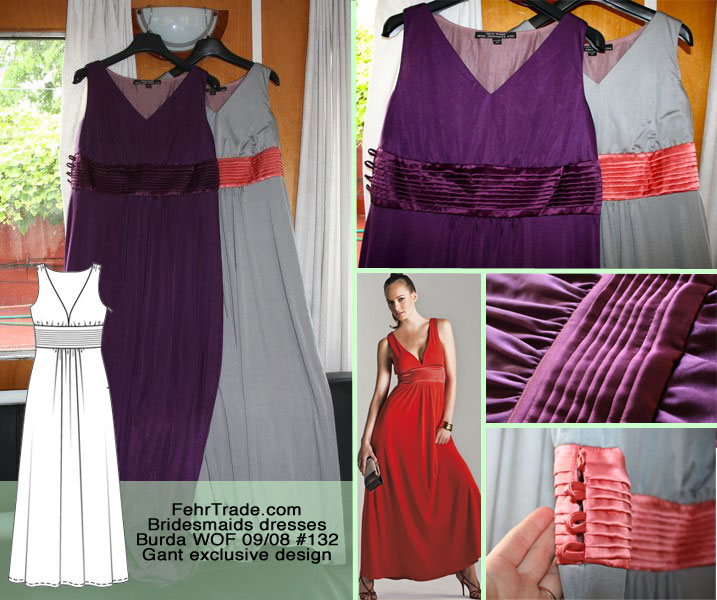
I’d completed the gowns back in May, but I left off the tiny covered buttons on the cummerbund and finishing the hem until closer to the day so that they wouldn’t have to worry about gaining or losing a few pounds, or deciding on different shoes before now!
Happily, Pip’s gown fits her perfectly, with minimal overlap at the cummerbund, and really her hem was just about perfect with her chosen heels. But then we realised that if she switched to her comfort flip-flops on the dancefloor, the hem would drag, so I’m going to pull up the hem by an inch.
Then Pip wanted to see me in my gown, and since I hadn’t tried it on since the skirt was attached, I felt it was a good idea. But even though I was capable of wrestling into the boned bodice before, it was proving impossible (and more than a little claustrophobic) with the attached skirt. It was apparent that I had to remove the brass bar at the top of the zipper to allow the top to fully open and give me extra room to squeeze into the gown. I’d thought I might have to, but I kept it in until now since it wasn’t a problem. So now I’ll just need to add one or more hook and eyes to the top of the zipper to keep it all in place.

It was still a bit of a struggle to get on, so it’s also apparent that I need the extra two inches left of the zipper at the bottom edge, so I’ll need to extend it down into the skirt seam afterall. Another reason I wanted to try it on while she was there to help me (and good god, I really do need help getting in and out of it!) is because I noticed the upper back was gaping just a tiny bit the last time I tried on the bodice, so I got her to lay size wide elastic across it and tell me how much stretch I’d need across the back neckline to keep it snug but not restrict movement.
I’ve still got two weeks to go (eek!) so I’ve still got plenty of time for these last little improvements and to sew the silk dressing gown. The bra strap carriers are done, so the remaining tasks are:
- Attach the elastic to the boning casings along the upper back neckline
- Create a small facing on the right side skirt seam and extend the lapped zipper a few inches down into the side seam (these few inches of zipper were just dangling inside the skirt until now)
- Fell stitch the lining in place along the waistband and zipper edge
- Attach one or two hook and eyes to the top of the zipper tape
- Get someone to mark out the new hemline while I’m wearing it, then trim and sew the hem
My mom and sister-in-law (along with the rest of my family!) arrive in exactly one week’s time so they might be helping me with that last task!
Oh, and if you’re a Burda size 42 or 44 (like me!) then go and have a bonanza downloading the free Lekala sewing patterns for the month of September. They’ve got some especially good dress and lingerie patterns right now!! (thanks very much, DD!)