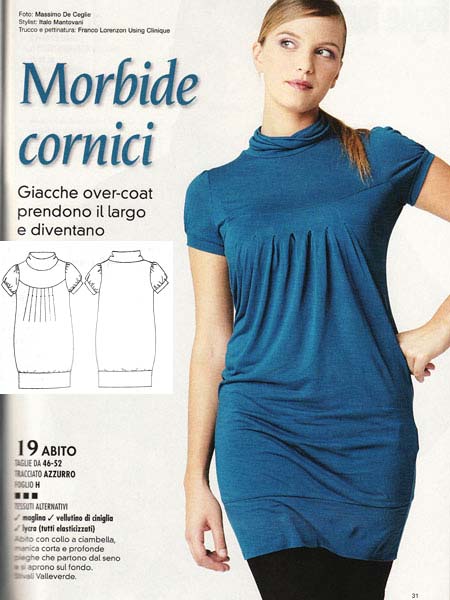
Cast your mind back a year ago, when I totally raved over a certain Plus-sized La Mia Boutique tunic pattern (La Mia Boutique 12-2009 #19)…

This pattern was SO in the style of my sister-in-law, Aileen, that I proposed it to her right away, and even made the muslin for her almost exactly a year ago! Thankfully I made all the changes to the pattern as soon as I got home from the fitting session, and I even bought the silver silk jersey she wanted from Classic Textiles on Goldhawk Road… But then I totally lost momentum and the altered pattern pieces have been hanging on my pattern rack making me feel guilty ever since!
So about 3 weeks ago, I finally sucked it up and made this for her (rather belated) birthday gift. All in all, it only took an afternoon from fabric cutting to completion – why didn’t I just do this months ago! We finally visited Aileen yesterday to give this to her, so I can now post about it. I didn’t get to see her in it since she had her hands full with her 6 year old’s birthday party, but she texted later last night to say it fits well and she loves it, so hopefully I’ll get to see it at some later family gathering!
Until then, you’ll have to make do with Susan modelling:


The body is totally lined in pink stretch netting, also from Classic Textiles:

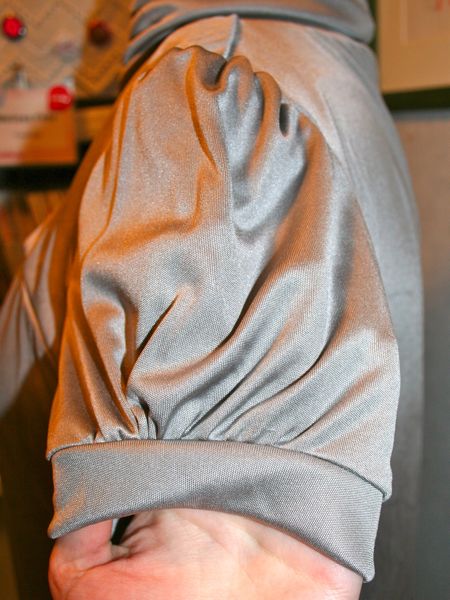
Aileen wanted a bubble hem on this instead of the band – I did this by making the lining shorter and narrower than the fashion fabric (I tapered the width from the hip line down so the lining wasn’t too tight around the waist and bust).

Neither of us liked the stitched-down pleats in the front so I left those free hanging!
I think the sleeve is really nicely done on this patterns – it’s gathered at the shoulder, and then again at the bottom before the band, but without being to “little girl” like some gathered sleeves can be.
After the muslin fitting, we brought the yoke seam up much further – I shortened the yoke and added about 4 inches to the top of the lower front piece. Aileen also preferred the collar to be tighter so I took about an inch (so 2 inches overall) off the collar piece width.
My order of construction (thank you, Previous Me, for writing this down so I didn’t have to struggle to think what to do one year later!):
- Sew the centre back seam (if not cut on fold) of the lining and fashion fabric
- Sew all four side seams (of the lining and also of the fashion fabric)
- Form the bubble hem by sewing the hems of the lining and fashion fabric together, right sides facing
- Baste the top edges together of the lining and fashion fabric
- Stabilise the shoulder seams with vilene bias tape or clear elastic, then sew the shoulder seams (burrito style for the front lining if you’d like an enclosed seam)
- Sew the collar seam so it forms a circle, then attach it to the neck edge
- Pleat the lower front (lining and fashion fabric as one) and baste
- Sew the pleated edge to the front yoke
- Sew the short sleeve seam
- Gather the sleeves as indicated on the top and bottom edges
- Sew the sleeve bands together to form two circles, then attach the sleeve bands to the bottom of the sleeves
- Insert sleeves in the round
Surprisingly, there’s no hemming or facings or anything else to be done here! It almost felt weird to attach something as the last step without any finishing business. Well, apart from a few dabs of Fray Check on the serger tails, that is!
And my little reward for finally sucking it up and sewing this? There’s a good 1.5m of luscious silk jersey leftover, all for meeee!