When you last heard about my wedding gown, it was two years ago(!!) and I was leaning towards turning my Granny’s gown from 1949 into something with a cowl neck, deep back, and sleek lines, using Vogue 2965 as my starting point.

But recently I’ve been looking more closely at the fabric I’ve got to work with in my grandmother’s gown, and my recent cowl sewing adventure has reminded me that cowl necks need pretty huge amounts of fabric, can’t easily be pieced together, and on top of that, the silk satin in her gown is more of the heavyweight duchesse variety than something very drapey that would cowl nicely. And while I love a low back, it does make things awkward for bras and any sort of shapewear, too.
So I had a bit of a wake up call and told one of my bridesmaids to keep reminding me that “This is just one dress. It is not all dresses.” (thanks, Stacy!). Yes, I like cowls. But I also like other things, too. And I do not need to put everything I like into one dress!
So with that in mind, I looked through my extensive pattern stash for bodice inspiration, looking specifically for bodices with a lot of little pieces that could be more easily gleaned from the existing bodice of my Granny’s gown (as I’m taking it apart from the waist up, using that fabric to create a new bodice, and reattaching the skirt).
So here are some pieces that inspired me…

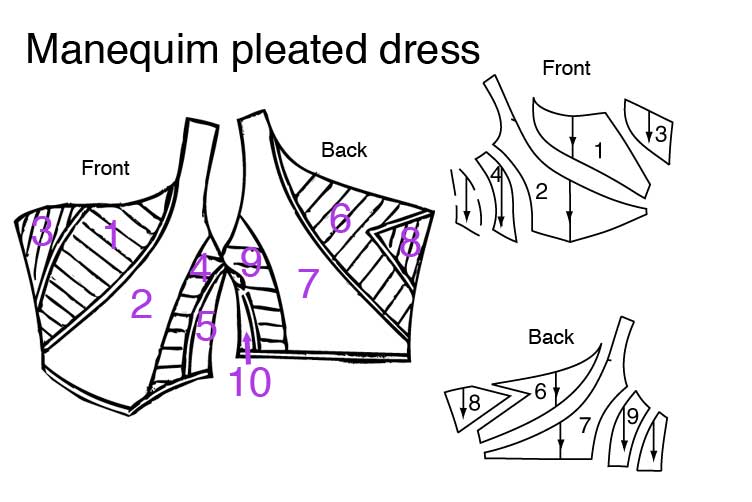
The standout pattern for me is definitely this Manequim pleated bodice dress that is a free pdf download from the Manequim site.

Digging a bit further, I found that this pattern is based on a dress by the designer Elisa Chanan, who is totally new to me. I can’t find my exact dress in her runway shows (for some reason she’s not on Style.com and Google’s coverage is patchy), but this orange dress has similar seamlines.
I love the lines of this dress, and that some of the panels are pleated in the original is just so me, and also hints back to the pleating on the bridesmaids dresses. But the pattern pieces for this dress are just INSANE. Even looking at the fabric layout and looking at the tech drawing, I couldn’t quite make out what was supposed to go where, and to make matters worse, all the pieces are cut in a single layer of fabric, and therefore mirror-flipped to the tech drawing, making things even more difficult to visualise… (and Google Translate is less-than-helpful with Portuguese!).
So I played around with Photoshop, isolated the bodice pieces and saw where they all lined up. Though in reality, the seam intersections are all nicely labelled on the pattern pieces themselves, so it wasn’t as bad as I’d first thought!
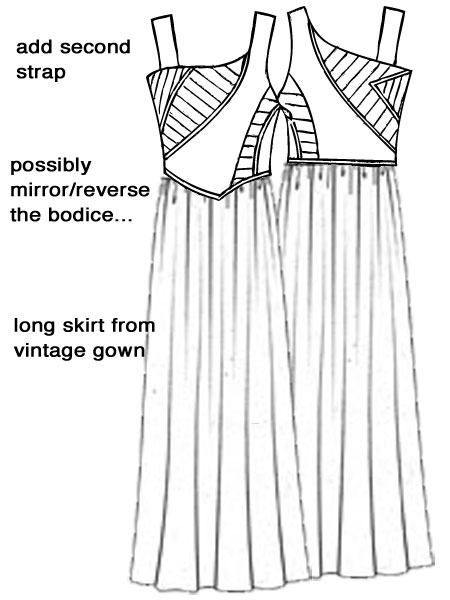
But even though this is my forerunner for the bodice, there are still some changes I want to make. Namely, I love asymmetry, but I’m not that keen on the one-shoulder look, so I want to add in a second strap, maybe mirror-flip it so the wider strap is on my right (to cover a scar), and play with the amount of skirt fabric to decrease the gathering. But here’s a rough mockup, anyway:
But that’s jumping ahead of myself, because the first step was to make the pattern exactly as-is, to test the drafting and fit before going about changing it!
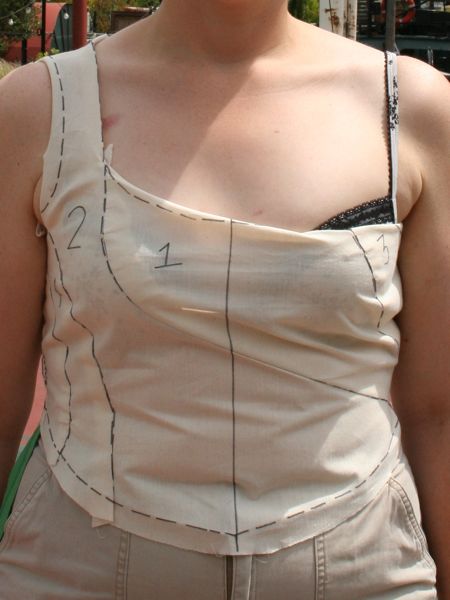
Muslin 1
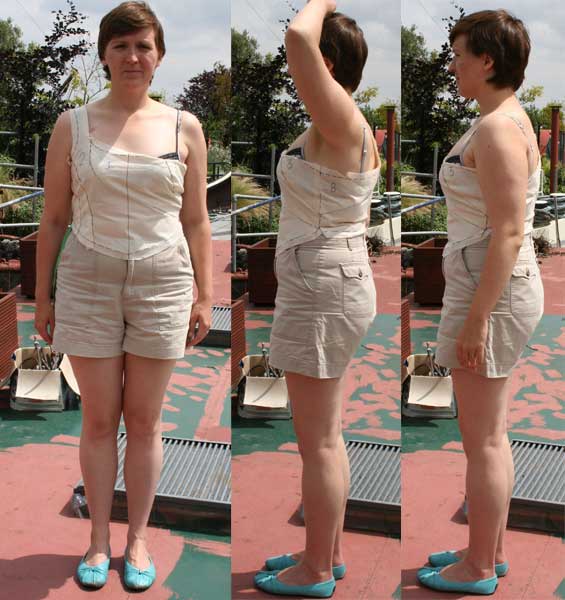
So I sewed up a quick muslin (in actual muslin fabric this time instead of a ratty old bedsheet. Yeah, you can tell it’s for the wedding gown!), emphasising accuracy above all, and “thread tracing” the edges of all the pieces in black marker pen, as well as marking the centre front and centre back. The muslin is a lot thinner than my silk, but with less drape (not that drape matters much in this particular design!). The semi-sheer muslin made it really easy to line up seam lines while sewing to make it ultra-accurate, but it’s not so great since you can kinda see my bra through this (sorry about that! And, I do realise I need to wear my bridal undergarments for the final fitting. But as I’m making my own corselet, it’s not really that important at this stage.).
Front & left
Back & right
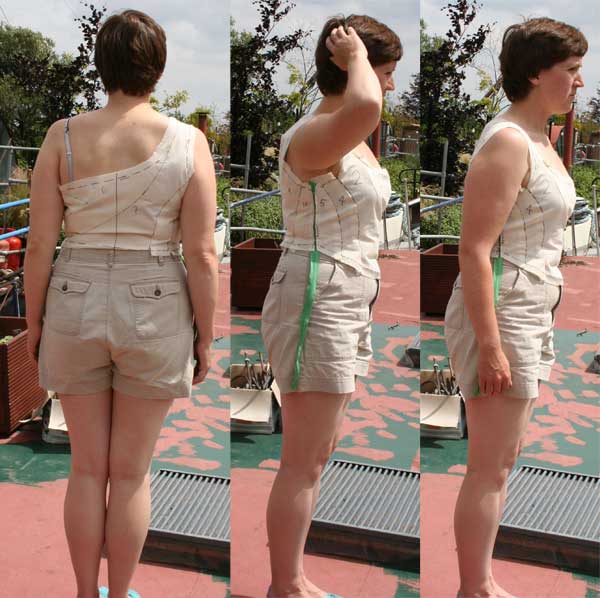
Detail shots of the front and back

(Hypocrite alert – Yes, I know I’ve said over and over that I don’t wear shorts. This is the only pair I own, bought in 1997 when I was a senior in high school, and I don’t wear them outside the moorings!)
Neighbour Helen came over to help photograph and advise, and we both feel the fit is about 98% perfect straight off the pattern – I just need to pinch in the left side seam at the underarm as it’s gaping by a half inch or so there (though I see a bit of diagonal pulling in the front and I’m not sure if I’m concerned about those or not…?).
Other than fit, her advice was:
- Add one inch to the bottom edge (front and back) to visually elongate my torso since I’ll be wearing such a long dress and only moderate heels
- Widen the top of the straps slightly at the shoulder seams to create more of a Victorian-inspired frame around my face
- Ditch the pleats on some of the panels (since she thinks my satin will be too thick once pleated), and instead insert a thin, standing pleated edge around the neckline
- Add the other strap and then either even out the neckline to make it symmetrical, or alter to make it really asymmetrical (as a slight asymmetry just looks bad)
- Lose the gathered waist on the skirt in favour of a smooth and sleek silhouette, or if necessary, add in two pleats in the front/back
I may not follow all of her advice, but I do hold a lot of stock in her opinion so I’m taking it all on board while I play with the muslin…
Next steps:
- Dry cleaning. Or not. – ugh, I have had a total nightmare trying to find somewhere that will clean a vintage gown. Even the ultra-posh shops that do couture and wedding dress cleaning won’t touch vintage, and Nadia even used her contacts at the V&A to help get recommendations for me, but in the end, I visited an exceptional vintage shop whose owner is a trained tailor and has an eye for exquisite vintage clothing (and definitely knows what they’re worth) and asked them what they do about cleaning vintage. And the guy there said they only clean pieces if they’re really bad and un-sellable as they are, because they do have pieces come back in shreds sometimes, and it’s impossible to predict which fibres can withstand the chemicals. And he seemed to think that since my gown only had a few spots and I was taking it apart anyway, don’t fix it if it ain’t broke. So I’m now not going to clean it at all, I’ve decided. Rather that that end up with a completely ruined gown. I was so busy focusing on how I was going to get it cleaned that I never quite stopped to think about why!
- Better photos – The only photos I’ve got of Granny’s gown as it is are on her at her wedding and her first anniversary (from quite a distance), and laid down flat on our table. I’d like to get some better photos before I start unpicking it, so luckily my neighbour Kate agreed to wear it this weekend so I can get some good, non-flat Before shots. It’s too small for my dressform and she’s about the thinnest person I know so fingers crossed she can get into it!
- Unpicking – Once I’ve got my photos, I’m going to carefully start unpicking the bodice seams and pressing each section flat so I know what I’ve got to work with…
- Muslin – Add the second strap and adjust the neckline
General Timeline:
- July – bodice muslin sorted, unpicking and pressing of original bodice pieces, construction of inner corselet
- August – continuation of corselet construction, construction of bodice, attach skirt
- September – make headpiece and veil, hem skirt, and possibly some lingerie
- Sept 18 – wedding!!
Oh yeah, and the secret project was announced on Tuesday! Yes, I’m being published again, though hopefully this time more than just a credit at the back! It’s going to be a very busy July!