Blog

A green leather three piece laptop set

Believe it or not, I’ve still got a backlog of finished projects from the holidays to tell you all about, so I’m going to attempt to get them all up before the end of January (because nobody likes hearing about Christmas presents in February!). First up is my Christmas holiday project for this year – a set I’ve had in mind since I quit my office job last Fall and went full-time working on the sewing business. I mostly work from home, but I also like to get a change of scenery once or twice a week and work elsewhere. I’ve actually found that our favourite whisky bar is a brilliant choice during the day – great atmosphere, lovely staff who know me (so therefore don’t rush me along and don’t mind if I just drink water for hours), comfortable seats, wifi, and music that’s easy to zone out. And it’s an easy 30min cycle along mostly segregated cycle paths, too. Plus I get to reward myself with a cocktail at the end of the day, too!

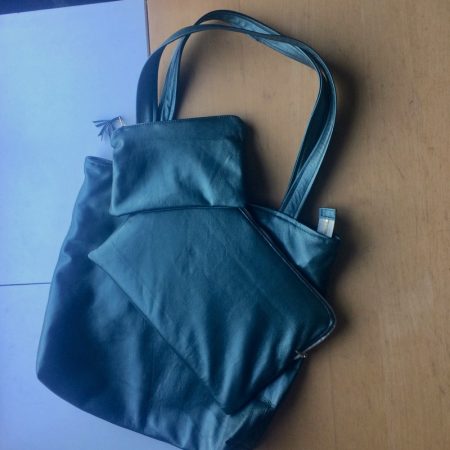
But I quickly realised that my options for lugging my new laptop around were definitely less-than-chic, and I needed something that looked a bit nicer without screaming “I’m a laptop bag!”. The case off my old laptop (bought in 2010 and therefore an ancient 6 years old!) was way too big for my slimmer new model even though they’re the same screen size, so I first thought about making a cushioned, zippered case for it, and the idea spawned into a bag to put the laptop into (and also hold my normal purse stuff), and something to contain the charging cables and USB sticks, too.

A visit to the fit studio…

You’ve probably not heard of them (neither had I!), but I was recently introduced to Alvanon, who manufacture a whole host of fitting mannequins for the apparel industry. They’re a family company who work with the biggest retail manufacturers (whom they usually can’t say due to NDAs, but believe me, you definitely have some in your closet!), but they’re really supportive of little indie designers, too, and invited me to come and use their fit studio yesterday afternoon.

Now, being from a science background myself, I freaking love that Alvanon’s are so based in science and data analysis, and founded by a doctor who was seeing a real disconnect between actual bodies and fitting dummies. The measurements for all of their models are all based on body scans of actual women (none of this “we measured women in the 1970s and have been using it ever since” crap!), and they’ve got different forms for European, American, Asian, UK, etc body types, and you can get forms based on specific countries, too. They’ve got squishy lingerie forms with different cup sizes, men’s sizes, pregnancy bellies, various arm configurations, all the kiddies from toddlers up through tweens, and a bunch of Plus-sized forms based, again, on actual women’s bodies.

A Quick Ombré Teeshirt

I only bought this fabric from Abakhan Liverpool only two weekends ago but I’ve already sewn it up and worn it already!

As you’ll recall, I was pretty restrained upstairs at my first Abakhan experience, but then I went down into the bargain basement, and saw this ombré teeshirting! Even then, I could see it was quite thin with very little stretch but I loved it too much to let it go! I paid about a fiver for the length (about 1.5-2m?), and there’s probably enough left for a second tee, too, to be honest. So this is quite the bargain make!

A fuss-free red shirt for James

While my own wardrobe may be 99% own-sewn, I’m only one woman and I like to concentrate my sewing for James into items he can’t regularly find in shops. Often this means loud and garish shirts in unusual prints (just wait til 4th of July…), but occasionally it’s for practical reasons. In this case, he has two Dakine shirts that are made from some sort of thin, technical woven that dries really quickly and resists wrinkling. So he got just a wee bit excited when he saw Fabric.com was stocking something that looked really similar. They called it “workwear fabric” (it’s no longer available) – a thin, 100% polyester woven that resists wrinkling and dries quickly – perfect for him to wear to cycle into work without looking like a sweaty mess all day.

Sewing jeans against the world

Sometimes you have to just close yourself into your sewing room, try to block out the world, and just make. This weekend I closed myself in my sewing cave and emerged on Sunday with a new pair of jeans and a teeshirt.

Let’s start with the jeans – I’ve lost track, but these are probably at least the 10-15th pair of jeans I’ve sewn myself, so I pretty much know what I want and how to achieve it by now. I usually try to make at least a pair a year, as they seem to live for just over a year of hard wear before the inner thighs inevitably start to wear thin and they’re relegated into “boat work jeans”.

Two quick tops

Not everything I made while I was ill was an involved as my navy Harriet jacket – I made quite a few small and quick projects, too, just to boost my mood. I wanted to show you two different quick tops today – it didn’t really feel like I had enough to say about either to warrant separate posts, but I wanted to document them just the same.

Seamwork Akita in Japanese floral

My friend Alex brought me back a ton of fabrics fro Tomato in Tokyo (which you’ll be seeing more of, I’m certain!), but this narrow, textured floral shrunk a TON in the wash and was narrow to begin with, so afterwards it was very narrow indeed. So I pulled out the Seamwork Akita blouse pattern since it only needs a narrow, non-directional print fabric because it’s just one pattern piece (no shoulder seams). In the end, the pattern piece touched both selvedges and I had to trim off some of the sleeve depth to fit it in!

I haven’t seen this pattern made up much, but I was disappointed in the fit – this runs HUGE, even for an over-the-head top (in contrast, the woven, over-the-head Sorbetto pattern fits much closer). In hindsight, I think I could’ve made the absolute smallest size and still be swimming in it (and no, no printing errors!). I chopped off about 6 inches in length, too, and it’s still on the long side.

But the worst bit is that the bust point is ridiculously low, which just looks bad. Luckily, it gets lost in such a busy print, but it’s still disappointing.

By the time I tried it on and realised it was massive, I didn’t have any bias fabric left to do the neckline facing, so instead I pulled out some silk charmeuse bias strips I had squirrelled away and used those to finish off the neckline in my preferred way. This is actually my favourite part of this top!

I’ve worn it with layers on top because I like the colours, but I’m glad I didn’t make it in an expensive silk like I was planning! The other Seamwork patterns I’ve made have been true to size, so I’m not sure what happened here…

Sweaty Betty striped tech tee

I had some weird, small offcuts of tech fabrics from my Sweaty Betty-working friend, one of which was this teal, black, and grey striped, slubby wicking teeshirt material. I cycle commute in street clothes that I wear at work all day (unless it’s pouring, in which case I change into dry clothes at the office) and I like to have a base layer which dries quickly. I never get that sweaty on my ride, but when I was ill it felt a bit harder than it does normally, so tech tees were useful.

A geometric art print teeshirt

Isn’t it funny how the most boring, basic garments somehow end up being the ones we wear the most? Take this top – it was really only meant to be a wearable muslin to test out a new teeshirt draft I was working on last Fall. I wasn’t even planning on even taking finished garment photos of it, as it was a rough pattern (no seam allowances or extraneous notches for my private patterns!) and I just grabbed some fabric out of a bag ready for donation and sewed it all together without much thought.

And it’s ended up being something I wear all the time. Like, I have to make mental notes to make sure I don’t wear it twice in the same week!

Long time readers may actually recall that I’d used this fabric for a long sleeved teeshirt a few years ago. Well, that particular top has since gone off to the charity shop because the neckline was just too low and wide for me to wear more than occasionally, and I hadn’t even worn it enough for the black and orange print to start doing their cool crackle/fading thing! The fabric was originally from Mood via Kollabora, so it’s probably long gone, but everything I disliked about it then I actually really like in this teeshirt. Funny, eh?

Pleated denim leggings

The three words in the title may not seem like they naturally go together, but it’s all made possible by the super stretchy denim I bought from Mood when we were in NYC for my birthday in March. The weave definitely looks more like a denim/twill than a knit, but strangely, there’s more lengthwise stretch than widthwise (about 50-60% compared to only about 20%). There’s still plenty of stretch there for them to just pull on with an elastic waistband, and the fit is definitely more “leggings” than “jeans”, despite the denim.

I made these well over a month ago, and I’ve been wearing them pretty much twice weekly since then – they’re unbelievably versatile and so much more interesting than just a basic stretch denim legging (or, ugh, “jegging”). They were one of the last items to be made in my old sewing room, and I’m not entirely sure why it’s taken so long to photograph these, because I really do like them!

There’s no pattern to talk about here, I’m afraid – I just opened my basic leggings sloper in Illustrator and made some modifications to fit what was in my head.

In short, I drew some design lines on the Front where I wanted the pleated panel to be, sliced that off as its own piece, then digitally spread it apart again to have twelve 1cm pleats with 2cm in between. (You can do this really quickly by overlaying a grid onto the pattern piece, splitting it apart, then moving the top (or bottom) piece by the amount you want the total spread to be (in my case, moving it 12 × 2cm=24cm). Then just set those pleat pieces to distribute vertically!) IMHO, this is so much easier then getting out scissors and tape and a ruler and trying to draw out all the pleats myself. I truly am a digital native when it comes to pattern drafting now, I swear!


Worn here with my mustard Drape Drape top – still a favourite 2.5 years later!

StyleArc Lalitha Leggings

I’ve been on the Aussie pattern company StyleArc‘s mailing list for a while now, and I always like to keep an eye on their new patterns, but their fabric options have never really appealed to me, to be honest (I’ve got to really like a fabric to pay for it to be shipped halfway around the world!).

Until March, that is, when they sent round details of their new range of “cut & sew” leggings, printed directly onto activewear knits:


They’ve since removed these from their site due to demand, so I’m reposting the original ad here so you can see the other colourways.

I’ll be honest – I was as intrigued by the concept as I was the prints, and for $60AU (£30) shipped, plus the freebie March pattern (knit top Melinda), I was sold. Quality leggings in great prints go for the £80-90 range in London, so for me, £30 was worth a gamble in the name of research. StyleArc had teamed up with a company called Fifth Element for these leggings, which you can also buy ready-made for about £45.

I ordered the “Lalitha” colourway the very next day, and then waited over 6 weeks for delivery (maybe they printed on demand?), but the kit finally arrived in mid-April. I was kinda hoping that the fabric would be printed all over, or in zones, like my collaboration with Laurie King, but you really only get the outline of the legging, with the rest in plain white.

Before I get into my complaints, let me just say that the fabric quality is fabulous – it’s soft, and stretchy, with great recovery and super vibrant colours, and from handling enough activewear fabrics in my day, I believe the that this is proper wicking fabric. I pre-washed it before cutting out, and everything remained vibrant, too.

Book Review: Two Pattern Grading books

I’ve got not one, but two books to talk about today, both on the subject of pattern grading, which, to be honest, has hardly any books published on the topic and seems to be a bit of an industry secret or something.

If you’re not familiar with what pattern grading is – it’s the process of taking one pattern and adding or subtracting amounts at various points to make it another size, or multiple sizes. This isn’t just a simple equation of “well, size Y is twice as big as size Q” because humans’ shapes don’t grow at the same rate (ie: the difference between a size 0 and a size 18’s shoulders aren’t likely to be as great as the difference in hip sizes). In general, the measurements around the body change much more than the vertical measurements, so you need to follow some rules to know how far to move different points and in which directions.

Now, there’s an old-fashioned way of doing this with paper patters, scissors, tape, a special “grade ruler”, and several hours of your time, and this was covered pretty extensively in the September 2014 Threads Magazine (#174). In my personal opinion, this is fine if you only want to change one pattern to one other size, for instance if you have a vintage pattern but want it in your own size. Doing more than one size this way is a great way to end up throwing everything into the bin after several hours of swearing.

In my opinion, the far less stressful way to do pattern grading is digitally. You select a point, tell your software (like Adobe Illustrator) to move it xx cm vertically and yy cm horizontally, and you do that to all the points around the pattern. No taping, no cutting, and no weird ruler. Plus it’s way more accurate. So with this in mind, my reviews of both books are skewed heavily towards how they deal with digital drafting.

Let’s look at “Grading Workbook” by Connie Crawford first. It’s been out as a print book for a while, but I bought an early edition of the pdf ebook last year, which has been extensively cleaned up and digitised. I checked about a month ago, and there haven’t been any revisions so the copy I’m reviewing here is indeed current.

The book is targeted at someone who has some knowledge of pattern drafting, but is a beginner at pattern grading – most home sewists would be able to follow along with the introductory chapters which explain the methods and theory, and how to select different grades.

For each of the grade tables (ie: bodice, skirt, sleeve, stretch, child, etc), there are a few pages which show which point is being selected and which direction to move it, shown in a series of diagrams, like these two: