Blog

A teal wool cape

After a few weeks, a head cold, and a lot of hand stitching through two seasons of Ru Paul’s Drag Race, my cape is finally finished! I’ve made an awful lot of coats over the years but this is my first cape. I thought perhaps it was a cloak, having mistakenly thought the difference was that cloaks have hoods, but in fact it’s a hem length distinction, so this is indeed a cape!

I covered a lot of the details of the making of this cape last week, so you’ll already know that it’s entirely underlined in cotton flannel to cut the wind, and that it uses this Burda magazine pattern from 2011 (still available to buy as a pdf). Funnily enough, there’s actually a fairly similar hooded cape pattern in the current December 2016 issue, too, which I’ll cover in my review post soon…

Named Harriet lumberjacket in wool & vintage silk

I am both back from our trip to the States and feeling back on form now, so I’ve started to tackle documenting the absolute mountain of finished makes from the last four months. I have some garments from early January, some made more recently and well, I’m just going to share them with you in no particular order! The photos are a bit more slapdash than usual, but I know that if I waited to do proper photoshoots of all of these then it’d be another 6 months before you’d get to see them!

So I’m going to start with a garment that was the longest in the planning, and also quite possibly my favourite of the early 2016 makes. It all started back in summer 2014, when I bought some fabulous navy wool coating & vintage silk twill from Ditto when I was down in Brighton. I knew I wanted to use them together for a transitional, short coat, but then I had quite a journey in finding the right pattern!


The psychedelic 1960s vintage silk twill lining that was originally made for neckties!

Over the course of 18 months, I ended up making five different muslins before I was happy enough to cut into the wool and silk:

  1. StyleArc Audrey (the silhouette and proportions were just so bad on me. So bad.)
  2. Burda Jan 2015 jacket in size 42 (way too small for non-stretch outerwear, oddly, though Burda’s fit is usually very standard)
  3. Burda Jan 2015 jacket in size 44 (traced ALL the pieces again and it still fit very weirdly)
  4. Patrones 342 No23 dolman sleeve coat (ridiculously tiny sleeves and zero arm mobility even with the underarm gusset)

And then finally I muslined Named’s Harriet lumberjacket pattern, bought during a flash sale during their advent calendar promotion. And I was like Goldilocks, it was juuuuuuust riiiiiight.

Grey wool trousers (with hidden biscuit pockets!)

I’ve been doing quite a lot of sewing recently (less so on the blogging!). Most of it is for an upcoming pattern, so I’m not able to really share details yet, but I’ve also been trying to take time out to fill a few holes in my own wardrobe. Specifically, I realised I was in desperate need of trousers – I pretty much only had jeans or leggings that still fit me, apart from the Navy twill trousers I made this summer of course. I have quite a few skirts and dresses that still fit, but I tend to only wear those once or twice a week to work and I definitely favour trousers in cooler, wet weather.

So taking inspiration from what I’d had that I wore the most, looked at the grey flannel trousers I made in 2012, which I absolutely wore to death over the past three years. They’re a bit too big now, aside from being bobbled, so I thought I’d look for a similar pattern and attempt to recreate them. I found this pattern from the October 2013 issue, though when I looked through my Burda archives there were a ton of slight variations on this general shape. Hooray for sewing from the archives!


(The top on this page was Tall sizes, but the trousers were the regular size range)

The fabric was from equally deep in my stash – I’d been given this soft, grey flannel by Neighbour Helen just before they moved off the moorings (4-5 years ago), and at the time I already had a similar grey flannel in my stash (which became the aforementioned trousers, a midi skirt, and a sheath dress amoungst other things) so I didn’t cut into this one until that had gone. For some reason I had noted in my records that it was a polyester, but when I did a burn test it turns out it was wool! I found hidden treasure in my deep stash, and there’s a good 2m of it left, too.


Seen here with my favourite green Kimono Sweat top, made with green fleck sweatshirting from Guthrie Ghani.

A green merino Astoria sweater

I’ve been a subscriber of Seamwork magazine since issue one back in December, and can I just say that they are killing it with the digital format, pattern bundling, and freemium vs add-on price point? Seriously, this is the future of not just sewing magazines, but magazines. I’m proud to be both a subscriber and a contributor (look out for more of my writing in the June issue!), to be honest! When I saw the cropped “Astoria” sweater in the April 2015 issue, I just knew I was going to sew it! The nice thing about Seamwork (which is made by the Colette Patterns team) is that subscribers get both patterns on the 1st of the month, but if you’re dawdling and don’t notice a great pattern until someone like me sews it up a month or two later, you can still go back and buy the pdf pattern on its own (and they include Copy Shop versions, too).

All the Seamwork patterns are designed to be sewn in an hour, and, just like the Oslo cardigan I made back in January, this one came together in a single evening. Also, I appear to only make Seamwork patterns in wool jerseys, ha!

I couldn’t believe my luck when this pattern appeared, as I’d just bought some gorgeously soft green merino wool jersey at Mood in NYC mere days before! I’d only bought 2 yards (which I’d regretted once I got home!) for $18/yd, but happily there was enough there to cut the long-sleeved version of this plus still have enough leftover for a winter running buff.

I made size Large since my waist and hips corresponded best to that size, though my bust is a Medium on their chart. At first I made size Large with no alterations, but I wasn’t 100% sold on the fit. It took a whole day of me wearing it to decide that it’d be better with the sides taken in by 2cm (an inch) on each side. In hindsight, I could’ve gone with the Medium, I think.

So I cut off the hem band, took in the sides from the armpits down (taking off the same 2cm from each of the hem band seams, too!), and overlocked the hem band back on, this time with only the minimum seam allowance to avoid shortening the hem any more than necessary. And the fit is waaaaaaaay more to my liking now!

A mustard wool StyleArc Elita wrap top

I don’t often click buy immediately when I see a pattern release, but when StyleArc announced this “Elita designer top” pattern, I had to buy it immediately! Though I’m not entirely sure what makes it designer? I’m especially glad that they released it simultaneously as a printed pattern or a pdf, because I vastly prefer the latter, and it meant I didn’t have to wait for it to ship from Australia before I could get started.

The pattern is essentially a cross-over wrap top, with a shawl collar that extends in front and joins itself to create a really long loop, which the pattern calls a “trunk”. This nomenclature amused me way more than it should! Anyway, you’re supposed to double the loop back over your head to get a sort of double-cowl effect.

I love this design – the first time I wore it I had two friends pleading with me to make versions for themselves! My only gripe on the download is that StyleArc don’t print their symmetrical pieces on the fold, so the entire Back piece had to the pieced together here, when it could’ve saved a significant amount of paper to just have half the piece. It’s also kinda annoying to only have one size per pdf, even though you get three sizes (as separate pdfs) when you order. I’m generally only one size, but this could be a bummer if you usually mix sizes. Their paper patterns are the same, though, so it’s not like the pdfs are any worse.

I had to shorten the “trunk” by 8cm to fit it all into the 2m of mustard yellow wool/viscose jersey I’d bought from Guthrie & Ghani (now sold out in this colourway). Some other reviewers found that the trunk creates a weird, triangular fold at the neck and recomended changing the angle of the trunk piece, but I cut mine as is and I don’t have that fold – perhaps because mine were shortened to begin with? In any case, there’s still plenty of length left to create a nice cowl shape, so I would recommend it if you’re a tad short on fabric, too.

A black wool Oslo cardigan

Last Friday I talked about the new digital magazine, Seamwork and my article on activewear fabrics in the latest issue. Each issue comes with two quick-and-easy pdf patterns, which you can get on subsciption for $6 USD an issue (so they’re $3 each).

I’m a little behind, but on my last day of the Christmas holidays, I decided to sew up the Oslo Cardigan from the first (December) Seamwork magazine. Since this is from a former issue, I’m not sure whether you can actually purchase this pattern anymore (if you subscribe now, you’ll get the January patterns – a very nice bias cami and cuffed leggings).

My measurements fit pretty neatly into their size Medium but all the Seamwork patterns go up to 3XL, which is brilliant for plus-sized sewists! I was really happy with the fit on this cardigan – it’s nice and slim without being either baggy or tight, and the sleeves are the perfect length for me (a little over the wrist). The hem comes down just over my bum.

All the Seamwork patterns claim to be able to be sewn in 2 hours or less. After piecing together the pdf pattern (it also comes with a copy shop version) and cutting out my fabric, it only took 55min for me to sew together!

Surf to Summit Top – Winter Merino version

Wow, thank you all so so much for your enthusiasm on the launch of my latest patterns! More than one person went and bought all seven of my patterns in one go, too, which is just crazy wonderful! Can you imagine the fun weekends of sewing them all up?? I’ve been totally bowled over by your comments, encouragement, and enthusiasm, and I haven’t even shown you all the great versions I’ve been busily sewing over the past few months yet, either.

I’m going to start with one of the more basic versions, but one that should particularly appeal to those of you experiencing a North American winter right now, as it’s perfect for winter base layers. I sewed this one up in a freaking fantastic merino jersey which has a wicking backing fused onto it. It came from Mill Yardage in America, and I also bought the mustard colourway, too, which I actually love even more than the teal! I highly recommend grabbing 2yds of this if you’d like your own version (I have no affiliation whatsoever!).

Let me first take a minute to introduce Emily, my athlete-model for the ladies’ version of the pattern. Emily runs with me every week at Run Dem Crew, but we also ran the Copenhagen marathon together a few years ago, too. But Emily is a truly talented, multisport athlete – she’s not just a runner, but an avid Cornish surfer, snowboarder, and skateboarder, too. She also cycles just about everywhere in London, so she was the perfect choice to show the versatility of the Surf to Summit Top pattern!

The Sherlock coat

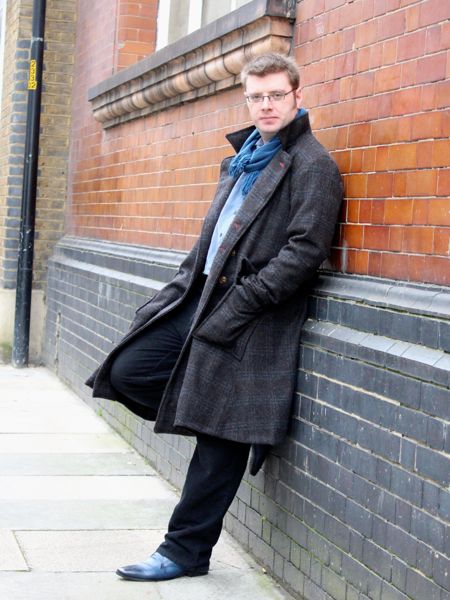
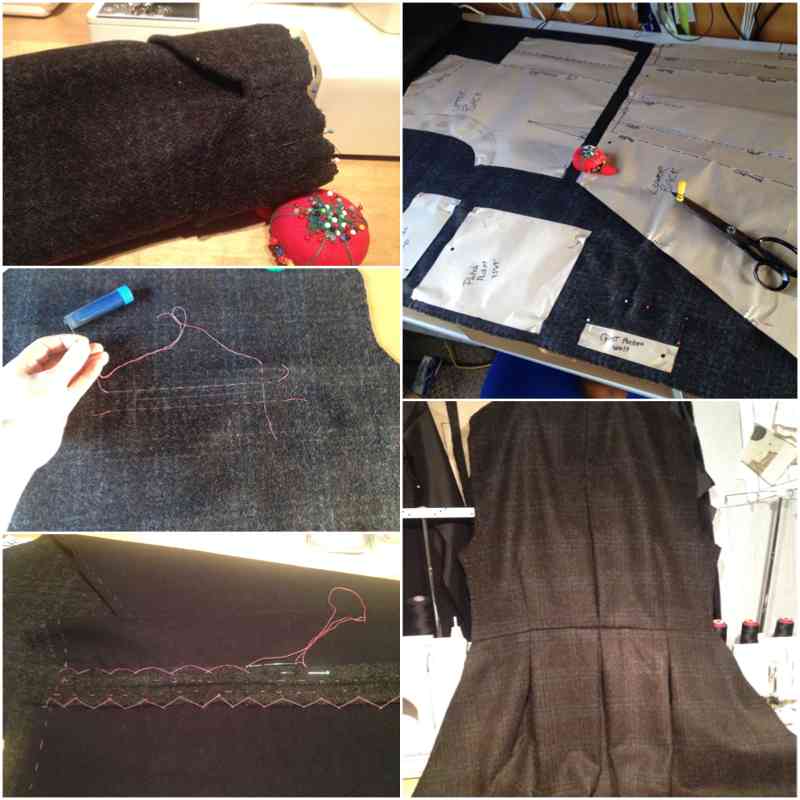
Sewing a coat is always a big accomplishment, but this coat in particular has been a long time in the making. I first told James I’d finally make him a coat like Benedict Cumberbatch wears in BBC’s “Sherlock” for his birthday back in early December. I drafted up a pattern using the details provided in this livejournal post, then made a muslin for him later that month. With only a few tweaks needed for fit and style (I made the lapels too big, for starters!), I then moved on to purchasing the wool coating, cotton flannel underlining, and black acetate lining.

But this is also where the first delay came in, as he wanted a black wool coating with faint blue and brown checks from Crescent Trading, who turned out to be closed over the full Christmas period, when I was hoping to get a lot of the work done. All of the above are detailed more
in this “progress report” post from January.

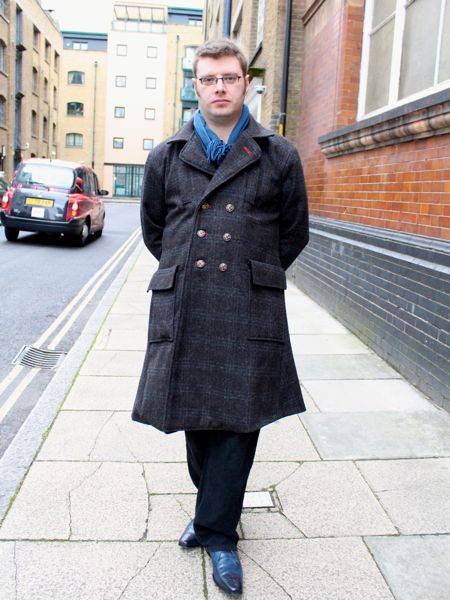
I then had more hurdles involving the hem bubbling (which meant I had to baste it in place, flip it back wrong-side out, handstitch, re-press, etc), waiting for some woman on Etsy to make more replica buttons (which we finally gave up on and just made our own with gold enamel paint), and getting the right upholstery thread to do all the buttonholes.

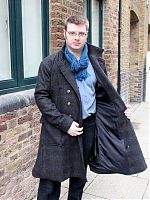
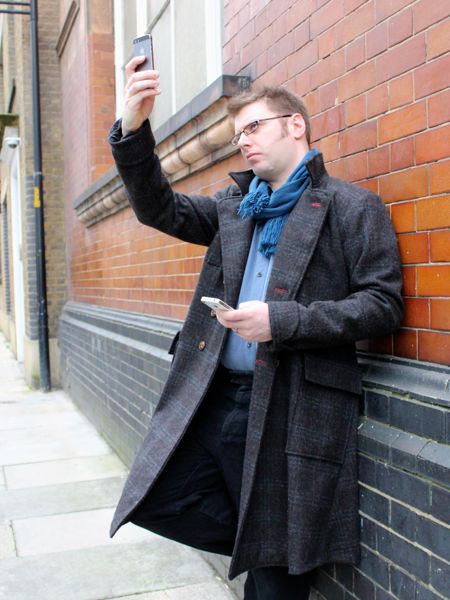
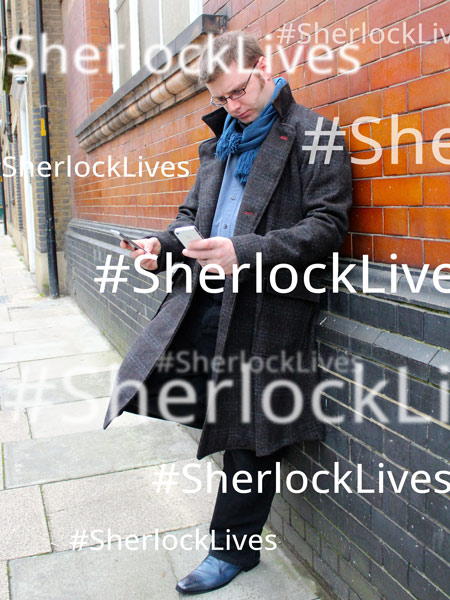
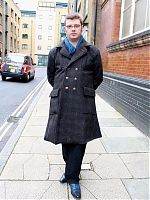
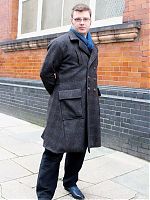
But it’s finished, it looks fantastic on James, and the proportions are really flattering on him, too! So the lengthy making process shall soon fade away in the light of the finished coat. He definitely prefers it open (as dos Sherlock himself), but it can be buttoned up in the coldest of days, too:

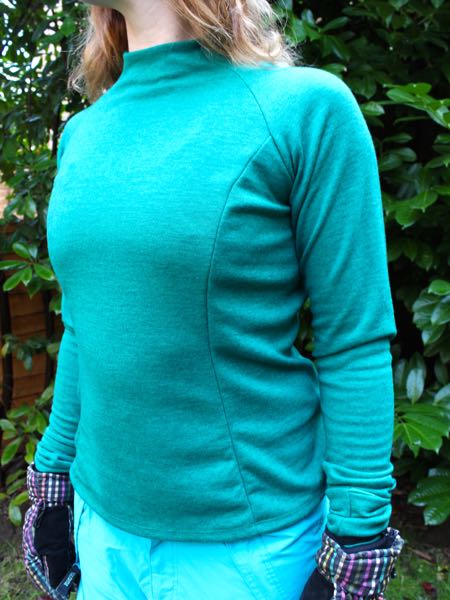
It’s a very warm coat, having underlined the body and sleeves in flannel, a trick I picked up in previous coats to stop the wind.

I can’t take the credit for these, as James was having fun with photoshoot ideas!

The Sherlock coat – progress report

I mentioned briefly back in December that, for James’s birthday, I gave him the promise of a custom-made coat in the style of the one Benedict Cumberbatch wears in Sherlock. Or as it will henceforth be known, “the Sherlock coat”.

A few others online have made this coat (including a few FehrTrade readers, hello!!), but I found the most helpful resource to be this livejournal entry from a lady who sketched and measured a lot of the details after analysing screen grabs. This was a big help in taking James’s TNT short jacket pattern and adapting it to look more like the coat on screen!

I first made an approximation on his paper pattern and sewed up a muslin. From this the only real fitting problems were that the upper back was too tight, and the Centre Front needed to be shifted by about an inch, but it was otherwise fine. I guessed a bit wrong on the collar and lapel shape though, but it was fairly easy to just draw a nicer shape onto the muslin itself and transfer it to the pattern.

Once the muslin was settled, I then bought the wool coating (delayed a bit as Crescent Trading were closed over the holidays) – not the exact black and grey small houndstooth used in the original (simply because I couldn’t find any locally), but instead a black/grey/brown check which still had the same feel. I also bought the black acetate lining at the same time, but the black cotton flannel for underlining came from Minerva.

I then settled in for the mammoth task of cutting out all the pieces in wool, underlining, interfacing, and lining, then fusing the crap out of everything that needed interfacing. With two patch pockets (and flaps), plus two welt pockets, two back belt pieces, sleeve cuffs, and a collar, (not to mention facings!), there was a good day taken up just by fusing alone!

A gathered merino wool cardigan

It’s June, I hear you cry – why is she sewing a wool cardigan in June??!? Well, I selected this cardigan in my Spring 2013 Sewing Ideas because I’m a realist, and I recognise that I need a lightweight cardigan for 80% of the British summer! I’m grateful to not have the disgustingly hot & humid East Coast summers I grew up with (nor the swarms of mosquitoes everywhere!) but it does mean some wardrobe concessions must be made.

This cardigan appeared in the March 2013 Burda magazine (or it’s available for purchase as a pdf here) and I thought it was one of the nicest, prettiest, and most versatile cardigan patterns I’d seen in a long, long time.

This is a basic, slim-fit cardigan with shaped, faced bands, front gathers, and button closure. I love the slim fit, the beautifully drafted, curved bands, and the delicate and pretty gathering. I get annoyed when patterns have skimpy gathering, but there’s a nice amount here, which is a great detail and offers bust shaping.

THIS PATTERN RUNS VERY SMALL! One reason I sew so much Burda is because they’re always so consistent, so I’m very, very glad I read the other reviews first.

When I compared the front and back to my self-drafted knit sloper, which has 10% negative ease (perfect for tight-fitting running tops, which is my usual usage), this cardigan pattern was even smaller still! If you can – go up a size, but if you’re the largest size already, like me, I recommend cutting larger seam allowances throughout the waist and hips at the very least. I personally tapered to about 1” allowances on the waist and hips in the side seams, then sewed ~3/8” (1cm) from the edge.