A Lime Linen Men's Shirt

James has a black linen shirt from Muji that he utterly loves. He’s worn it very nearly to death over almost ten years, though, with it rather faded and with a hole worn in in one place. So he asked me if I could copy it, as it’s a design that he’s never been able to find it shops again.


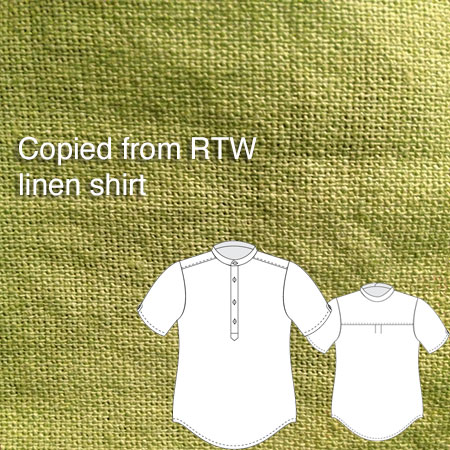
I’m so proud that my Illustrator skills are such that I can whip up a tech drawing like this in a few minutes now!

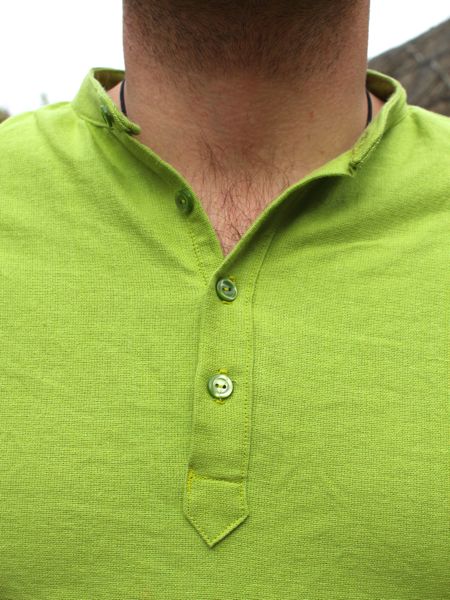
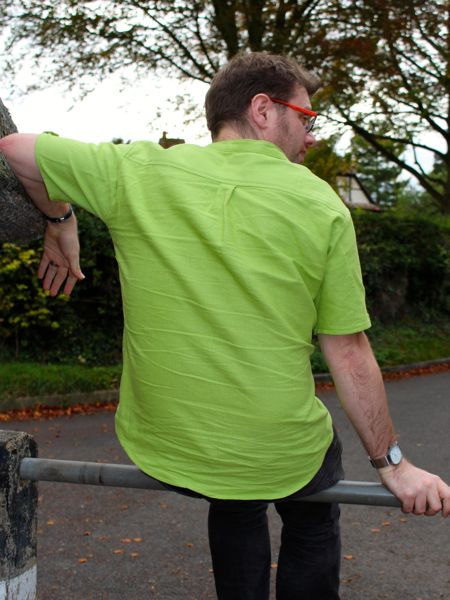
It’s an over-the-head design with a front button placket, stand collar, back yoke, and short sleeves with little button tabs on the sleeve hems. The only change I made from the original was to introduce a small pleat at the back yoke, as I just think men’s yoked shirts look weird when they don’t have them, plus it gives a bit of wearing ease back there.

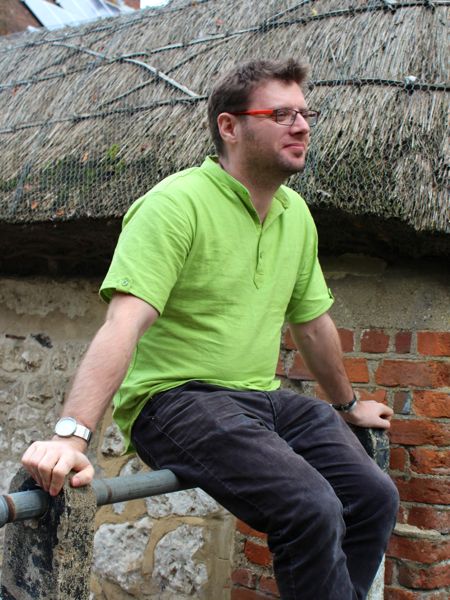
I traced out his existing shirt with craft paper and my serrated tracing wheel, and made a quick muslin, which miraculously needed no fitting changes! Then it was onto the first real version, made up in a lime-green linen-blend mix from Ditto which he chose when we were in their Brighton shop earlier this year.

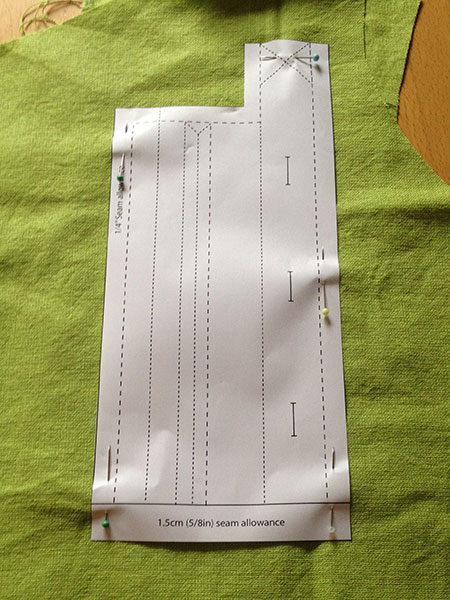
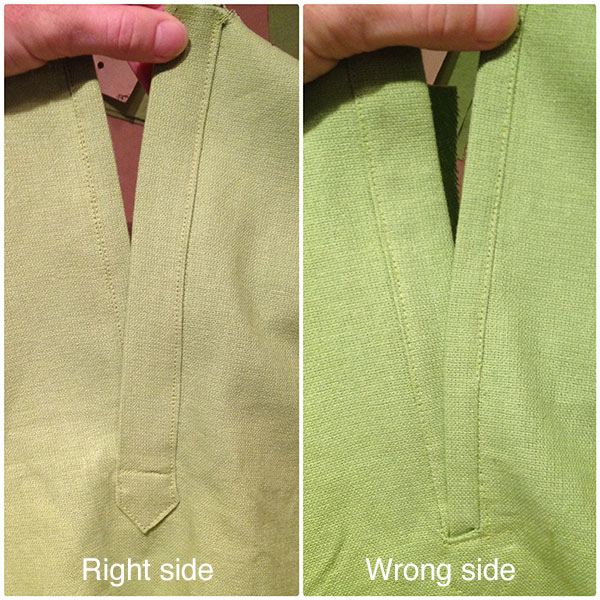
Plackets always tend to intimidate me as they seem like a bit of witchcraft – how can this weird shape turn into that in just a few steps?? So I put off sewing it, until I remembered that I’d scanned and digitised the placket template from David Page Coffin’s excellent “Shirtmaking” book. This is one of my clever-er ideas, as it means I just just adjust the width and length of the placket in Illustrator and print myself off a fresh template. Because obviously the dimensions for sleeve plackets for men’s shirts are of a different scale than the neck placket here!

Minimum Viable Dress (and speed sewing tips!)

In the tech industry, there’s a term “Minimum Viable Product”, which means the absolute minimum you can do to get code out the door. It’s not your best work, but it works.

Like half of London, we had tickets to see Secret Cinema’s performance and screening of the first Back to the Future film, where they recreated the entire 1955 town of Hill Valley, California, complete with about 20 business, the clock tower, full fun fair, a cast of hundreds of actors, you name it. We were also all asked to assume an identity (I was “Tiffany Hyslop, developer!”) and dress in 1955 styles. Now, I’ve only got one 1950s dress pattern (which I made into that Porsche dress a few years back) but it’s too big in the bodice now and would require too much work.

So instead, I picked a modern dress with a 1950s feel – the Simplicity Cynthia Rowley pattern (1873) which I had already made in fuchsia and really liked the fit of.

The pink version was the wrong colour for the 1950s and definitely too short, so I bought some striped cotton poplin from Minerva that had the right vibe, and figured it’d be close enough.

How to change the presser foot on a JL Mini sewing machine

I do not work for John Lewis. Yet somehow, I know more about their sewing machines than the people who do, and I know this because I get a constant stream of emails and comments from people who find my review of the JL Mini basic sewing machine on Google and ask me questions about it.

By far, the Number 1 question is “How do I change the presser foot?” Apparently many John Lewis employees have told people that the feet cannot be changed. This is not true.

To change the presser foot, grab a Philips head screwdriver (the kind that looks like a +). Unscrew the screw to the left and above the presser foot (see photos below).

When the screw is completely loosened, you can remove the screw and the foot. You can now place any generic “low shank” foot on the machine (using that screw you just removed!), including a zipper foot, walking foot, rolled hem foot, you name it.

Golden silk asymmetric blouse

From a total loser of a silk blouse to a triumph of a silk blouse, all in one afternoon! After the Burda FAIL, I turned around, cut into my gorgeous butter yellow floral silk charmeuse I bought at Ditto in Brighton last weekend, and sewed up this blouse in about two hours flat!

The layout of this blouse is really cool, and the entire blouse is just one piece, with only one side seam (and two shoulder seams). I took a photo of my fabric when it was laid out on the floor, and I added some annotations in pink (below) to help show where the drapey side comes into play. I hadn’t realised it from the diagram, but the CF neckline is on the straight grain, and the CB neckline is on the cross-grain, with the only side seam on the bias. Very cool, and the design feels quite Bunka.

I used the leftover silk in the bottom left corner to make several bias strips about 4cm wide, as I prefer a narrow bias edge on my silk blouses instead of finicky facings. I also left off the shoulder bow, as I felt there’s enough going on in this blouse already!

We were very lucky to catch the “golden hour” on Monday evening, which just makes this silk come alive in these photos! I’ve paired it here with my grey leather skirt to try and give an edgier look to the twee floral of the silk.

Revisiting my John Lewis JL Mini sewing machine – a review for beginners

I’ve noticed that there’s a lot of talk online about sewing machines for beginners (especially with Christmas coming up!), and I’ve been asked several times online and in person about my opinion on the John Lewis JL Mini sewing machine and I realised I’ve never done a proper review of it.

I’ve had my JL Mini machine (in red – they change the colours a few times a year, but right now it’s offered in white, red, yellow, pink, blue, and purple) for nearly three years now and I’ve recommended it a lot for beginning sewers. On our moorings so far we’ve got my red one, a purple one, and a mint green one! I use mine as my travel machine (I originally got it when I was going into hospital so I could sew through my transplant!), but it’s a good, sturdy machine made by a good brand (Janome), and it has enough features that you should know in a year or two whether you’re into sewing or not and you can upgrade to a machine with more features. Or if you decide sewing’s not for you, you’re not out much money.

A plum tulip top and seamed silver trousers

I’m finally over my post-wardrobe exhaustion and able to sew again, so I carried on with my March mini-wardrobe plans and made the seamed trousers from KnipMode Oct 2010 (#8):

(hmm, why are they covering the waistband in their only magazine photo?)

I also thought I was due a “quick knit top” so I pulled out Jalie 2806 (a gift from LynnRowe on PR!) so I could try out those fantastic tulip sleeves, with the thought of maybe using them on the spring/summer version of my Burda September cover dress

I had just enough of Ditto‘s wonderfully soft and supple plum bamboo/lycra jersey leftover from my plum and green lace top for this, so it was clearly meant to be! For the trousers I used the same Fabric.com stretch twill as in my navy riding trousers, though in different lights this goes from looking pale grey (nice!) to baby blue (not so nice!). But the combo of pale trousers and dark top feels very Spring-like to me.

(Vote for my) March Mini Wardrobe

It doesn’t seem that long ago that I was first laying out my initial plans for this mini wardrobe, but now I’ve had some time to step back and have a look over what I managed to accomplish last month. I made this wardrobe mostly for myself, to use some luscious fabrics from my stash in combination with patterns that really appealed to me, but I also kept one eye on the contest requirements running over at PaternReview.com to make sure I remained within their rules, too. Here’s my entry into their contest, or you can just read on below…

I started with a blue viscose, draped knit top that I’d bought from ASOS and really liked, but I wanted to wear with both casual and dressy bottoms.

To coordinate, I sewed:

1. Jalie jeans – I’d made a muslin but the waistband was horrible so I had my work cut out for me on this pair using great quality stretch denim from Mood in NYC, plus some London streetsign fabric for the waistband facings and pockets. I used my vintage hand crank Singer machine for all the topstitching, plus I got to use my vintage buttonholer attachment and high quality rivets for the first time! I fixed all the waistband issues in this pair and these are now my favourite jeans. Read more…

Me-Made March

Me-Made March has been in full swing for a month now, and as I stated in February, I’ve been playing along at home, but taking photos of what I wear every day is just completely infeasible for me, so I’ve just kept a record of what I’ve worn instead.

I did something similar a few years ago and it was really helpful in observing what I tended to wear throughout the week and which items I turned to most often. I can’t actually remember the last time I wore an outfit that didn’t contain at least one “me-made” item (not counting weekends, where I live in grotty, boat-DIY clothes), so this challenge isn’t really that challenging for me! It’s what I tend to wear anyway!

March

  1. Tues. Navy blue riding trousers & purple cashmere turtleneck (RTW)
  2. Wed. Taupe corduroy skirt & turquoise mohair sweater (layered over a RTW white long sleeved top) (so yes, I am wearing the exact same outfit as shown in my citizenship post, right down to the same tights and boots!)

  3. Thur. First Jalie jeans & plum and green lace Patrones top
  4. Fri. Foldover wool trousers (so warm!) & RTW black long sleeved top
  5. Sat. Two 40th birthday parties! Burda September cover dress

March Mini Wardrobe

I’ve finished my post-coat winter sewing plans apart from the La Mia Boutique draped skirt which I’m feeling now is better suited for spring or summer, so I thought I’d dip my toes into the Pattern Review Mini Wardrobe contest that’s running throughout the month of March.

This is a pared-down version of their usual, sprawling wardrobe/SWAP contest, so this time around you need to create a five piece wardrobe in four weeks, using one item you already own (sewn or RTW) and be able to create at least six different outfits from this. I’m actually going one better and aiming to sew five pieces rather than four, but that may fall by the wayside depending on how the month goes.

Here’s what I’ve got in mind: