I chose the title “big shirt” as an homage to Burda’s strange predilection for calling any oversized top a “big shirt”. Looking at the size of this top, I think it definitely applies here!
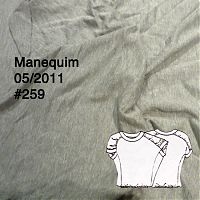
This Manequim top was printed twice, as July 2010 #307 and again as May 2011 #259. I liked it enough the first time around to trace it off Susannah’s copy, but then when I saw it the second time, I knew it must be a keeper to be repeated and be in my size, so I gave this a go in some drapey, viscose grey marl jersey I’d bought from Totally Fabrics a while back.
You can see it’s a roomy fit from both magazine photos, but you can’t really tell exactly how large this runs – I measured the hem circumference at over 150cm!! I always make Manequim size 44, but this is over 50cm of ease! OMG! I’d say that if you are usually a Manequim 46, 48, or even a 50 or 52, you’d be absolutely fine in sewing this up, even though it’s marked as size 44.
Manequim say to pull the hem in with elastic in a casing, but I chose to apply inch-wide waistband elastic instead. I measured the elastic to my hips and then stretched it as much as humanly possible and it only just stretched to the fabric hem.
But the adventure doesn’t stop there – I had to introduce gathers in several places not indicated on the pattern in order to get pieces to line up. Namely, the bottom edge of the sleeve where it meets to sleeve band, and also around the neck edge. So in reality, I gathered all four edges of that sleeve piece. With all the gathers plus the bubbled hem, it’s vital that you have a lightweight, drapey knit for this top.
The neck band is supposed to be 62cm x 7cm, but I tried it and, at this length, the neckline just looked bad – stretched out, floppy, and not really staying on the shoulders. So I cut off the overlocker stitching (making my band rather narrower, because I’m lazy like that), made the band 12cm smaller (so 50×7 would be perfect!), and gathered the neckline edge to match. And it’s way better that way.
Because the sleeves in this pattern are more like a side panel with a banded hole than a normal sleeve, I had to play a bit of “match up the pattern numbers” and do some mental pre-sewing to work out the best order of construction:
- Sew side to back
- Pleat and gather sleeve edges
- Sew sleeve to back
- Sew sleeve to sleeve band
- Sew sleeve to front and the front to side in one go (#7 to 5 to 6 to 4 and on). The edges of the sleeve band should just barely meet, with the sleeve-to-sleeve-band seams hitting at the marked notches.
- Gather the neck edge
- Attach the neck band
- Attach elastic to the hem, turn under and zigzag topstitch. Or do the hem elastic as a casing like Manequim suggest.
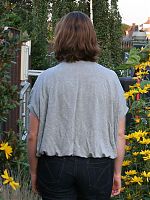
Here’s a back view, and I stretched my arms out here so you can see exactly how big this “big shirt” is with outstretched arms!
To be perfectly honest, I wasn’t so sure about this top at first. I think the problem is that it reminds me of the early 90s when we all used to buy XXL shirts and bubble them in the waistband of our jeans. And that’s not a kind memory!
But, like most garments I’m unsure of, I wore it for a day, and I liked it much more after a day at the office. It’s not my usual style or silhouette, but it’s a fun take on your average teeshirt.
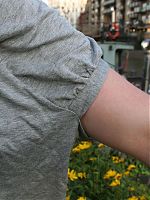
Here’s a shot of those interesting, banded “sleeve holes”. I wouldn’t really call this a sleeveless top, nor a raglan top, either, but it’s something in between…
And finally, just one last shot that shows the lovely moorings flowers and our neighbour Dora’s beautiful top deck, which is just perfect for these long and mild summer evenings….
(Oh, and Dora’s the boat, not a person!)


