Blog

A doubly-recycled denim coffee sack jacket

This blog post title is quite a mouthful but the “fabric” I used has such a great origin story that I didn’t want it to get lost in view of the final jacket. It all started last summer, when I found out that a local coffee roasters here in London had partnered up with a Guatemalan company to reuse waste cotton fibres leftover from the denim industry. They mix the waste denim in with a small amount of virgin, undyed cotton, and produce fabric on giant looms which they turn into coffee sacks. These are then filled with local beans and shipped all over the world, and after the coffee beans are off-loaded, you can buy the recycled denim sacks to reuse however you’d like.

There’s a lot more about the super-interesting process over on Square Mile Coffee’s blog, but as soon as I heard about it, I instantly bought two sacks with the idea that I’d make myself a pair of jeans with it. But when they arrived, I realised that, while the original fibres were denim, the recycled sacks were more like a cotton bouclé, and far too loosely woven to be used in place of denim.

So I pre-washed the sacks, dutifully unpicked all the seams, and thought about making a jacket while the seasons rolled around to something more befitting an unlined jacket (since I knew I didn’t want to cover up the cool coffee sack printing!). A couple of candidate jacket patterns caught my attention, but then I saw New Look 6532 as a free covermount pattern on Sew Magazine and thought it was pretty much exactly what I had been imagining for my coffee sacks.

An ice blue running gilet

Last weekend I was overcome by the desire to make something.

I didn’t want anything long or involved, so I grabbed some ice blue soft shell I’d bought from Plush Addict and thought I’d make myself a gilet to keep my body warm when I go on long runs and springtime cycle rides. But I’d only bought a half meter to test out the fabric since they don’t have samples and it cost like £3 for the half meter. When it arrived, it wasn’t quite what I was expecting (so I’m glad I didn’t buy the full yardage!) but the fabric itself was too nice not to use for something. It’s got a dense, tightly woven exterior with a very slight stretch and the inside is a soft microfleece. So it’s both water resistant and warm, and I thought it’d be great for wearing over a base layer for the upcoming transitional weather.

But I was impatient, and made lots of mistakes. I planned to use a block I’ve been working on (but cut a size larger to account for less stretch than I’d drafted for), but the fabric was so short it only came to an inch or two below the waist. “Fine”, I thought, “I’ll just have a cropped gilet or add a hem band or something!” and merrily cut away. It was only then I realised that I’d cut the Front on the fold, forgetting in my haste that I wanted to have a front zipper or snap placket and I’d now not given myself enough room.

So rather than cause further damage, I opted to step back, put it aside, and come back to it later when I was less of a liability.

The #sewdots Falda jacket

Rosie (of DIY Couture fame) created the “Sew Dots, Raise Lots” campaign for the month of October to raise money for the RNIB (Royal National Institute Of Blind People). The premise was simple – sew something with polka dots (because it looks like Braille!), donate to the RNIB, and share on social media with the #sewdots hashtag to be in the running for a huge prize mountain.

I’m not able to participate in every sewing initiative that comes along, but I knew I wanted to be a part of this one, because sight loss is something that’s affected people I love. For pretty much my entire childhood, my grandmother was legally blind from cataracts and glaucoma and I saw how her lack of eyesight isolated her from everything she used to love (like knitting and her independence). More recently, my Dad has suffered from Macular Degeneration, enduring years of regular injections directly into his eyeballs (!!) in order to try and slow the progression of the disease and retain his ability to still at least have some peripheral vision. I’ve also worked closely with the Blind Abilities community in my previous spoken word audio career, and tried to make our service and apps welcoming for the visually impaired. If you’ve got an Apple device, go ahead and turn on VoiceOver for a few minutes and try to navigate through your favourite apps as a visually impaired user would (but they do it way, way faster!)

Navy Steffi jacket for cycling and running

While I was ill, I found myself mostly working on two in-depth projects – both of which were navy blue jackets for some strange reason! You’ve already seen my wool lumberjacket but I also made myself another StyleArc Steffi jacket pattern, too.

Some of you may recall that I made this a pattern few years ago and sewed some twinkling LEDs into the back of it! At the time, there were a bunch of problems in the instructions (as well as an inadequate seam allowance in one spot, too) so I let StyleArc know about them, and they corrected them, and posted me the corrected version along with another pattern of my choice. Which is freaking awesome customer service if you ask me! I’m pleased to report that the corrected version of the pattern is much, much better. There’s still a major step missing (if I recall, it’s one of the vertical body seams), but everything else is better so it wasn’t quite as frustrating to sew this time around.

But this isn’t my best work, not by a long shot – I made this when I was feeling really bad and couldn’t sit up for more than 10min at a time, and felt like a zombie for weeks on end. But it’s nice enough for a functional cycling jacket when the weather is warmer, and possibly for winter running, too, though I’ve missed that almost entirely this year. Boo.

The main fabric here is some off-cut stuff from my Sweaty Betty industry friend – it’s navy lycra on the outside and super soft brushed fleece on this inside. At the time I received it, I’d never seen anything quite like it, but as it’s been maturing in my stash, the FunkiFabrics thermo range has since been released, and I can tell you that it’s really similar. So if you’re after a fabric that’s both stretchy and warm for a jacket like this, I’d definitely recommend the thermo. The pocket linings and zip shield use offcuts of Laurie King X Fehr Trade Spoonflower fabrics from my zigzag XYT Workout Top, and the two neon yellow pocket zips I bought off eBay.

Named Harriet lumberjacket in wool & vintage silk

I am both back from our trip to the States and feeling back on form now, so I’ve started to tackle documenting the absolute mountain of finished makes from the last four months. I have some garments from early January, some made more recently and well, I’m just going to share them with you in no particular order! The photos are a bit more slapdash than usual, but I know that if I waited to do proper photoshoots of all of these then it’d be another 6 months before you’d get to see them!

So I’m going to start with a garment that was the longest in the planning, and also quite possibly my favourite of the early 2016 makes. It all started back in summer 2014, when I bought some fabulous navy wool coating & vintage silk twill from Ditto when I was down in Brighton. I knew I wanted to use them together for a transitional, short coat, but then I had quite a journey in finding the right pattern!


The psychedelic 1960s vintage silk twill lining that was originally made for neckties!

Over the course of 18 months, I ended up making five different muslins before I was happy enough to cut into the wool and silk:

  1. StyleArc Audrey (the silhouette and proportions were just so bad on me. So bad.)
  2. Burda Jan 2015 jacket in size 42 (way too small for non-stretch outerwear, oddly, though Burda’s fit is usually very standard)
  3. Burda Jan 2015 jacket in size 44 (traced ALL the pieces again and it still fit very weirdly)
  4. Patrones 342 No23 dolman sleeve coat (ridiculously tiny sleeves and zero arm mobility even with the underarm gusset)

And then finally I muslined Named’s Harriet lumberjacket pattern, bought during a flash sale during their advent calendar promotion. And I was like Goldilocks, it was juuuuuuust riiiiiight.

A charcoal and lime Jasper sweatshirt

For some reason, Paprika Patterns wasn’t entirely on my radar. I remember liking their skirt pattern when it was released, but I was super busy with my own patterns, and somehow I missed the release of their Jasper sweater/dress pattern entirely, until I stumbled upon it on my Twitter timeline, and thought WOW! And then immediately went and bought it.

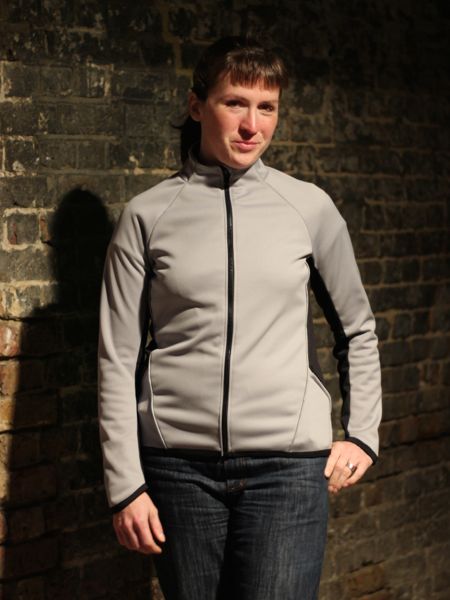
As luck would have it, shortly after I bought the pattern I was gifted some amaaaaaaazing technical fabric from my friend with activewear industry connections – it’s charcoal jersey on one side, bonded with navy wicking fleece on the reverse. It’s super high quality with nice stretch and a great weight for keeping warm post-workout. I have also seen nothing like it on sale anywhere, sorry!

So I thought it’d be the perfect fabric and pattern combo to be my post-workout cooldown coverup. I’m a bit embarrassed to admit that I’ve been wearing the same ratty old red jacket after long runs and hard workouts, which I’d bought 10 years ago from a discount chain! Not really a great look when I wear all the crazy, wonderful workout gear underneath, so it was high time I upped my post-workout wardrobe game.


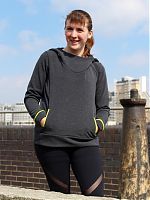
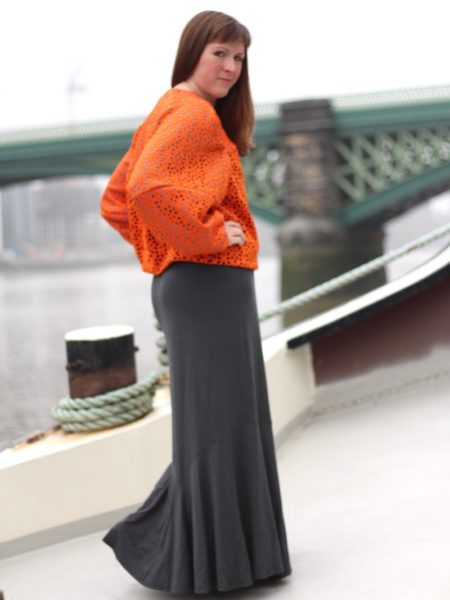
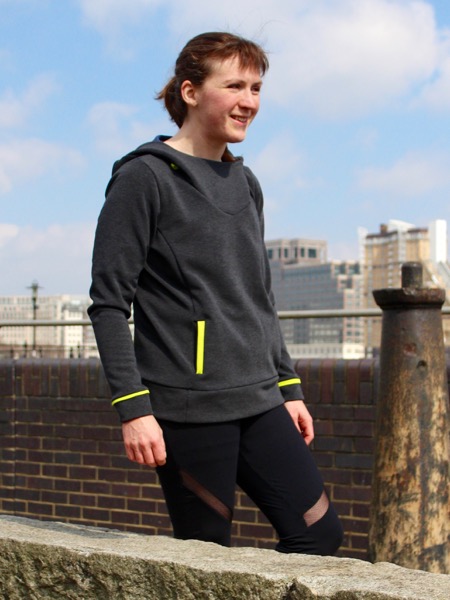
Seen here with my mesh-insertion leggings which I still love, but are too baggy for running in these days. Still great for cycling and casualwear though!

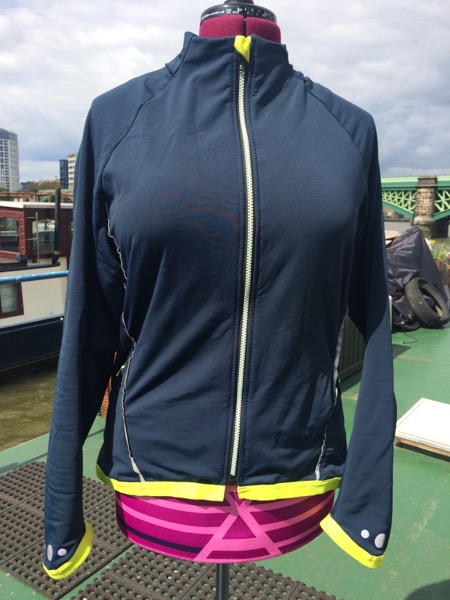
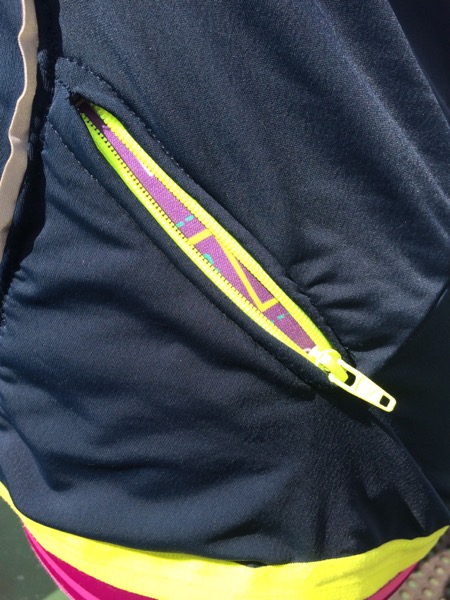
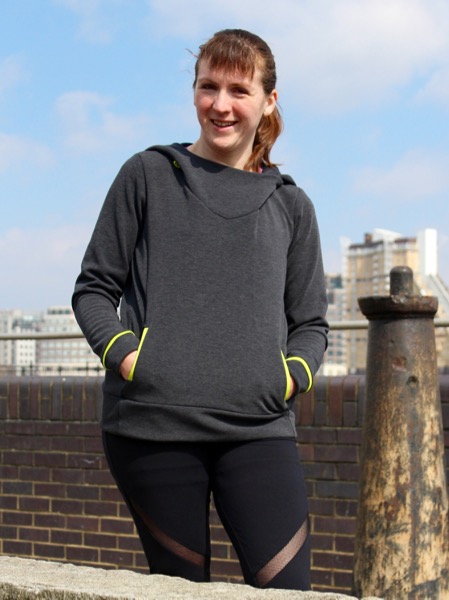
I thought an all-grey sweatshirt would be too boring for me, though, so I added a bunch of accents in lime green wicking jersey – I’d found some deep discounted gym tops in Pennsylvania in January so I bought the biggest I could find to get the most fabric possible, and paid only $5! The hems and bindings were particularly useful for inserting into seams, but for the large colourblocked areas I overlaid the green onto the thicker jersey/fleece first, since the green was considerably thinner.

I made a size 6 (B cup) of the Sweater length and the fit is great – I did narrow the sleeves by about 1.5cm further (and adjusted the cuff to match) but that was the only fit change I made. The length of everything is perfect for me.

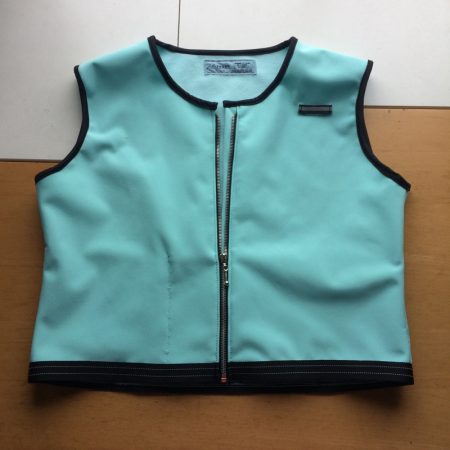
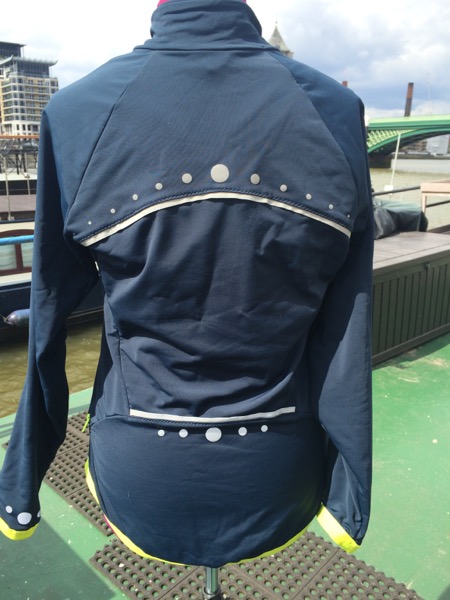
The lower back colourblocking wasn’t originally intended – it’s not included in the pattern and only came about because I realised I did “a stupid” and accidentally cut the Back piece along the Lengthen/Shorten Line instead of the Sweater cut line, guh! So instead of cutting a whole new piece, I decided to play with the lower back and make it look intentional instead!

A green cropped blazer

I’ve got a wedding rapidly approaching, and for once in my life, I actually bought a dress instead of sewing it (ok, technically James bought it for me when we were in France!). But I couldn’t let this occasion go by without sewing something so I decided I wanted a little cropped jacket to go along with it. Luckily there are a lot of colours in the dress to pick out, and a good friend gifted me this green, ex-Karen Millen piqué specifically for this purpose!

I sifted through my pattern magazine archive (made easier since I’ve got each issue overview online) and decided on a sharp little cropped blazer pattern from the September 2013 Manequim magazine (curiously I’d overlooked it when I reviewed the issue!).

I love that this jacket is short in the body so it won’t interrupt the full skirt on my dress, has got 3/4 length sleeves which are so nice for summer evenings, and best of all – a shawl collar with little tuxedo styling at the bottom. There’s no front closure, either, so it’s a nice one to just slip on over the dress and not have it look like it should be buttoned or something.

Many of you ask how I deal with Manequim patterns that aren’t in my size – the short answer is, I don’t. I’ve got so freaking many issues and patterns to choose from that most of the ones I want to sew either either in a 44 or 42 (this one’s a 44), or if they are significantly smaller, I just graft the interesting features onto an existing base pattern that fits me.

My light-up, twinkling running jacket – the sewing bit!

You heard all about the electronic components earlier this week, but the sewing of the jacket itself was in no straightforward, either! If you missed the video of the LEDs in action, have another look:

You might think, that, as a pattern designer for exercise wear, I might view other exercise patterns as competition. On the contrary – when I first saw the StyleArc Steffi jacket, my first thought was “Brilliant! Now I don’t have to draft it myself!”. I’ve got enough ideas in my head for patterns already, so I’d rather refer folks to other good patterns if I can rather than constantly reinvent the wheel.

This pattern was a birthday gift from my inlaws, and I was initially concerned because they’d bought me a size 10 instead of the 12 I’d asked for, but as it turned out this fits me really well anyway. It’s a smidge too tight in the chest for me to run in (my trainer has me focus on pulling my shoulder blades back to open up my chest for better breathing), but is utterly perfect as a warm-up, cool-down jacket, so hurrah for happy accidents!

I chose to do my colourblocking like it’s shown in the technical drawing – I used a grey/black sportshell as the main body, then I used the black reverse of this black/grey “budget” sportshell as the contrast panels. The main sportshell is really nice – a soft, technical jersey with a thin layer of fleece bonded to the inside – it feels really RTW and high quality. The budget one, well, lived up to its name. The grey side looks a bit naff, there’s no fleece, and the black side is just smooth like the other fabric’s grey exterior. So it was fine for my purposes here, but I wouldn’t recommend skimping if you want a similar jacket – go for the more expensive option and you won’t regret it.

My light-up, twinkling running jacket – the electronics!

This is an epic jacket, and something I’ve been wanting to do for, ooh, 6-7 years at least. You see, I really liked the idea of wearable electronics, and clothes that do something and interact with their environment, so I started buying LilyPad components many years ago with the hopes of making something.

Then I realised that I know nothing about circuits and electronics, and it all seemed really confusing every time I tried to sit down and learn about it. Finally, I decided that I’d bring my suitcase of tricks (no really, I have a little yellow plastic “suitcase” with all my beginning circuitry stuff in it!) along to France on holiday and I’d sit down and teach myself how to do it then. And I actually did!

LilyPad is the sewable line of Arduino products, made especially for folks like us. They’re easy to attach onto clothes, and (apart from the batteries) are machine washable, too. For this jacket I used a LilyPad battery pack (I started with the Coin Cell one but it wasn’t quite enough power), a Lily Twinkle controller, a bunch of LEDs, and a spool of conductive thread.

I used a mix of the regular LilyPad LEDs and the Micro LEDs because that’s what I had – the micro green ones were much brighter than the bigger purple ones, but you can really only get about four loops of thread around each terminal of the micro ones, so if you need to connect it to more than two lines, go for a bigger one. The Twinkle controller is really just a tiny board with four connection spots for LEDs and makes them fade in and out randomly (though you can connect more than one LED to each spot & they’ll twinkle in unison). I wanted to make things easy for myself this time around so I left out any input sensors, though I do have an accelerometer in my stash…

I’d thought to bring along this “Fashioning Technology” book and between that and this Lilypad Twinkle tutorial, I pretty much taught myself how to make a simple circuit to do what I wanted. When I go to do my next project, I’ll need to read a few different chapters and watch some more tutorials, I’m sure!

A colourblocked Cynthia Rowley satin jacket

Last week I mentioned a few projects I’d been working on, including a little satin jacket to wear with both my purple Matthew Willamson birthday dress and my swirl sheath dress. Well, the Welsh wedding was over the weekend and we managed to squeeze in some photos in the hotel room before the big bash so you all can see how it coordinates with the Matthew Williamson sheath!

As I mentioned before, the pattern is the same Cynthia Rowley Simplicity pattern I used for my fuschia party dress – a simple, loose, open jacket with dropped shoulders and wide sleeves.

I didn’t have enough of either satin to make the entire jacket in one colour so I decided to colourblock it. Since there weren’t many seams in the jacket itself, I just drew some extra seamlines onto the pattern pieces for my colourblocking.