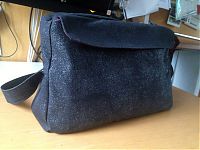
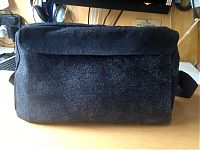
I wasn’t planning on doing this, but as I was packing for Mexico, I realised that I didn’t have a suitable bag to carry around with me on all our adventures – something that would be big enough to carry water, guidebooks, and all my usual purse stuff, but also be both secure, low-key, and not kill my shoulders. I utterly love my orange leather satchel, but it’s very recognizable, plus it’s only got two snap closures and I have to open the whole top to get anything in or out. Fine for London, but not for traveling.
So, I found myself, on the day before our flight, devoting the vast majority of the day to sewing up the free Urban Jungle bag tutorial! Nothing like sewing on a deadline (or, uh, preferring to sew all day rather than just go to TK Maxx and buy a bag!).
By its very nature, this bag used only supplies I already had on hand, so it was essentially free. The exterior fabric is this silver-coated stretch denim from Minerva that I’d bought then did my usual 30 degree pre-wash, and I was really disappointed to find most of the silver coating had disappeared (they’ve since added a warning to the listing). Minerva were great, though, and sent me the same fabric again so I could try hand-washing it. I wasn’t quite sure what to do with the faded yardage since I wanted rock star jeans (though both pairs of Catherine’s look great anyway – her pre-washed pair and her unwashed pair), so this seemed like a great use.
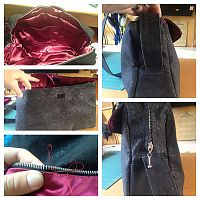
For the lining I used some cheap poly satin I’d been given years ago, plus I found a nice metal-toothed 20 inch zipper in my stash (I think from Zipperstop in NYC?), and I got to use up a bunch of really heavy interfacing that’s been in my stash for ages, too (though IMHO, the tutorial goes a bit overboard on the interfacing, but it was written for an interfacing company so go figure).
I made some changes to the tutorial for my own use – I left off the “accent” pieces and instead doubled the side pieces so I have little pockets on the side, I used velcro as the closures for these side pockets as well as the large, flapped document pocket purely because I didn’t have any magnetic closures lying around! I also added a few patch pockets in the lining to help organise my stuff. Normally I’d have a zippered lining pocket in there, too, but I was feeling quite stressed about finishing in time (I literally finished with minutes to spare before I had to leave for Run dem Crew!), so I left that out. Oh, and instead of purchased handles, I made my own shoulder strap, which is conveniently long enough to either go over my shoulder, or across the body.
To be honest, I found this bag quite stressful to sew – I accidentally cut the main body pieces the wrong way around (the pdf instructions say it’s 9 1/2” x 7” on the fold, but don’t say which way around), so I had to re-cut and re-fuse all of those midway through. I ended up breaking two denim needles in sewing this, so god knows what it would’ve been like had I actually used the additional interfacing the tutorial called for (I used heavy interfacing on all the exterior pieces and also on the document pocket lining, plus a super heavy duty interfacing on the exterior bottom.
The only thing I really didn’t like about the tutorial is that it requires hand-stitching the lining to the zipper tape at the very end, ugh ugh ugh. I’m sure I could’ve re-ordered things to machine-sew that and leave an opening elsewhere in the lining for flipping, but my brain was melting by that point so I just sucked it up and hand sewed it. But overall, I’d definitely recommend this bag – it’s a great size, has a nice shape with great pockets, has a secure zipper closure, and the instructions are really carefully written. And it’s free.
I’m currently away in Mexico – this post was written before I left. Please leave comments – I’ll read them as I have internet but will probably not be able to reply!


