I had about a half meter of tubular black cotton interlock leftover in my stash, and
Burda WOF 11/2008 #125 looked to be an excellent use for it! It’s in the workout section of this issue, and #124 is a variation of the same shirt with longer sleeves and a triangular neck insert. I was aiming to make the long sleeves minus the insert, but as it turned out, I was really only able to squeeze in the short sleeves with some creative refolding of the fabric after cutting out half the pieces.
Oh yeah, and I got new glasses, too. I’ve been a contact lens wearer for going on 13 years now but sometimes the eyes need a rest and at least these look better than my last pair!
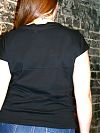
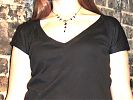
It may be difficult to see the details in the black fabric (I upped the contrast on the last photo), but the sleeves are triangular and fold up over the centre section at the shoulders. I don’t really look at BWOF instructions much anymore, so I’m not sure if they suggested to topstitch the sleeves onto the body with a twin needle, but that’s how I went about it and it works great. This is definitely an exercise for your twin needle (or if you’re lucky enough, a coverstitch machine!), so if you’ve not got a serger, I wouldn’t shy away from this as it’s mostly done on the sewing machine anyway.
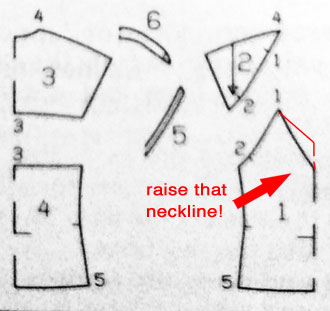
The only thing I’m not really sold on with this pattern is that the neckline really is very low. Normally I’m fine with Burda low necklines as we tend to wear them lower in the UK than most Americans anyway, but really, this is low even for Burda’s standards. I’m fine wearing it out and about, but I really do have to watch myself, and I think the next time I make this I will simply redraw the V neck on that centre front piece:

So if you’re doing this at home, you’ll want to trace the pattern, then add an extra bit of paper underneath piece 1 to raise the point of that V a few inches. Personally, I think raising it on the pattern looks a lot better than adding a separate triangular panel, but if you’ve already made it and it’s too low, the latter is your best option.
If you’re using facings, you’ll also need to remember to redraw that to account for your new angle (just take your new neckline and make a piece about an inch or two wide along that). But on this pattern, I just eliminated the facings entirely (especially since you’re just going to topstitch them down anyway!), and opted to fold down the seam allowances along the neckline and twin-stitch those down. At the V, I clipped it most of the way to the edge, but then fused on a small amount of black tricot interfacing just to make sure the snip didn’t go any further!
A few updates!
First of all, my nephew Logan received his green hoodie for his birthday (rather than Christmas, long story) and it fits him pretty well, though my sister in law says it’s a tad short in the body. Here he is wearing it:
Next, I got a great update from my dad regarding what the two different tops in the Navy uniform were used for (and how the sailors avoided losing any of the 13 trouser buttons!), and I’ve added it to the bottom of the post there if you’re interested.
And finally, thanks very much to everyone who wrote in and gave advice on my bias seam issue. After a few of you asked, I realised that it’s hard to see from the tech drawing how far the bust dart pulls the bottom of the dress onto the bias, so I’ve added a (manipulated) pattern piece drawing to that post which should hopefully clear things up, too. The consensus seems to be to unpick the troubled seams and let it hang for a few days, so I’ve done that, and will go one step further and hand baste those seams before machine stitching, just to be sure!
What’s up next?
I’m currently working on remaking the black biker trousers in dark grey stretch denim with silver topstitching and rivets, to continue on with my Endless Combinations sewing (so these jeans will coordinate with my purple sweater and with the above black tee).


