It seems like everyone’s caught the jeans sewing bug recently! Maybe it’s the warmer weather or just the slow realisation that I could really do with more casual trews in my wardrobe, but KnipMode Jan 09 #11a really took my fancy and wouldn’t let go.
This is my first pair of Knip trousers (the leggings don’t really count!), though certainly not my first pair of trousers or jeans!
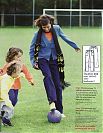
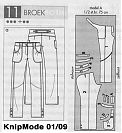
Annoyingly, it’s hard to get a good look at these jeans in the magazine photos – they’re either covered up by her jacket, or partially shown in the detail shots, or just not photographed at all.
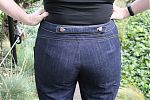
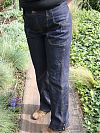
But between these and the technical drawing, I was able to piece together how these should go together, in what order, and with what topstitching (I posted some essential topstitching tips a few years ago, fyi). What really drew me to the pattern was also to be the most difficult sewing aspect – the front pattern piece has “arms” at the top that wrap around completely to meet at the centre back, and the back piece of the trousers has a curved seam around the bum, and wraps round slightly so the “side seam” on the legs is actually on the front:
So this means there’s no traditional side seam to tweak the fit, and there’s no centre back seam in the waistband to tweak there, either. So if you’re unsure of the fit, I’d fully recommend sewing a muslin first, though I actually just threw all caution to the wind here and used my super heavyweight Levis denim from the outset (since I’ve made so much KnipMode in the past and knew I was a consistent size).
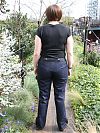
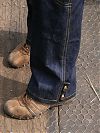
The one adjustment I did make, however, was to initially compare the crotch curve of this pattern to my beloved BWOF trouser pattern. When I lined up just those curves (trying to compare the weird side shapes was just impossible) I saw that this was about a 1/2 inch taller in the crotch on both front and back, meaning there’d be slightly less body room there. So I shaved that off to match Burda’s curve since I knew that fit well, and I’m really happy with the overall result. Even the leg length was perfect on me here, and I’ve usually got to extend Burda’s by an inch or two, so that was a happy result before adding the ankle flaps!
I realised that my new little red JL Mini machine could also have advantages outside hospital use, so I set it to do the topstitching with the yellow upholstery thread, but I learned early on that the machine has another disadvantage – the foot pedal is just on/off, with no speed control! So if you thought contrast topstitching was nerve wracking before, you should try it with no brakes!
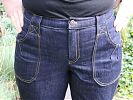
So that really helped to minimise the rethreading (navy for the regular seams, then yellow for topstitching, then back to navy, etc) that makes jeans take just sooooo long, but I did switch to my trusty Sonata for that outer seam topstitching. On most pairs of trousers, my order of construction is: 1) sew the front pockets, 2) centre front and zipper fly, 3) centre back and back pockets, 4) inseam and topstitch, 5) outer seam and check the fit, 6) attach waistband, 7) button(hole) and hem. I had to change this a bit on this pair since the front pockets had to be attached at the very end, and the extra seaming changed things as well.
But unlike 99% of jeans, these have topstitching on the inseam and the outer seam (you really need it to play up that great curved back seam!), so that meant topstitching with the entirety of the jeans leg bunched up on my sewing machine’s free arm, and for that, I really needed both the longer free arm and the fine speed control of the Sonata. Topstitching that outer seam was by far the most technically difficult part of these jeans, and the awkwardness of getting to the seam meant that it was impossible to do in one nice, neat swoop. I had to break off and reposition the jeans a few times, but luckily I was able to place the breaks in stitching underneath where the pockets were topstitched into place later so they’re hidden.
These jeans also used up a whopping 7 jeans buttons! I was supposed to use 9 (adding two onto either side of that half-belt on the back waistband) but I only had 7 copper ones on hand so I left it at that.
Overall, I’m really pleased that I broke away from my standard, tried and true Burda patterns for once and attempted a really challenging jeans pattern. I think the extra seaming is a really nice touch on these – different enough to be special, but not so different that they’re being willfully weird. I wouldn’t recommend these for a beginner, but if you do fancy sewing your first pair of jeans, try joining the Pattern Review Jeans Sewalong that’s going on now! There’s tons of help and advice on choosing a good pattern and getting the fit right and sourcing all the weird notions that jeans require, and if you’re following along, you’d have even gotten a sneak peek at this pair!

