You may have noticed that one of the items on my Spring Sewing Ideas list was a “self-drafted/copied from RTW” bra. I’ve sewn countless bras before, but really only been happy with the fit and look of one (a foam cup muslin, of all things!). I really want to try and get away from moulded foam cups for a number of reasons (which Orange Lingerie discusses here), so my dream bra drawer would be entirely lacey, gorgeous, self-made, frameless, underwired bras, with one nude moulded foam cup bra for when I really need a seamless look.
The problem is, I’d been buying foam cup bras for so long that I didn’t really have any non-padded ones I could clone, and on a whim last year, I bought a few M&S bras and was amazed to find that two (identical, apart from colour) all-lace, single-darted, frameless, underwire bras, fit me perfectly and gave me a great shape.
So in the back of my mind I’ve been wanting to clone these, since my last bra using the Elan pattern ended up fitting well (at first I thought I’d cracked it finally!!), but the cup shape looked B-A-D. Boobs like duck-bills, oh god no!
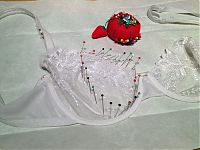
Anyway, so I started the process of cloning the white version of the M&S bra last night, by using my method of tracing patterns – placing the bra down on top of paper and running my serrated tracing wheel around it. This worked well for the band, but I wasn’t convinced I got an accurate trace for the cup, so I looked up an old Threads article, “Clone Your Favorite Bra” (Issue 99, Feb/March 2002 if you’ve got the archive DVDs), which suggested stabbing lots of pins around the bra edge until you got to a point where it would no longer lie flat. Then you unpin the first pins you put down, and re-shift everything using the latter pins (in my case, along the dart) as an anchor so it lies flat and you get all the edges pinned.
Then, in my case, because the dart stayed in place and everything shifted around it, I had to cut through the dart and open it back up. Because the top edge of mine was the lace edge, I knew this had to be straight, so it made it easy to re-adjust.
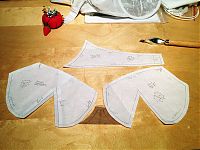
In the end, I ended up with really similar bra cups from the two different methods – the dart is exactly the same on both, with only slight differences at the sides.
Though looking at these now, I realise I drew 1/4” seam allowances the whole way round, instead of varying them based on elastic widths and such, so I need to go back and re-read that section of Demystifying Bra Fitting and Construction before I make my muslin.
I’m going to try both cup patterns and see how they fit, but the only thing I’m concerned about is the shape of that dart, which I imagine should be curved rather than straight, but that’s something I can adjust after the first muslin.
Funny – you may notice in that last photo that the bridge (the little triangle between the cups) is brown rather than white. That’s because that’s the only piece from the last bra that matched up PERFECTLY to my RTW bra. And that’s because I’d used the Bridge Test in an early draft of Demystifying Bra Fitting and Construction and altered it significantly. I said it before, and I’ll say it again – that tip is worth the price of the e-book alone!
Oh, and I have sad lingerie supplier news – eLingeria is now going out of business, too!! First Danglez, now this! With a heavy heart I went through their remaining laces and elastics and chose my final supplies, sniffle. But if you are on the lookout for wide, stretchy laces to make more Lacey Thongs, they’ve got tons of it at great prices right now…
Fingers crossed that Sewing Chest may buy up any excess stock and carry on the lingerie haberdashery torch for a long, long time (omg please don’t close, too!!).


