Quite a few of you were interested in hearing about the process of launching my own line of exercise sewing patterns, and since I tried to keep everything very quiet until the launch day, I couldn’t really talk about the process at the time, either (I decided to keep it quiet to minimise the “Are they ready yet? Are they ready yet? How about now??”, etc pressure when people get excited!).
I’ve been thinking about the possibility of making some of my own patterns for a while now, testing the waters last year with my Lacey Thong pattern, of course, but a full time job, marathon training, boat work, and busy social schedule mean that it always seemed to be on the back burner and never at the top of my To Do List. But I was made redundant from my tech job in August (really, it’s ok!) so I had time to think about what I wanted to do while we were in Mexico, and I realised that I wanted to give sewing a shot as my main career, with patternmaking as a large part of that.
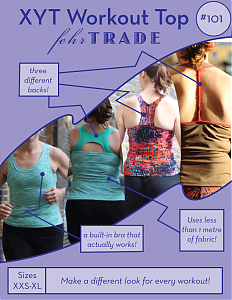
I had lots of ideas in my head (and in my sketchbook!) but I opted to specialise in exercisewear because that was something I a) was passionate about, b) had lots of practice sewing and designing for myself, and c) there wasn’t much on the market for already. I knew I wanted to release at least two patterns at the launch, but I developed these sequentially, starting with the XYT Workout Top.
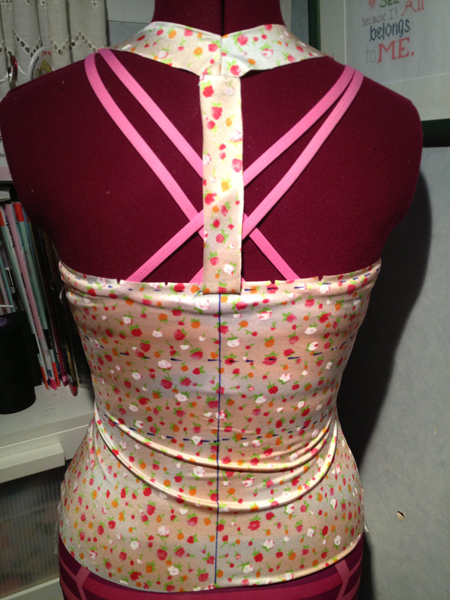
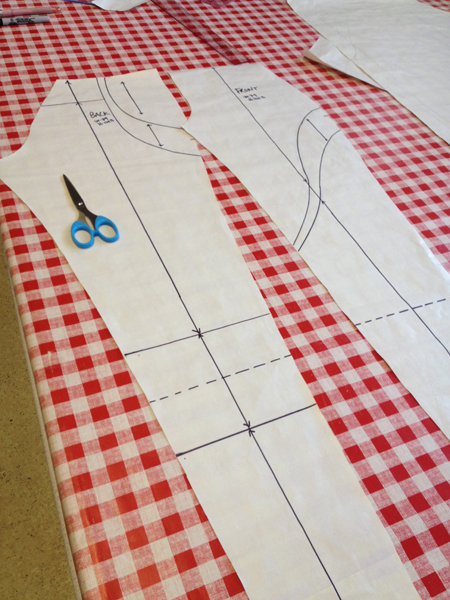
The first step in the XYT development was to draft my own sloper and make a series of muslins for the different versions, chopping and redrafting the basic shapes until I was happy. Then I made a muslin which had a bra the same basic shape as the exterior with one layer of power mesh, but I found that even though I took the side seams in closer and closer, I still didn’t have the support I needed for running. It was only after talking to a friend that I was able to make the leap to the arrangement of the second mesh layer that made all the difference and stopped the bouncing! I then finished off this muslin version, wore it for a few runs, and only then did I start the process of transferring my hand-drafted pattern pieces into digital.
I started by scanning in the paper pieces and re-joining them digitally in Photoshop, and then came the laborious and tedious process of tracing around all the pieces with the Pen Tool (ie: vector paths) in Illustrator. I’ve used Photoshop for 10+ years, but I was a complete Illustrator novice when I started this patternmaking, and my god there’s a steep learning curve!
Then, using Connie Crawford’s Grading Workbook, I laboriously graded all the pieces to the various sizes, partly because I wanted to understand the process, but also so that it was all under my control. I wouldn’t necessarily recommend this book, however, as I found the information for digital grading to be very sparse, extremely user-unfriendly (I spent about 3 hours making myself usable cheat-sheets for the few included pages of knit blocks!!), and with hardly any information on stretch fabrics, which is really all I was interested in. But AFAIK, there’s not really anything else out there, save this technique which I’m a bit wary of.

After it was all graded, I then had to break it all up into individual pages (which takes a few hours in itself), then print, trim, and tape it out to check everything aligns ok before going over each and every freaking line with my rulers and pizza-wheel measuring ruler, making notes where seam edges don’t quite match, where marks are off, and generally being as anal-retentive as possible about every single line. Once I had a bunch of notes scrawled about “Size Whatever on Piece Q being 2mm too long”, then I went back into Illustrator, made all the little adjustments, and paginated, printed, trimmed, taped, and re-measured everything all over again.
I made a couple muslins here at this point, too, using the printed copies, just to make sure things lined up in reality when sewing. And also to keep from losing my mind at the sheer tedium of the above. I also starting writing the instructions, starting with my own, very basic order of construction, and filling them out further as I sewed and saw opportunities to make them better.
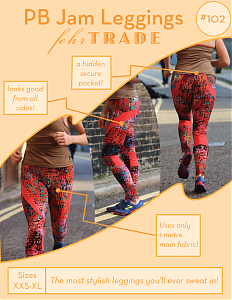
It was around this point that I started on the PB Jam Leggings, as I was due to go to the States for a week and wanted everything scanned and in my computer before I left. So in one day I managed to draft myself a fresh pair of leggings, make up a muslin with the swirls drawn on instead of pieced, adjust those, cut the new pattern pieces, and sew up my first trial pair, which happened to be the print & neon red pair I absolutely, utterly love. That was a good day!
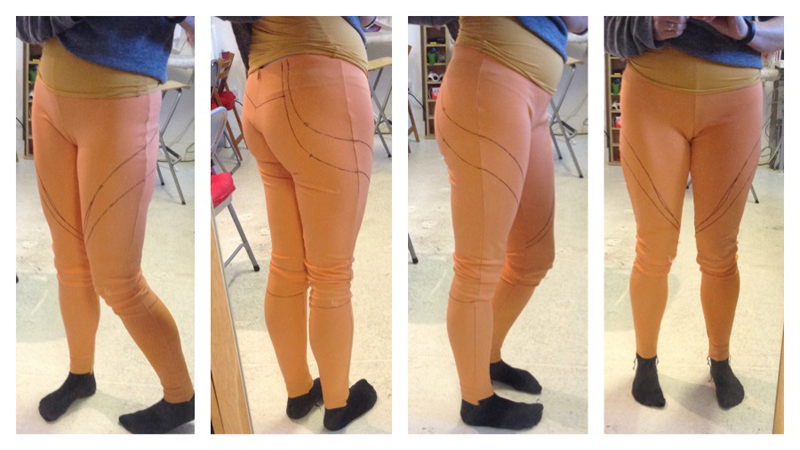
I ran in my muslin pair a few times, then scanned in my paper pattern pieces, again, re-joining them in Photoshop, and tracing around the shapes with the Pen Tool in Illustrator. I largely followed the same process as the XYT Workout Top, except this time I employed a professional grader to create the different sizes off my base pattern, since this time around I understood the process, and the multiple pieces made it rather more complicated. This bit of grading work remains the only bit of work I didn’t do myself throughout the entire process! Otherwise, it’s all me – drafting, digitising, sample sewing, illustration, marketing, modelling, everything. I’m literally a one-woman show here.
But I digress – while I was in the States I did some more paginating, where I discovered that the frame size I had been using for years was actually getting trimmed when I used my Dad’s US Letter printer, so I had to go back, shorten the grid on both patterns, re-paginate everything, reslice every single vector path, and re-generate the patterns. This was extremely time consuming, and annoying, but still, I’d rather notice the problem early on than have customers find it! So I honestly can say that my patterns now (and hereafter!) do indeed work on both A4 and US Letter printers, because I’ve tried them myself on two continents!
End of Part One – stay tuned for more…