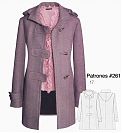
Since I’m not entirely confident of how Patrones patterns fit me, and I’m equally not confident that I am a size 44 anymore (well, I was when I traced it 18 months ago, argh), I decided to play it safe and make a bedsheet muslin for my Patrones spring coat before cutting into the basketweave wool. If you remember, this is the coat:
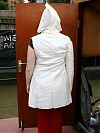
And this is how the muslin looks straight off the pattern sheets:
Aye yae yae. The first and most glaring problem is that the sleeve is tiny! I mean, if this were a dress shirt, I’d size up, but for a coat, it’s a no-brainer. And the fit is too tight across the upper back, and the bust and waist, and you can see in the photos that it hangs open at the front hem, so there needs to be some walking ease there… Oh yeah, and the marked waist is about an inch lower than my natural waist, so that’s got to come up. I have a feeling I’d only have to do half as many alterations if I’d just traced a 48, but c’est la vie.
Full list of alterations:
- Raise shoulder 1/2” on each side for shoulder pad room
- Widen top sleeve by 1” along the entire length
- Raise waist by 1”
- Insert walking ease
- Increase upper back
- Increase bust/waist
- Lengthen sleeve by 1”
- Increase meagre pocket bag
- Create back neck facing (the pattern just has the lining meet the collar and I like back facings)
The only really optional changes I’m making in all this are the back facing and the pockets – they’re ridiculously tiny, and don’t hang down deep enough from the opening to prevent things falling out!
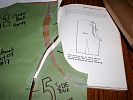
It’s a good thing I learned how to do most of these during the Great Coat Sew Along, otherwise I’d be lost, since I hardly ever have to do any alterations usually. The only one that really had me stumped was increasing the upper back, but luckily I brought out the fantastic 1970s “Making Your Clothes Fit” book (long out of print), which highlights a bunch of wrinkles in various places and shows you the sewing solution and the pattern alteration for each one. So I followed that to give a bit more room across my upper back:
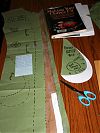
But my most-hacked apart piece was probably the centre front, since it had the raised shoulder, raised waist, increased room for bust and waist, plus the walking ease triangle, and moved button tabs!
You can also see there the increased pocket piece and how stupidly small it was before. All the alterations make me remember exactly why I love patterns without included seam allowances! All of these changes took me about an hour or so to cut and tape, but if I’d had to trim off all the seam allowances and add them back on afterwards, it probably would’ve taken several evenings! And by keeping the facing on the centre front piece, I only need to do those alterations once. Then, after I’m done cutting the centre front piece in my fabric, I cut off the facing in the paper pattern, then use the two parts to cut out the facing and use the rest to cut out the lining. And that’s SO much easier!
Talking about cutting out fabric reminded me, too, that I laid out all these altered pattern pieces and I have just barely enough lightweight fused wool to not have to buy any more! Hurrah! So I’m going to cut out those pieces, then fuse more heavyweight interfacing for the button tabs and facings. I was debating whether I should line the hood or keep it unfused, but since that was the only piece that didn’t fit on the bulk fused fabric, the decision was kinda made for me – I’m keeping the hood unlined and I’ll use a bit of the lining fabric to bind the seam allowances along the centre seam.

