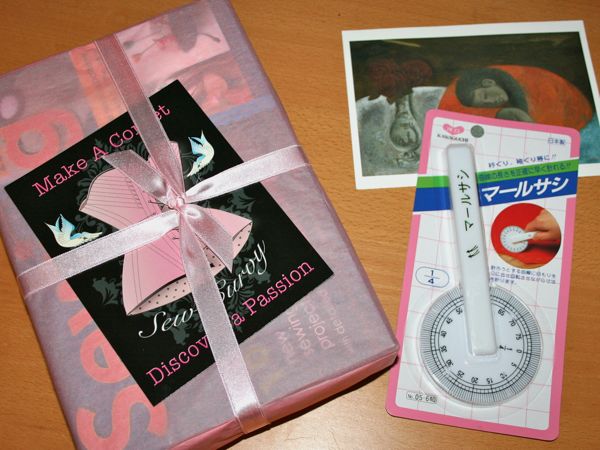
Blog

The Motherload of KnipMode – Part Two

You can read my roundup of Part One of the haul of older KnipModes from Hilde here, but now it’s time for the exciting conclusion to my newly-acquired stash of KnipModes from 2005 through 2007.

KnipMode May 2006

Wow Knip have gone full-on wedding crazy here! The bridal feature takes up a good third of the magazine! Ok so the wedding gown is not really to my taste, but I still think it’s a shame that the pattern is a special-offer to post away for and isn’t included…

…but the patterns for the rest of the bridal party are!! Everyone from the baby to mother of the bride to wow! those are the first maternity patterns I’ve ever seen in Knip! I wonder why they stopped printing them, especially since Burda and Patrones seem to publish maternity patterns with some regularity.

I really liked the khaki and white colour scheme of this feature, especially with this model’s colouring, but my favourite pattern of the lot was these nice pleated trousers:

How to sew welt pockets

It may be FREEZING in London, but the heat is on for me to sew James’s fantasy jacket in time for his birthday on Saturday!

I’m calling it his “fantasy jacket” because he’s asked me to recreated a beloved unlined, simple, waterproof jacket that was stolen from a pub on the night he met me. So he recalled it from memory while I attempted to create an accurate tech drawing. Then I compared this against my vast pattern magazine archive and decided that BWOF 10/08 #134 minus all the bells and whistles plus a few different whistles and bells was the best starting point. The muslin went well, so this weekend I started on the final jacket, made from a very cool laminated linen from Mood in NYC, with bias binding made from some dark red and black tie silk bought in Dublin three years ago.

The rubberised coating on the fabric means any and all pin holes show, so I needed to treat it like leather – pattern weights and rotary cutter for the pieces, and since it’s unlined, I also needed to create metres upon metres of bias binding for the exposed edges. I used a continuous bias binding method for the first time ever and it was very quick, though not very intuitive.

(I wrapped the binding around a sunglasses case to avoid creases. And because it was handy. Let’s face it – I’m not going to be needing the sunglasses any time soon!)

After binding most of the edges, I then set to work on the front welt pockets, which were rather tricky on a fabric that requires a press cloth (I’m paranoid that the laminating will melt!) and can only be basted where it will never be seen. So I thought I’d document the process and give you all a little welt pocket tutorial.

This is also exactly how I do bound buttonholes, but because the scale is much larger here, it’s easier to try welt pockets first to get the technique down and then just do the same thing on a smaller scale for buttons once you get the hang of it.

How to sew a double welt pocket

My pockets here are 7 inches long (6” is standard but I wanted to make sure his big man paws would fit in), and the opening is a total of 2cm wide (1cm on either side of the centre opening line). So the welts I cut out were 4cm wide (folded in half, they’re 2cm wide so straddle the stitching line nicely), and 8 inches long (so I get some overlap at the ends). You’ll need two welts per pocket. I folded each of these lengthwise and machine basted close to the cut edges to keep them together. If your fabric frays or shifts in anyway, you may want to interface the welt pieces in addition to the area around the pocket opening.

Step 1
Hand baste the pocket edges and central line. When you’re basting (in general), never turn a corner with your hand stitches, but leave the tails free at the corners. Also, you should extend the short edges here two centimeters or so beyond the long lines. I haven’t here because the needle holes would show!

Brown knit winter dress

Continuing on my quest for more long sleeved tops and dresses as the weather turns decidedly chilly here in London, I’ve pulled out KnipMode 09/2010 #11 from my stash for a quick and versatile knit dress.

The dress is a pretty basic shape – a rectangular skirt (same for the front and back) at a gathered waistline with a basic V-neck bodice and long sleeves. But the twist is that there are two triangular waistband pieces in front to help cover that waist seam, visually cinch in the waist, and create interest in an otherwise basic dress.

And I had the perfect fabric – when we met up with Karen for drinks when we were in Philly a few months ago, she brought me this lovely and soft poly/viscose/lycra(?) jersey for me as a gift! How nice! So I thought it’d make the perfect winter dress.

Bronze leather obi belt

When I was in NYC on our honeymoon, I went a bit mental in Global Leathers and I found this awesome bronze leather with a black suede reverse in their scrap bin for $10! Steal! It was plenty big enough to make this obi belt, and I reckon I’ve got enough leftover to either make this again as a gift, or make a ruffled wristlet for me..

Cidell, Ghainskom, and Dawn have all already made BWOF 06/09 #151 ages ago and I’d kept this in the back of my mind since I saw theirs. This is the perfect pattern for this leather because not only do you get to see both sides, but it’s fully reversible, too!

KnipMode blue draped collar dress

As you read last week, I was so inspired by the December KnipMode issue that the day after I received it, I traced out dress #11, the following night bought the navy blue cotton lycra jersey and cut out the fabric, and then sewed this dress last Saturday!

This dress has got some really unique construction – the two front skirt pieces meet at the centre front to form a collar, which then goes up and around your head and comes back down to join the centre front again. Everything is sewed together, though, so there’s no chance of gaping!

The other great thing about this dress is that they’ve chosen this pattern to have the big, illustrated instructions for this issue! So you really only need to sew the shoulder seams and centre back (if you didn’t cut it on the fold like me), follow their illustrations for that really unique scarf collar, waist, neckline, and centre front, and then after the illustrations attach the sleeves, sew the side seams, and do the hems! So what could’ve been a really complicated pattern is actually made fairly straightforward. Yay! Thanks, Knip! (You can download those big illustration in colour pdfs on Knip’s site, too!)

The bad weather and early nights may have kept me from taking photos of me in the dress earlier, but we had a mammoth photoshoot session yesterday so there’s lots to show!

La Mia Boutique November 2010

With KnipMode pulling out all the stops for their fantastic new December issue, would La Mia Boutique rise to the challenge and present an issue full of wonderful, glitzy holiday wear?

Err, sadly, no. But let’s have a look anyway…

This minidress has some interesting pleating going on at the centre front, but it’s a detail I’ve seen countless times in RTW, and one that Burda published patterns for at least two years ago. But it’s still a nice, very wearable look, and hems can always be lengthened.

This knit cowl dress with shoulder yokes would look great in a luxe, drapey fabric like silk jersey…

KnipMode December 2010

If you thought November was a great issue, wait til you see what KnipMode have in store for us this month! In my opinion, this is one of their best issues in months, and it’s resulted in me sewing a dress from it before the month has even started! That’s a new record, even for me!

So let’s take a look inside…

Right from the first page, I knew this would be a good issue, as I turned the page and gasped with joy when I saw this asymmetrical cocktail dress for stretch wovens. I absolutely love the three curved bands that come up and over the hip and are released into full pleats at the skirt. These bands also carry on around the back at the waist level, so you don’t get a plain “coffin back”, either.

You’ve already seen this one since I sewed this over the weekend, but I love love love this shawl collar dress!! The skirt pieces meet in the centre front then come up and around the neck and back down again to form the collar. This is so nice in person, too, just you wait til I can get a photoshoot up!

The loaner

Dateline – last week…

Wednesday: The new December KnipMode magazine arrived. OMG!! Best issue in a long time, holy crap! (It’s scanned and a preview is coming up very soon!)

Thursday: I traced out dress #11, where the centre front portion of the skirt comes up and around to form the collar, joining back on itself. The pattern pieces were massive and several needed joining together and extending, so it took me much longer than usual.

Friday: Pip convinced me that this absolutely must be in a solid, and since my longest solid knit was only 2m, I either had to run into the West End on Saturday (ugh), wait a week for an internet fabric order, or hope against hope that the lady at Bhopal Textiles on Brick Lane (just about the only non-wholesaler there) had any suitable jerseys, and was actually still open when I walked past.

And score! She was in the midst of closing up (she said she normally closes around 6 or 6:15, which explains why sometimes she’s open and sometimes she’s shut when I walk home) and had a fantastic navy blue cotton-lycra jersey for £3.50/m. So the 3m length cost me £10.50. At first I felt guilty for buying new fabric when I have such an overflowing stash from NYC, but then it occurred to me that I’m sure James spent more than that at the pub on the same night…

So I came home and laid out the fabric and cut out all the pieces, needing almost the entire 3m, even with Knip’s single layer layout! I went to bed with all my pieces ready to go on Saturday…

Winter coat shortlist

With the Burda/Armani coat firmly OFF my list for my winter coat (a few of you suggested I could change/fix/alter the pattern but sorry, my time is too valuable to throw after a bad pattern. I know when to cut my losses and choose a better one!), I’m now in the process of picking a different winter coat pattern for my luscious and very thick ex-Burberry wool coating.

Since I scan all of the “At-a-glance” pages for my pattern magazines and store these in a private online gallery, looking through these and creating a shortlist is much, much easier than wading through each and every one of my magazines! I went through the gallery, and when I found a coat pattern I quite liked, I took a small screenshot of it (on Macs you can Shift-Apple-4 to draw a small square and only capture just that area), and renamed the screenshot to the pattern issue and number so I wouldn’t forget where it came from. Then I pasted all these into one big image so I can see all my choices at once.

This is the same process I used to narrow down my wedding gown pattern shortlist, but I cleaned the collage up a bit nicer in Photoshop this time around!


(click to see it bigger)

Sookie Stackhouse Halloween costume

James and I are big fans of the fantastic and fantastically trashy HBO show “True Blood” so this Halloween we decided to dress up as Bon Temps’s psychic waitress Sookie Stackhouse and her 250 year old vampire boyfriend Bill Compton. James’s costume was considerably easier than mine (wear black, put on plastic fangs and fake blood, speak with Southern drawl), but thankfully mine didn’t involve too much effort this year either.

I wanted to recreate Sookie’s most recognisable outfit, the Merlotte’s bar uniform, which consists of black shorts, a tight white teeshirt with the green Merlotte’s logo, and a back bar apron.

As I’ve made clear before, I do not wear shorts. I own one pair that I bought when I was 18, and they don’t get worn outside the moorings. Whatever shorts I made here would be a one-time only garment, so I wanted to make them as simple and easy as possible. Since the October edition of Burda magazine was handy, I traced off #111 and then modified them to make them as simple as possible: