Half of the fun of Sewing Indie Month is connecting with other indie pattern designers – finding out […]
Wrap-style Bess top – Tutorial for Imagine Gnats
Burda magazine September 2015
I actually received this issue before we left for Argentina, but in the mad rush to finish sewing my bikini and get all the other posts ready to go, I just couldn’t work up the enthusiasm to talk about this issue. And then I couldn’t really be bothered to complain yet again about the dirndlpalooza issue yet again, for another freaking year. Yes, I could almost just copy/paste the comments I get every year when I complain about the dirndls, but it’s just too exhausting to complain all the time. Let’s just say I’m sick of the dirndls taking up space in a global magazine every single year which could otherwise go to clothes the vast majority of their global audience might actually wear. If Burda sell so many dirndl issues (one of the arguments), then why haven’t they just produced a one-off 100% dirndl compilation of all their past patterns and sell that every September? I’d be thrilled!
But dirndl complaints aside, let’s take a peek inside this issue before October actually lands in my mailbox!

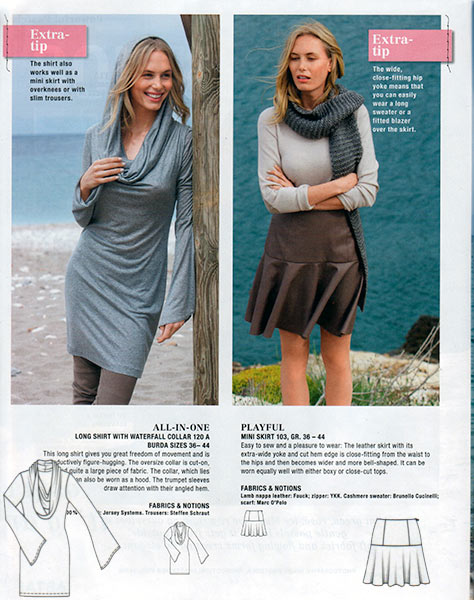
Two interesting patterns here: on the left, I really like the exaggerated cowl neck tunic (ut I’d definitely substitute in regular knit sleeves instead!) and, on the right, a great short skirt, similar to Maison Fleur’s Fit and Flare Skirt.
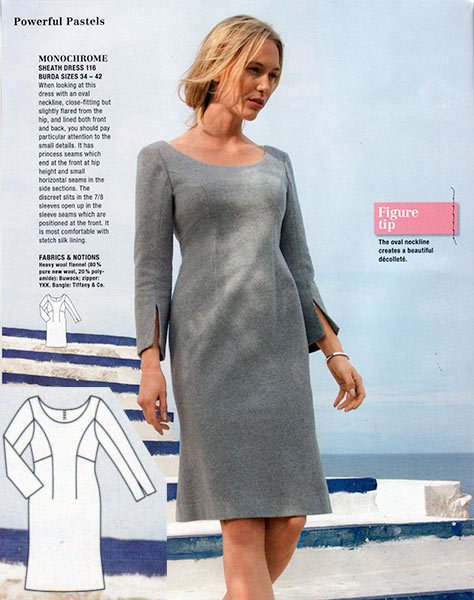
Oh. My. Gorgeous! This is such an elegant sheath dress! The subtle seamlines and shaping are just so masterfully done, and they’ve chosen a great fabric to showcase it, too. You may have missed it, but I also love how they shifted the sleeve seam to be at the front instead of the usual place at the inner arm.
I’m not a fan of the dress but the peacoat and biker trousers are great (also a longer version of that coat is available). Which reminds me that I still have some wonderful navy wool coating and silk lining ready for a jacket, since none of the 3(!) muslins I made for it last winter passed my stringent tests…

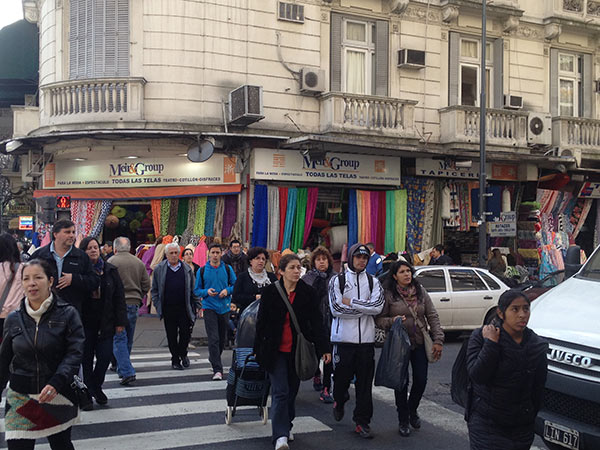
Fabric Shops and Sewing Magazines in Buenos Aires
We’ve been back from our Argentina trip for a while now, and now that the “holy crap I’m a world champion and world record holder!” glow has subsided a bit and I’ve had time to unpack all my goodies, I wanted to share with you the sewing-related finds from our time in Buenos Aires, Mar del Plata, and Iguazu Falls (all three of which I heartily recommend visiting – even if you don’t like tango! I really don’t care about tango, but the food and cocktails in Buenos Aires were out of this world!).
Fabric Shops in Buenos Aires
Handily, the fabric shops in Buenos Aires were concentrated in one small area near the centre, so it was really easy to just pop over and buy some fabric souvenirs, even if you just have an hour or two spare in your schedule (as often happens if you’re in a city for work or on a guided tour).

The shops were much smaller than those in NYC or Goldhawk Road, but they contained a surprisingly wide variety of fabrics, and prices were cheap (but not ridiculously so). It was a pretty laid back atmosphere – no pressure to buy, but employees were around if you wanted something cut.

I paid $260 pesos (about $25US or £18) total for the 3.5 metres of fabric I bought. Prices weren’t marked on any bolts that I saw, so I have no idea of the individual prices of my fabrics, and the fibres were only loosely labelled in sections – “algodón” (cotton), “seda” (silk), etc, so you’ve got to be good at identifying fabrics by feel!
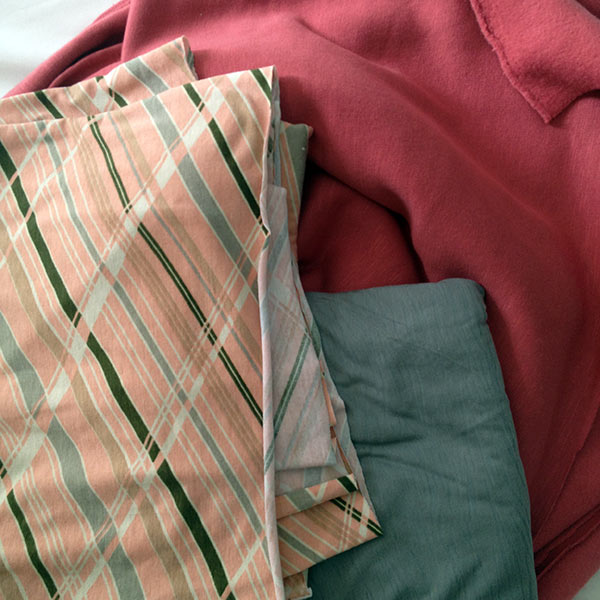
My purchases – 1m each of the printed and grey lightweight jerseys for me, and 1.5m of the coral sweatshirting to sew a Kimono Sweat for my mom
Lengths are in metric measurements (“meters” or “medio”, for half), so just know your lower Spanish numbers or hold up fingers, and most shops have calculators at the tills to just show you the price in pesos if you’re not great with your higher numbers in Spanish. Like pretty much everywhere in Argentina, the fabric shops are cash only – it’s really rare to find anywhere that takes payment by card, though cash machines are fairly easy to find in major cities.
Yoga-style PB Jam Leggings – a tutorial by Lolita Patterns
Sewing Indie Month is back again so you can look forward to a whole month of fun interviews, tutorials, pattern sales, and sewing contests (with a ton of prizes!) throughout the month of September. Just like last year, when I interviewed Hannah from Sinbad & Sailor and you got a great tutorial from Heath Lou hacking my XYT Workout Top into a maxi dress, you’ll get to read some great, different content from my usual sort, starting off with this fabulous tutorial by Amity of Lolita Patterns. You may recall that I pattern tested her Sugar Plum dress a few years ago (and I still wear it!), plus we got to meet up when she visited London a while back, too. So read on and see how she adapted my PB Jam Leggings pattern to have wider legs and a yoga-style waistband, too! – melissa
I was so lucky to get paired with Melissa for the tutorial post for SIM. While my life before baby was filled with court visits (I was an attorney) and professional wear, my new mom life incorporates a LOT of yoga pants. Casual wear is my life now! So it was unbelievably perfect to get paired with Fehr Trade patterns.

For my tutorial I turned her very stylish PB Jam Leggings into yoga pants! This required a different and thicker waistband, and a widening of the legs. Can I just tell you that my pants turned out amazing?!? I was going to just go black pants with the gray houndstooth contrast but at the last second remembered I had some orange stretch piping I had bought for a project but had since bought a different shade of orange. This piping made the pants. Literally. The piping looks so amazing I have worn these pants 4 times already and I’ve only had them made for a week!

I’m here to share pictures and a tutorial on how I transformed the PB Jam leggings into yoga pants. To do this, I used a pair of yoga pants I loved to see how wide I wanted each part of the leg.
Wide leg alteration

Excuse the dog hair—such is the life with three dogs 🙂
The bottom of the leg was 10 inches.

In between the knee and the hem was 8 7/8, and the knee was 8 5/8. I took these measurements and wrote them on the diagram so I could compare and make sure I didn’t forget them. I also measured the inseam and how far down the knee began from the waist. These are all helpful measurements when altering the pattern to match the yoga pants we are copying from.

Now keep in mind, these are all just one side of the leg (so the entire circumference would be twice the measurement) and also do not include seam allowances. But this measurement is perfect because the pattern pieces work this way.
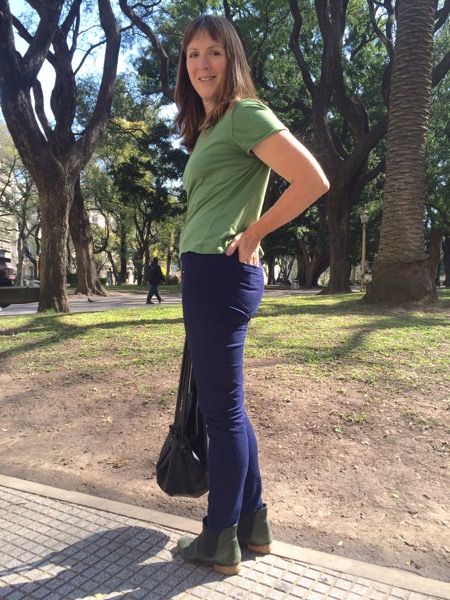
Navy twill Jamie Jeans
With my sprint training regime over the summer, I’d lost quite a bit of weight from around my waist and hips, while my legs essentially stayed the same size. This has meant that pretty much all my trousers are now too big (some of them, comically so), and I pretty desperately needed some trousers that fit properly.
With the Kimono Sweat pattern launch out of the way, I went through my fabric stash to find something trouser-y, and discovered a length of stretch navy twill from Ditto that my friend Pip bought me as a Christmas present two years ago and I’d been meaning to sew ever since. Then I had a little dig through my pattern stash for something easy with minimal fitting, and I pulled out Named’s Jamie Jeans pattern, which I’d previously sewn in silver denim. Unfortunately, that fabric was not the best quality, with the silver coating having worn away considerably despite zero machine washing, and are just murky black now. So sad. But I mostly liked the fit of those, and the pattern was ready to go, so the trousers were GO!
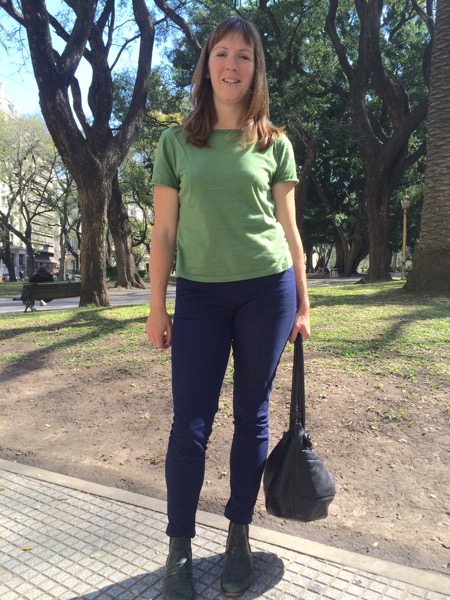

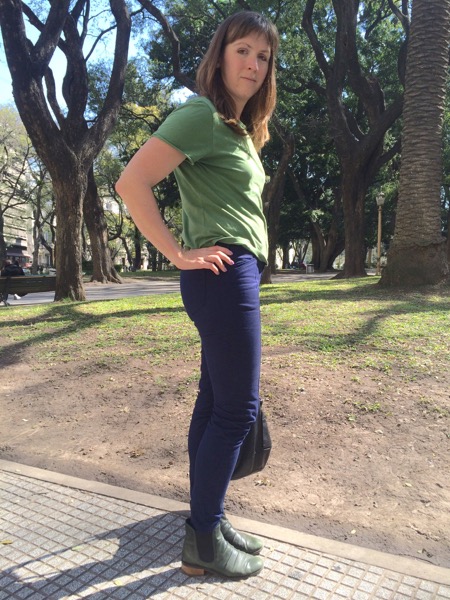
These photos were taken in Plaza San Martin in Buenos Aires last week, and were lightened to try and show the details a bit better!
In the silver pair, I loved the close fit through the legs, but the crotch was just not comfortable. To me, it felt like they were too low-rise, but upon closer comparison with my favourite (non-stretch) Burda jeans pattern, it turned out that the crotch curve was about an inch too high, so I lowered it to match Burda’s and the fit is just right now. So they hit at about the same point, just below my belly button, but the crotch isn’t pulling and feeling a bit too… camel-toe!


Manequim magazine August 2015
There’s a bumper crop of Plus patterns this month – my favourites are this lace-overlay dress, and the top with the lace upper back (paired with a nice but basicpencil skirt).

The patterns aren’t anythng special here, but I like that they’ve made what’s essentially a basic jeanskirt in a luxe fabric. I’m not a fan of the archetypal Chanel jacket, so this would be a way to use up a luxe boucle in a more modern way than a stuffy skirt suit IMHO.

Omg I love this maxi dress with the asymmetric cutouts! Though a bare midriff there is pretty much my worst nightmare, body phobia-wise, I think I still love this enough to wear it anyway! Anyone want to invite me to the Baftas next Spring? I think I’ve found my gown…

An orange VNA Top with revamped Threshold Shorts
This top has spent quite a long time brewing in my brain before coming into reality. I really wanted to have another VNA Top for exercising since I loved my others so much, and I’ve had this project near the top of my To Sew queue for so long. But I had so many other projects that had to be done for deadlines, that this just kept getting pushed aside, until finally I had a spare weekend day to just do some Fun Sewing for myself!
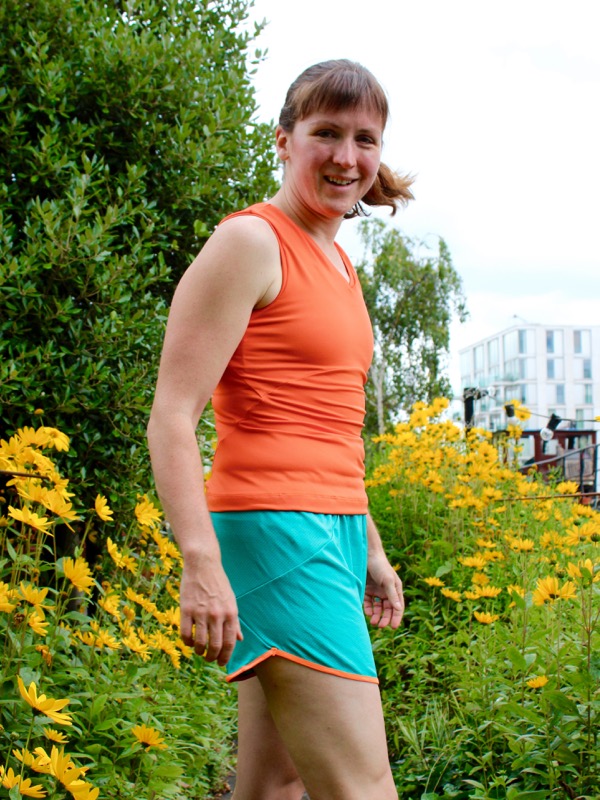
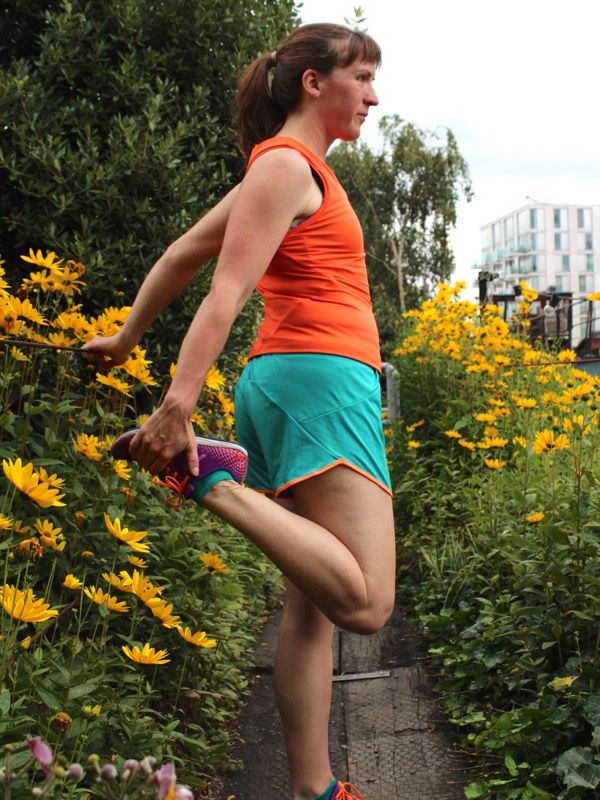
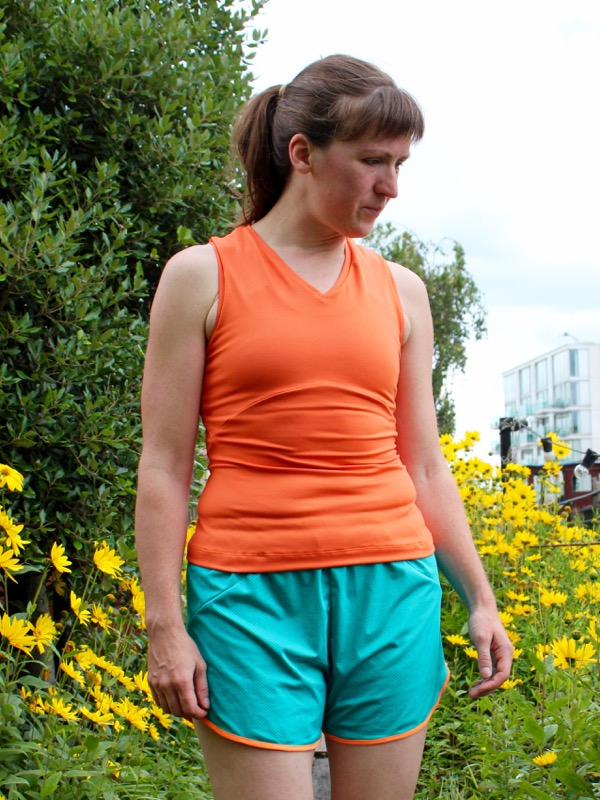
Remember my VNA Top pattern I released last summer – the one inspired by a 1930s Vionnet gown? Or to give it the full blurb: This is a pattern for a close-fitting, sleeveless workout top inspired by a 1930s Vionnet evening gown. It features a front V-neck, curved under bust seam, and distinctive angular seaming in back. Neckline and armhole edges are finished with binding, and there are no side seams.
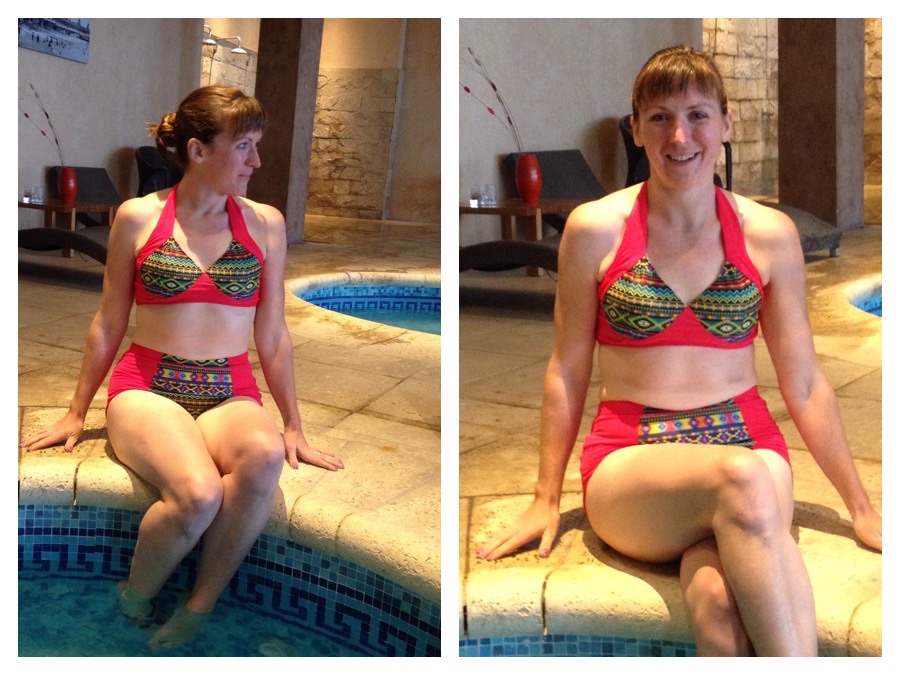
Aztec print Seamwork retro bikini
I have a really bad habit of trying to cram in a bunch of last-minute sewing just before I go away on holiday, when most normal people would be packing their suitcase or reading through guidebooks. But no, I decide to sew up a pair of trousers and a bikini in the week before I leave!
I’d sewn up a swimsuit once before, but I’m not even sure whether I actually wore it in the water at all, as I hardly ever go swimming, and I’d moved away from one-pieces and that one had zero bust support so it just flattened the girls. But discovering that Team GB had been allocated the posh beachfront hotel with the pool, sauna and jacuzzi for the World Transplant Games gave me renewed enthusiasm to cram in the retro bikini patterns included in the August Seamwork magazine (which you can buy separately if you’re not a subscriber).

The Reno halter bikini top has ties around the neck and the back, separate seamed cups, and is also fully lined. The August issue (free!) gives tips on selecting and sewing swimsuit fabrics and elastics, and also how to insert boning, underwires, or foam cups if you prefer. I opted for the latter, since I had some in my stash anyway, though my foam cups were a little bigger than the lining piece, and I had to trim some off.
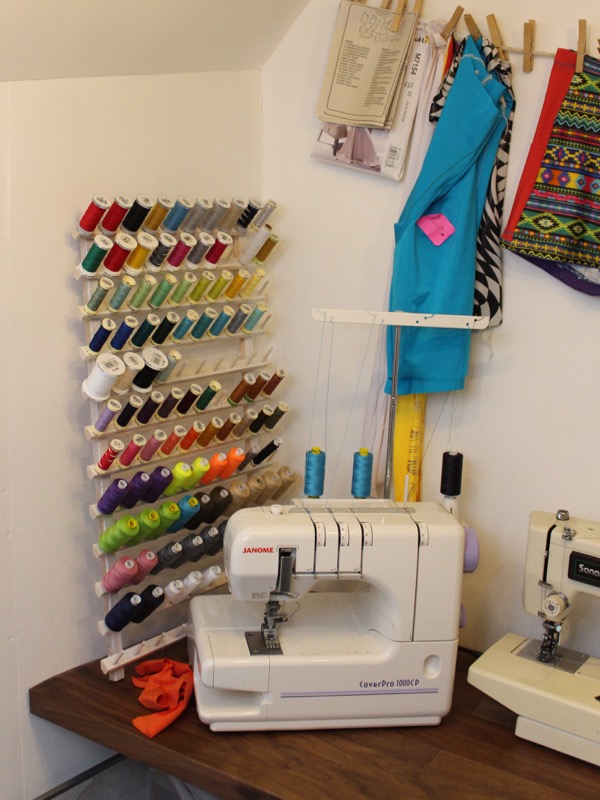
A tour of my new sewing room!
I know I’ve been talking about my new sewing room for ages (and believe me, it feels like even longer to me!) but I’m finally moved in and so chuffed to finally share it with you!
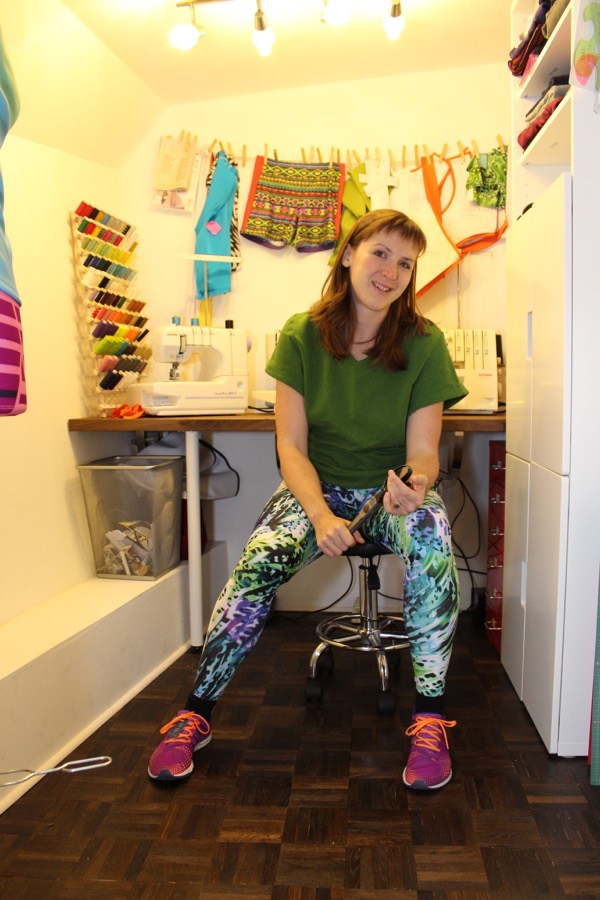
My new sewing room is very small, but what it lacks in size, it more than makes up for in cool points – who else has a sewing room on a boat, concealed behind a hidden bookcase door, eh??
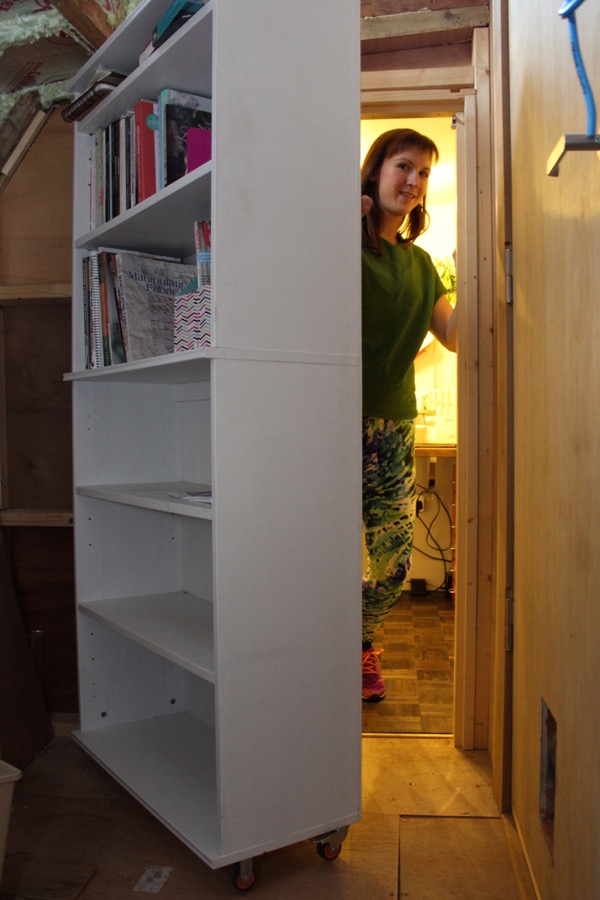
This is the bit everyone loves – a modified Hemnes bookcase from Ikea, with reinforcements, casters (wheels), and a hidden pull latch to keep it closed. Our joiner is a genius and we’re so lucky to have found him!! The greatest thing about this is that my sewing room is at the very end of the corridor, and the way the various deck heights work means there’s a porthole just above the bookcase. So it really does look convincing, like there’s no boat beyond it!!
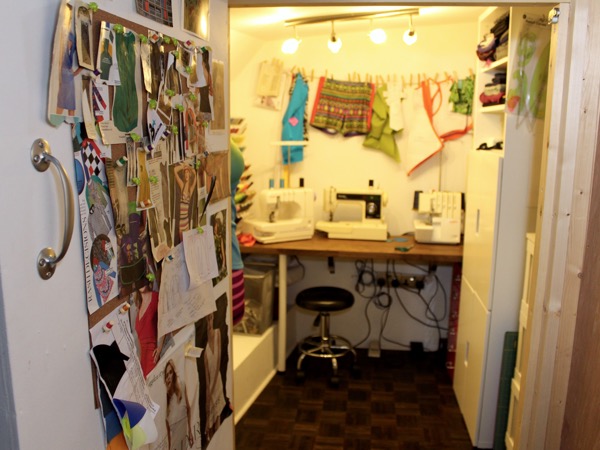
Once inside, I’ve put a corkboard on the inside of the door as a place to pin all my magazine clippings, sketches of designs past and present, and general mood-boardy stuff. You can also see how small the room is here – it’s only a little under 2m (6 feet) long by 2m wide at its widest point.
Also take note of the smoked oak parquet floor that I painstakingly cut, laid, sanded, and hand oiled myself. Loooouuuurve my floor! It was expensive, both in cost and effort, but so worth it.
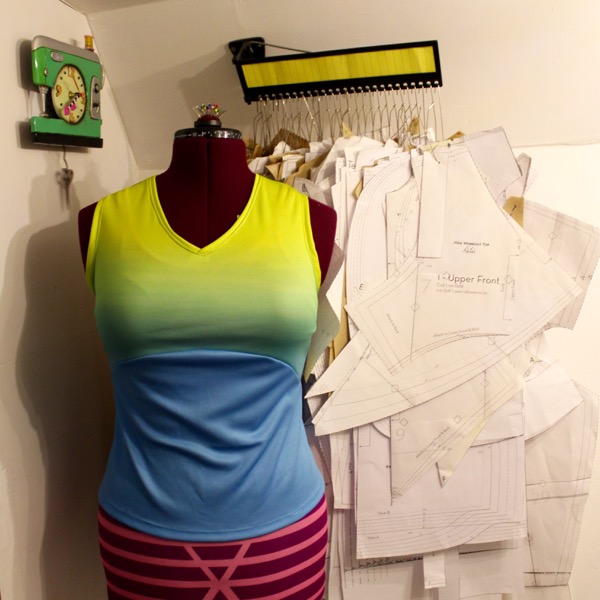
When you enter the room, immediately on your left you’ll find Susan, my dressform (seen here wearing my Laurie King fabric collaboration VNA Top pattern), and my pattern rack, which I’ve had for quite a few years but came from the garment industry supply shop, Morplan. As you can see from the number of patterns on it, I find it unbelievably useful! Also note the cute sewing machine clock my mom sent over to me!
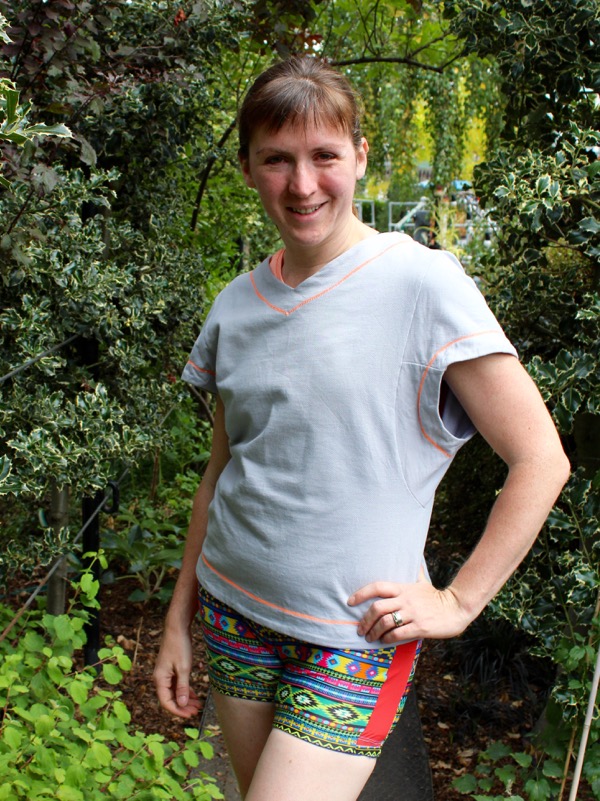
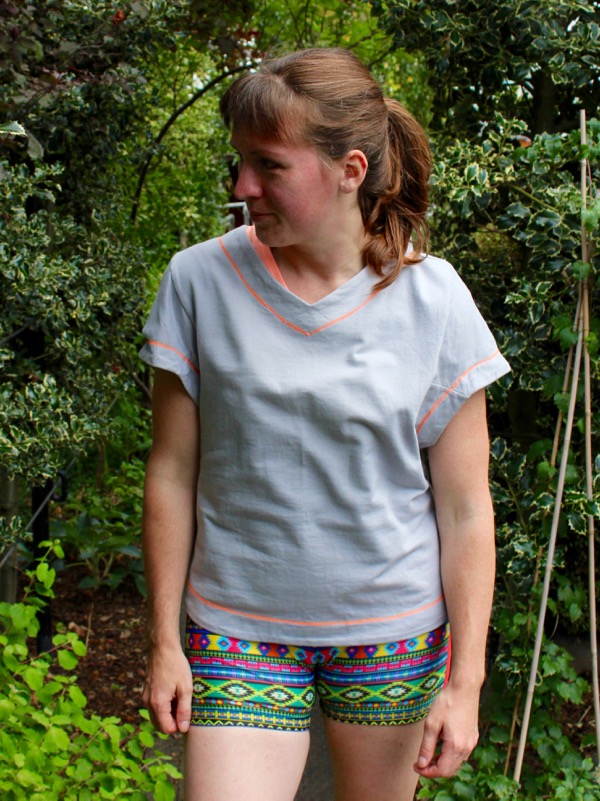
Grey Kimono Sweat top (View A)
Buenos dias from Argentina! While I was developing my latest Kimono Sweat pattern, I made up a bunch of samples for myself to test the fit and how they performed while exercising… or in the case of View A, how practical they were for post-exercise! Today I’d like to show you one of my earlest View A samples, made up in a cheap grey sweatshirting, but it’s one I’ve worn over and over again throughout the summer.

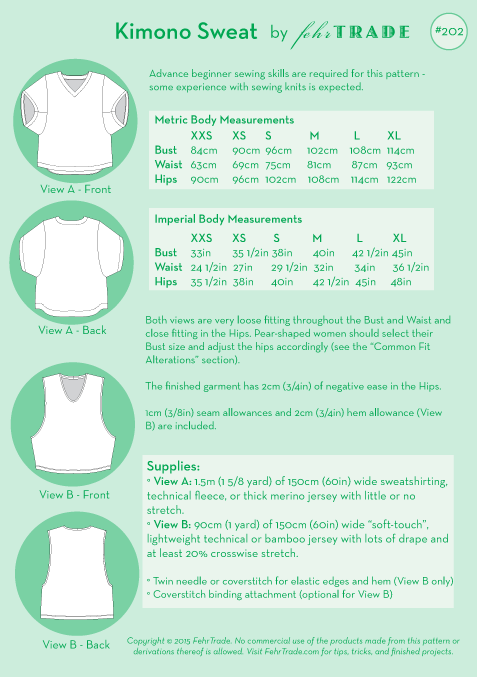
Two tops from one pattern! View A is a top with a deep armscye and kimono-inspired short sleeves with a faced V-neck and dipped hem, designed to wear for your warmup or cool-down, or even just with jeans.
If you’ll recall, this is same view of the pattern which you’ve seen Binta modelling, and it’s one I’ve found to be so useful for rolling up into my kit bag to throw on over my sweaty workout clothes post workout. The short sleeves cover up your shoulders but they’re still loose enough to let a bit of airflow through, and wearing it means I don’t feel quite as self conscious on the bus ride home.