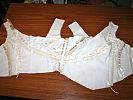
With the seams (mostly) constructed and all the seam allowances tacked down, it was time for the boning! Bridal Couture assumes that you’ve got a fairly standard princess-seamed bodice and so advises that you sew the channels to the centre of the underlining pieces at the very beginning before attaching the underlining to the fashion fabric. But my bodice has all sorts of crazy seams and the boning crosses over a bunch of seamlines, so I had to obviously apply my channels after the main seams were stitched, as Susan Khalje advises in this Threads article.
I was originally thinking to make my own channels with silk organza, but then I saw that the Sewing Chest had pre-made and seam-free cotton channels so I bought those and ended up going with that instead to save myself some time. And as Ms Khalje talks about using them herself, I figured it’s okay!
So I started a production line – first I sewed the end of the channel closed with the sewing machine, then I carefully pinned the channel to the bodice underlining where it was needed, then cut the end just before the seamline at the bottom of the bodice. Once all the channels were in place, I then catchstitched them all to the flannel underlining, keeping the bottom free to insert the boning.
Here you can see all the channels, minus the one going on the zipper tape (to be attached after the zipper is in place):


