Blog

Pedal power

My main sewing machine is a JoAnn Sonata, and it has a bit of a history. It’s technically a vintage machine, I think, having been made in the early 1980s and then promptly forgotten by the entire world. Every now and then I get an email from someone who bought one at a yard sale, thanking me profusely for scanning and uploading the user manual, but for years the only Google hits for it were ones I’d written myself.


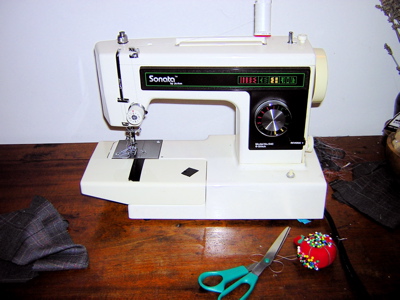
My machine, photographed in 2006

To complicate matters even further, my machine began life as my sister-in-law’s grandmother’s machine, which was gifted to me well over a decade ago when my mom brought it over as checked luggage on a flight from the States. So on top of being some random, vintage brand no one’s ever heard of, it’s also the wrong voltage (I run it through a voltage converter).

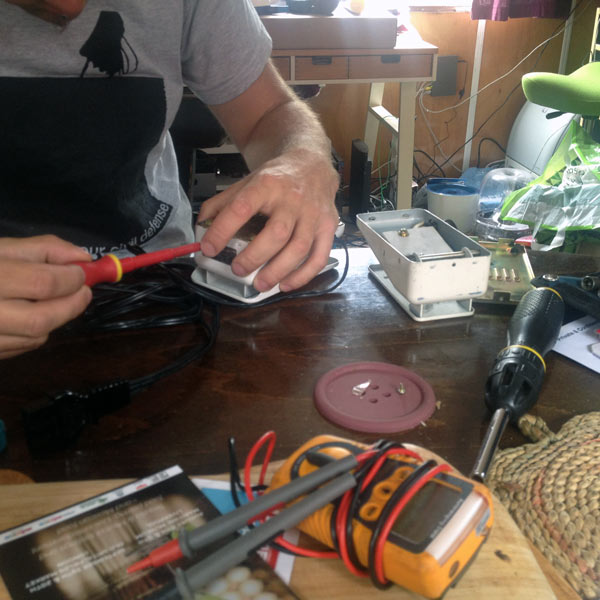
Considering the sheer volume of use it sees, the machine does so well, and I have no intention of ever replacing it so long as I can keep repairing it. I mean, I clean it fairly regularly, but I hardly ever oil it, and it only went in for its first ever service (during my tenure, anyway) last winter when the foot pedal stopped responding. My man at Maury Sewing was able to repair the foot pedal then, but advised that if it failed again, I should buy a replacement pedal from the States and just swap out the plug end (he looked into replacing the motor with a 220v one but couldn’t find one to fit the body on short notice).

The repairs lasted a good six months, but again recently, I found myself having to pump the pedal to get it to respond, and even then, it’d only go at maximum speed which isn’t exactly ideal. So I hunted on US eBay and found a really similar-looking vintage, metal food pedal in 110v wiring, with the thought of recruiting James to rewire the old plug end onto the new-to-me pedal.


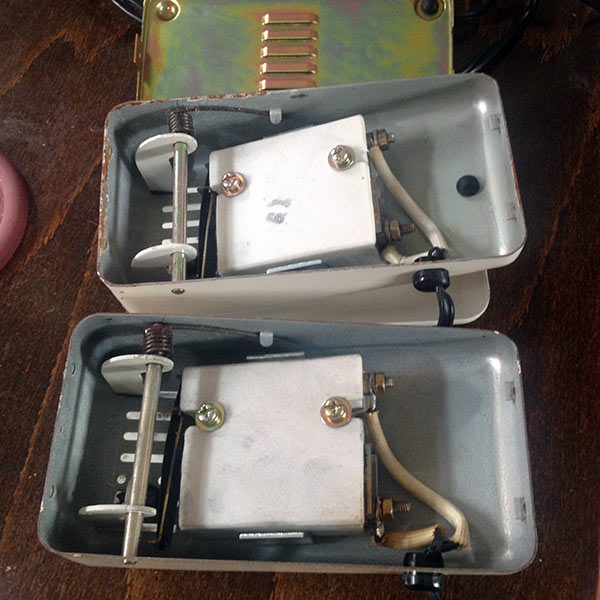
The eBay replacement (top) and my original (bottom)

But our friend Alex happened to be visiting after it arrived, and said he’d be happy to have a look. He grabbed a screwdriver and opened them up and to our amazement, the pedals were actually identical inside!

My light-up, twinkling running jacket – the sewing bit!

You heard all about the electronic components earlier this week, but the sewing of the jacket itself was in no straightforward, either! If you missed the video of the LEDs in action, have another look:

You might think, that, as a pattern designer for exercise wear, I might view other exercise patterns as competition. On the contrary – when I first saw the StyleArc Steffi jacket, my first thought was “Brilliant! Now I don’t have to draft it myself!”. I’ve got enough ideas in my head for patterns already, so I’d rather refer folks to other good patterns if I can rather than constantly reinvent the wheel.

This pattern was a birthday gift from my inlaws, and I was initially concerned because they’d bought me a size 10 instead of the 12 I’d asked for, but as it turned out this fits me really well anyway. It’s a smidge too tight in the chest for me to run in (my trainer has me focus on pulling my shoulder blades back to open up my chest for better breathing), but is utterly perfect as a warm-up, cool-down jacket, so hurrah for happy accidents!

I chose to do my colourblocking like it’s shown in the technical drawing – I used a grey/black sportshell as the main body, then I used the black reverse of this black/grey “budget” sportshell as the contrast panels. The main sportshell is really nice – a soft, technical jersey with a thin layer of fleece bonded to the inside – it feels really RTW and high quality. The budget one, well, lived up to its name. The grey side looks a bit naff, there’s no fleece, and the black side is just smooth like the other fabric’s grey exterior. So it was fine for my purposes here, but I wouldn’t recommend skimping if you want a similar jacket – go for the more expensive option and you won’t regret it.

My light-up, twinkling running jacket – the electronics!

This is an epic jacket, and something I’ve been wanting to do for, ooh, 6-7 years at least. You see, I really liked the idea of wearable electronics, and clothes that do something and interact with their environment, so I started buying LilyPad components many years ago with the hopes of making something.

Then I realised that I know nothing about circuits and electronics, and it all seemed really confusing every time I tried to sit down and learn about it. Finally, I decided that I’d bring my suitcase of tricks (no really, I have a little yellow plastic “suitcase” with all my beginning circuitry stuff in it!) along to France on holiday and I’d sit down and teach myself how to do it then. And I actually did!

LilyPad is the sewable line of Arduino products, made especially for folks like us. They’re easy to attach onto clothes, and (apart from the batteries) are machine washable, too. For this jacket I used a LilyPad battery pack (I started with the Coin Cell one but it wasn’t quite enough power), a Lily Twinkle controller, a bunch of LEDs, and a spool of conductive thread.

I used a mix of the regular LilyPad LEDs and the Micro LEDs because that’s what I had – the micro green ones were much brighter than the bigger purple ones, but you can really only get about four loops of thread around each terminal of the micro ones, so if you need to connect it to more than two lines, go for a bigger one. The Twinkle controller is really just a tiny board with four connection spots for LEDs and makes them fade in and out randomly (though you can connect more than one LED to each spot & they’ll twinkle in unison). I wanted to make things easy for myself this time around so I left out any input sensors, though I do have an accelerometer in my stash…

I’d thought to bring along this “Fashioning Technology” book and between that and this Lilypad Twinkle tutorial, I pretty much taught myself how to make a simple circuit to do what I wanted. When I go to do my next project, I’ll need to read a few different chapters and watch some more tutorials, I’m sure!