Blog

Exercise eye candy

It’s been a while since I showed you some of the amazing finished versions of my first two patterns I’ve spotted from around the internet (over a month, in fact!), so I thought I’d show off some of the amazing diversity of workout gear others have achieved.

My own printed PB Jams and mocha T-Back Workout Top

I’ll start off with two versions of my own that you’ve seen peeks of in the pattern photos, but not properly had a look at. This is probably my favourite pair of PB Jam Leggings I’ve made so far – I used some printed lycra from Minerva (sold out now!) teamed up with some neon red wicking lycra from my stash and I swear I get compliments every single time I wear them!

The top is a very early version of the T-Back XYT Workout Top, and one I wasn’t entirely happy with – you can see a lot of pulling around the neckline that I eliminated in later revisions of the pattern, but I wanted to show this one anyway so you could see the contrast coverstitch binding edges and my use of braided trim at the vertical T piece. I’d used the same neon red wicking lycra for the accents so these two coordinate rather nicely when work together – you could easily do the same by using your leggings swirl fabric in your upper back piece on the workout top.

Here you can see the classic (non-invisible) pocket in the centre back, and that it really does keep your phone and gels close enough to not bounce or bulge!

And lastly, I just really like this shot my dad took of me in these leggings while I was running around a frosty park in Virginia last November.

Beaute’ J’Adore’s Reebok-inspired PB Jams

I love this idea – Nikki had the opportunity to design her own pair of Reebok trainers, so of course she took it one step further and made her own leggings to match!

How amazing is it that this is the first activewear she’s sewn, too?! (Seriously, go back and look at her DIY makes – I’d steal her entire wardrobe if I could!)

A Rainbow in Bath

You may have already read Winnie’s post about our weekend (‘cos she’s well faster than me at writing!), but it’s just too big not to post, however late, because…

….I finally got to meet Winnie (aka Scruffy Badger)! Look, we’re on the same couch and everything!

When I was looking at half marathons to run before London Marathon, Winnie stepped up to campaign for Bath, and won me over with her offer of a comfortable bed, carb-loaded dinner, and pre-race breakfast. And all I had to do was show her a few coverstitch tricks. Bargain!

To top it off, she gifted me some of her adorable shoe bows, too, with signature Winnie elephants!

Winnie runs the Bath Half every year, so this was her 5th(!) time running it, but a first for me so I was grateful for a local to get me to the start line on time. And I finally got to race in the PB Jam Leggings I made from the rainbow space-dyed supplex, too.

Updated progress – 5 different projects!

Real life is starting to run away from the documented garments on this site, so it’s definitely time for a little roundup of projects which I’ve been working on, yet haven’t quite done a full photoshoot for yet…

The Sherlock coat

The Sherlock coat is 90% done – I’ve attached the lining and flipped it all right side out, but there’s still some hand-stitching to be done. However, this is currently “parked” while James is waiting for the Etsy lady to put up more replica buttons for sale (yes, someone makes buttons that look just like the ones on Cumberbatch’s coat!). When those arrive, I’ll finish the handstitching, sew them on, and make a gajillion keyhole buttonholes with my vintage Singer attachment.

The Rainbow PB Jam Leggings

I used some of my most precious, imported Space Dyed “confetti” supplex to make a pair of my PB Jam Leggings to wear to the Bath Half marathon next weekend, and possibly run London marathon in, too, depending on the weather. These are totally finished and road-tested at Run dem Crew last week (to rapturous compliments!) but I’m waiting until next weekend to do a photoshoot in the race environment.

You saw these in my invisible pocket tutorial, remember?

(Actually, now that I think of it, I still need to show you all my last set of PB Jams and XYT Tops from my big pre-release photoshoot, too!)

The Brasilia Dress

I’ve been wanting to make Rachel’s free Brasilia Dress pattern since she released it on Christmas Day, and I finally got the kick I needed, in the form of a big opportunity – I’ve been asked to speak at the House of Commons on Monday about a new stem cell bill! Omg!! So of course I needed a new dress, and I figured the red cotton sateen in my stash would be perfect, both for confidence and the connotation with blood. Even though it was a rush job, I still made enough time to sew up a muslin first, and the finished dress is now finished, too. I’ll try to do a photoshoot this weekend and the grab a few photos in the Houses of Parliament itself next week!

A lace & silver weekend

I ended up having a fun and full weekend of sewing this weekend, partially because I lost a few days work last week to a spa day (omg!) and a full day of filming (for Extra Mile – if you haven’t already seen my blue wigged self all over your internets, watch here!). Part of the work sewing was to get a bunch of stuff done on my next pattern, which is digitised, graded, and now ready for my second test version before I test it out on some unsuspecting local athletes, mwahahah! I also had a few projects for private clients to get done, as well, so I had to change mental “gears” a few times, too.

Another bit of work sewing was actually a bit too fun to be strictly considered “work”, and that’s because I needed to sew up a fresh sample pair of my free Lacey Thong pattern to bring along to the Panty Party class this Thursday, 13 February. There are still a few spots left if you want to snag them and join the fun, btw – I mean, seriously, look at this pile of lace and fabrics that arrived last week which is all for the class! Don’t you want to dive right in?!

To clarify: The Panty party class is at the ThriftyStitcher studio in Stoke Newington, North London, and it’s this Thursday!

I’ve probably made at least ten versions of my Lacey Thong for myself, but, umm, I wear those, and it’s pretty creepy and gross to be showing other people your worn underwear, even if it’s clean, eww. So that’s why I needed to sew up a fresh sample pair to show off in the class, so I selected this thin, blue burnout jersey and some white lace and paired it with navy blue satin-edged elastic.

Isn’t she pretty? I also received a comment today from a Frenchman who made this utterly gorgeous satin & lace pair for his woman. So it doesn’t have to be a one-way lingerie sewing street – you could book your man on the course as a “surprise” and let him sew a pair for you! Ha!

I got to a point early on Sunday where I’d finished all the work sewing I wanted to accomplish, so I pulled out the Named “Jamie Jeans” pattern (now with US Letter-compatible printing and multi-sized, btw). I’ve been eyeing up this pattern since it was released, but it took it disappearing when the new collection was released to make me realise how much I wanted to sew it! Since a-l-l of my clothes are falling off me right now (thanks, running!) I am in serious need of trousers and even my leggings are baggy, so these were the top of my Fun Sewing list.

PB Jam Leggings – invisible pocket tutorial

One of the favourite features of my PB Jam Leggings pattern is that there’s a secure, inner pocket at the upper back to keep things like your phone, keys, or gels handy while you’re working out. While I was developing the pattern, I decided to make this pocket one layer, and use the exterior of the leggings as the other side of the pocket, sealing off the bottom with topstitching.

But sometimes you may not want any topstitching visible from the right side, so to do this, you only need one extra piece of fabric and a few short steps. Making the pocket invisible from the outside will only add about 5 minutes max onto your construction time, but if your fabric is thick, definitely consider cutting your pocket from a thinner lycra!

Here’s the finished invisible pocket on my latest “rainbow sherbert” pair I’ve just finished!

Before you start…

When you’re cutting out your fabric, cut two pocket pieces instead of just one.

Step One


Fold down the shorter, curved edge of one of the pocket pieces and topstitch with a twin needle or coverstitch (or, alternatively, finish with narrow elastic or FOE)

Step Two


With right sides together, stitch the longer, curved edge of the two pocket pieces, and flip right side out (note: if you’re zigzagging this seam, you’ll want to trim the seam allowance and/or clip the curves to get a smooth seam)

Winnie's Junglicious X-back Workout Top

I’ve got a bit of a backlogue of fabulous pattern makes to show you, but I had to drop everything to purr over Winnie’s workout top! She’s managed to combine both Jungle January and the X-back version of my XYT Workout Top pattern in a single, glorious, specimen of exercisability.

But lo! the jungle print and secret crazy bra lining weren’t enough, because Winnie also finished the edges with FOE (fold over elastic) for yet even more colour! Pow! Take that, grey, drizzly January!

I’m even more proud of how awesome Winnie’s top turned out because she had difficulties in sewing the pattern early on in the testing process before I had the illustrated instructions, so for her to be able to come back to the finished version and sew this one up lickity-split makes me really pleased! Usually when I have problems with a pattern I get frustrated and want to dump it, but not Winnie!

Read more about her versions over on her site, Scruffy Badger Time

Diary of an indie patternmaker, part two

Read Part One here!

While I was in the States visiting family, I also took the brave step of contacting a few other activewear-sewing ladies and asking them if they’d be interested in pattern testing for me. I knew that I wanted to keep the testing pool small, but also use sewists who I knew had sewn their own exercise gear before, both so that they were comfortable with the basic techniques, knew what they liked, and also could potentially go out an exercise in my patterns for some useful on-the-road feedback. I was utterly delighted when every single one of them said yes, and this really started the timeline towards Launch Day, which I knew I wanted to be before the usual New Years resolutions exercise explosion. Since I started the XYT Workout Top first and it was further ahead in the patternmaking process, I’d give the testers two weeks to test that, a short break, then hopefully I’d be finished with the PB Jam Leggings by that point so they could have two weeks to test that before I’d get their feedback and finish up everything for Launch Day.

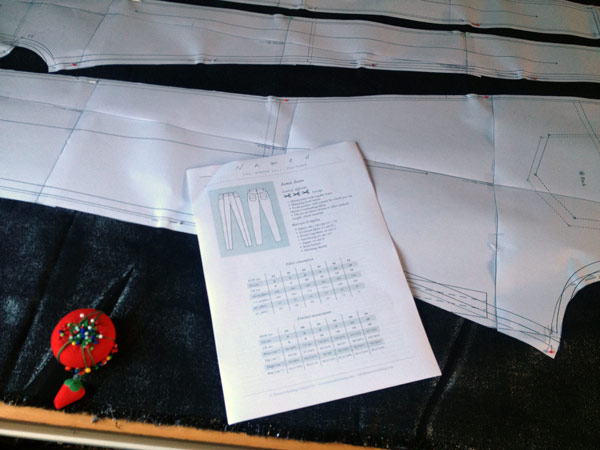
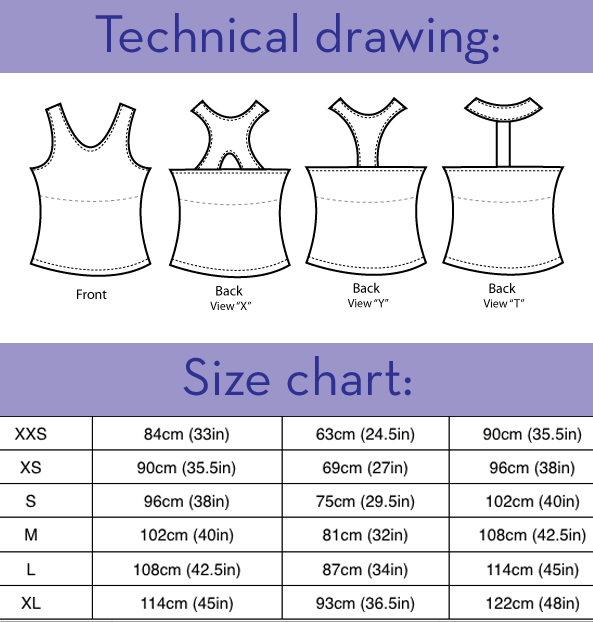
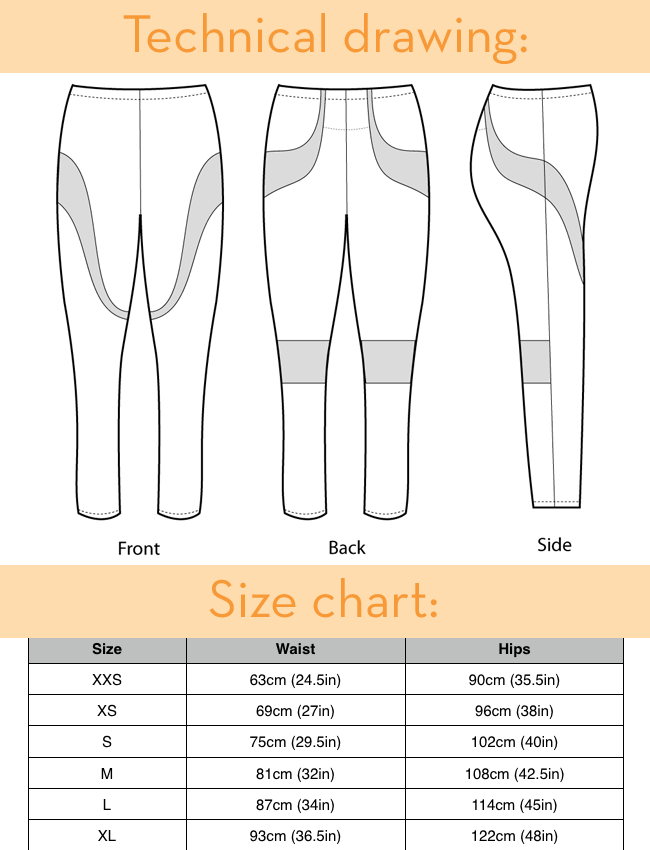
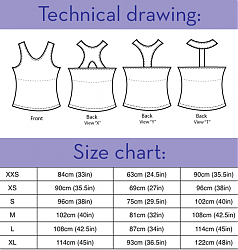
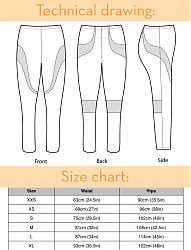
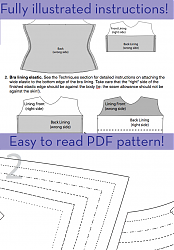
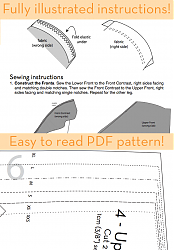
The XYT Workout Top pattern pieces were pretty much ready for testing, but I knew I’d have to create the tech drawings as well as all the illustrated instructions at some point, and, while I used to be a semi-decent drawer, I am totally crap at drawing anything digitally. Like, comically crap. So my first attempts at the tech drawing were done by my sketching them out on paper, scanning it in, then tracing over top with (yes, you guessed it) The Pen Tool in Illustrator before cleaning it all up, mirroring to make things symmetrical, etc.

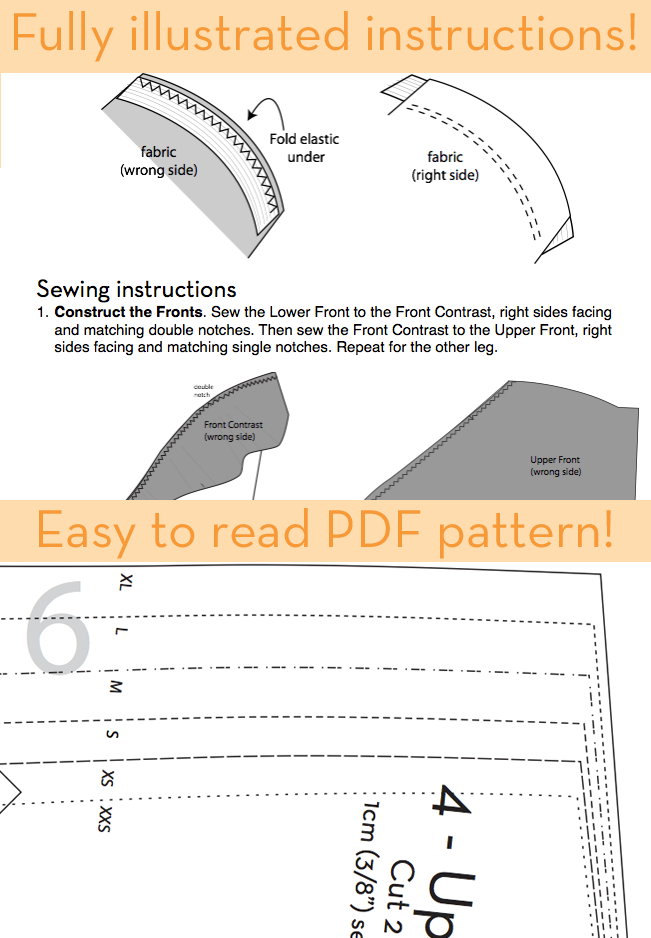
The instruction illustrations were all done by myself, too, but I did all of those without the hand-sketching step, sometimes using the pattern pieces themselves as a starting point (since I already had those digitally, I just had to shrink down the scale!), and sometimes just referring to photos I’d taken during construction. I never quite appreciated exactly how long illustrated instructions take to create, but my god, they took a LONG TIME. The step-by-step illustrations were easily the most time consuming piece of the entire patternmaking process, EASILY. I totally understand now why some indie designers skip the illustrations entirely, because it would be SO tempting to, and it’d make the process to Launch Day so much quicker. But in the end, I’m glad I did do them, as I think they make the instructions a lot clearer, especially for non-native English speakers.

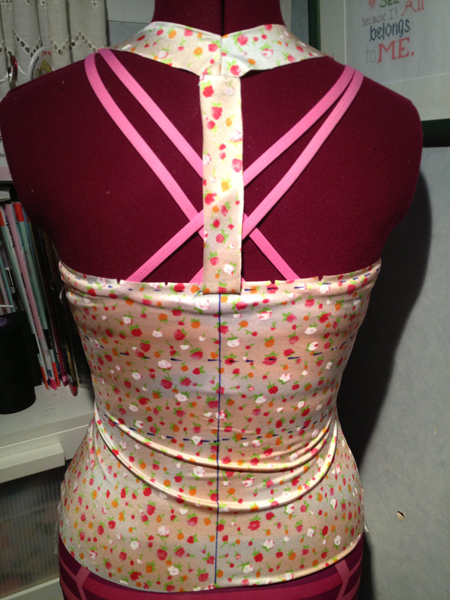
Another thing I wasn’t really expecting was how the pattern testing process would really work. I guess I kinda thought that I’d send them out, some testers would have some fit issues, others might not think the mesh bra worked for them, I’d get some feedback, and maybe catch a typo or two. Ha! I’m so, so glad I have the amazing pattern testers I did, because both of my patterns needed major revisions thanks to my testers. Yes, it hurts at the time, but I’d much, much rather resolve these issues before release than have paying customers go through them later!

Diary of an indie patternmaker, part one

Quite a few of you were interested in hearing about the process of launching my own line of exercise sewing patterns, and since I tried to keep everything very quiet until the launch day, I couldn’t really talk about the process at the time, either (I decided to keep it quiet to minimise the “Are they ready yet? Are they ready yet? How about now??”, etc pressure when people get excited!).

I’ve been thinking about the possibility of making some of my own patterns for a while now, testing the waters last year with my Lacey Thong pattern, of course, but a full time job, marathon training, boat work, and busy social schedule mean that it always seemed to be on the back burner and never at the top of my To Do List. But I was made redundant from my tech job in August (really, it’s ok!) so I had time to think about what I wanted to do while we were in Mexico, and I realised that I wanted to give sewing a shot as my main career, with patternmaking as a large part of that.

I had lots of ideas in my head (and in my sketchbook!) but I opted to specialise in exercisewear because that was something I a) was passionate about, b) had lots of practice sewing and designing for myself, and c) there wasn’t much on the market for already. I knew I wanted to release at least two patterns at the launch, but I developed these sequentially, starting with the XYT Workout Top.

The first step in the XYT development was to draft my own sloper and make a series of muslins for the different versions, chopping and redrafting the basic shapes until I was happy. Then I made a muslin which had a bra the same basic shape as the exterior with one layer of power mesh, but I found that even though I took the side seams in closer and closer, I still didn’t have the support I needed for running. It was only after talking to a friend that I was able to make the leap to the arrangement of the second mesh layer that made all the difference and stopped the bouncing! I then finished off this muslin version, wore it for a few runs, and only then did I start the process of transferring my hand-drafted pattern pieces into digital.

I started by scanning in the paper pieces and re-joining them digitally in Photoshop, and then came the laborious and tedious process of tracing around all the pieces with the Pen Tool (ie: vector paths) in Illustrator. I’ve used Photoshop for 10+ years, but I was a complete Illustrator novice when I started this patternmaking, and my god there’s a steep learning curve!

Londoners – Come sew with me! Panty Party 13th Feb!

Remember around this time last year when I released my free Lacey Thong pattern and had that big Lingerie Sewing Week extravaganza?! Well, in the intervening year I’ve of course sewed way more lingerie and released more patterns, but I still love my little ‘Thongs and wear mine all the time, so I thought I’d share the love and have a full-on PANTY PARTY!

It’s in the evening of Thursday 13 February, so you can de-stress after a long day at work by playing with frilly lace…

That’s right – come and sew with me and we’ll make Lacey Thongs til we run out of free tea and biscuits and/or start wearing panties on our heads. I’ll cover all the basics of lace placement, attaching lingerie elastic, that cool “burrito method” of enclosing the crotch seams, and you’ll get to go home with some saucy little panties just in time for Valentine’s Day. Or a Me Party, whatever floats your boat.

The panty party venue is at the Thrifty Stitcher’s studio up in Stoke Newington (a quick walk from Canonbury overground, or there’s plentiful buses), and all materials will be provided, including the aforementioned coffee, tea, and bickies.

Dawn's Psychedelic Rainbow PB Jam Leggings

When was the last time you actually LOLed at a sewing blog? Because I just did, twice, reading Dawn’s (aka “cabinbaby”) post about her PB Jam Leggings. Seriously! She totally nails the self-defeating runner inner dialogue there, too…

You all know I’m partial to super loud patterns and bright colours when I make my own leggings, but look – I have a fellow kindred spirit! Rainbow colours and psychedlic swirls weren’t enough for Dawn, no, no – she even used rainbow variegated thread, people! I totally applaud the use of the gymnastic poses in showing off all the finer points of the leggings, too.

One thing Dawn talks about in her post is using your serger/overlocker to make a mock-flatlock stitch, like you see on a lot of RTW sportswear. I haven’t found the regular overlocked seams to be a chafing problem for me, but I know a lot of people are more sensitive to it, and you can do your own flatlock stitching at home with just a few tension adjustments…

Read more about her versions over on her site, Two On, Two Off?