Blog

Navy blue Pattern Magic "Jutting Edge" dress

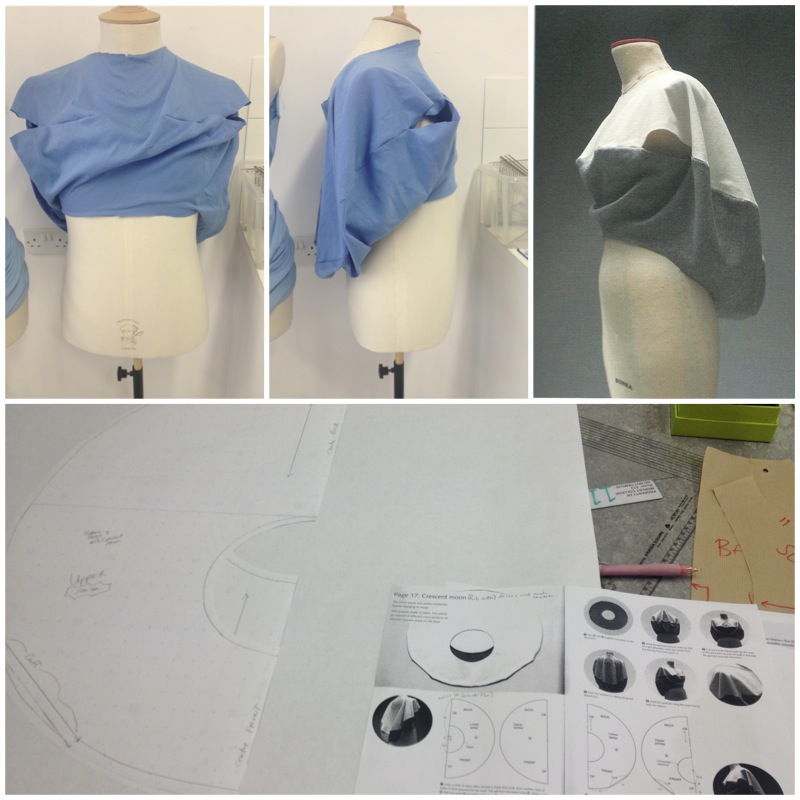
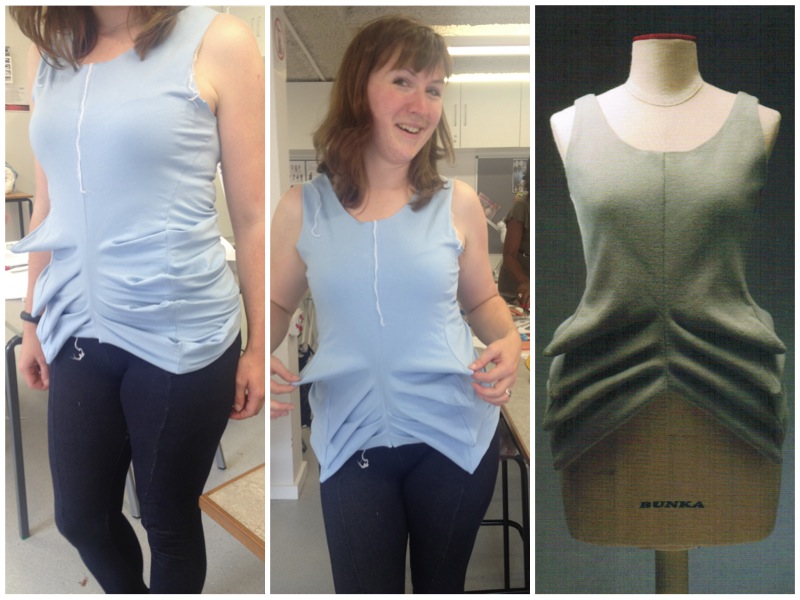
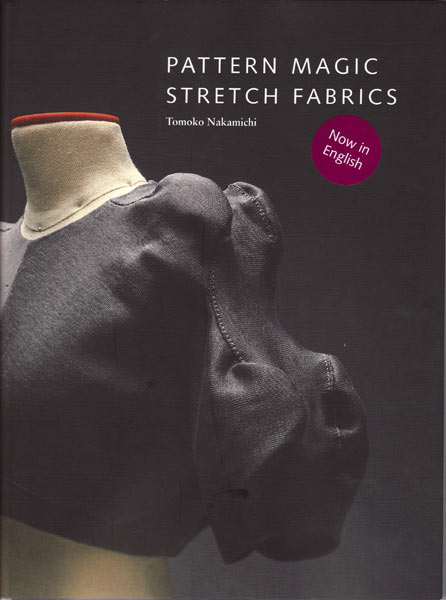
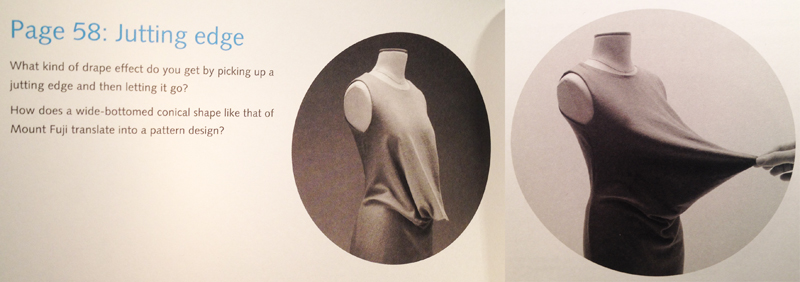
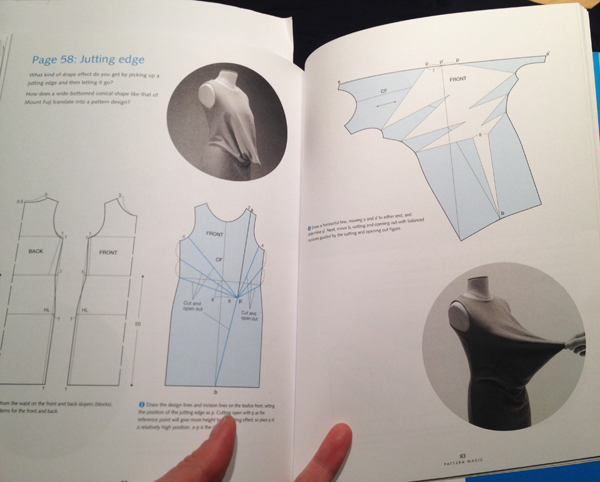
I drafted a few patterns over the summer on the Morley College course based on the Pattern Magic: Stretch Fabrics book, this design included. To be perfectly honest, the photos in the book do absolutely nothing for me, so I flipped right past it when reading it on my own:

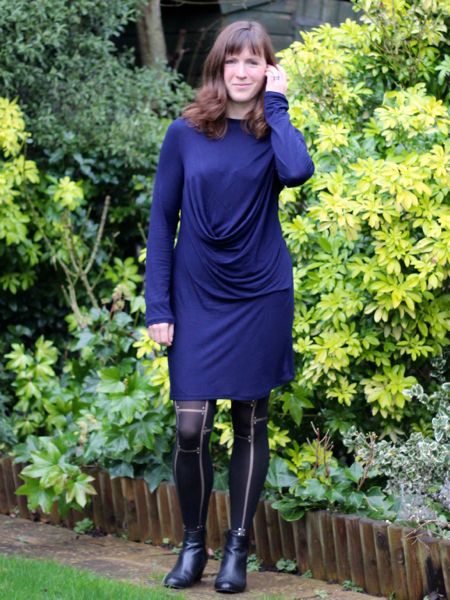
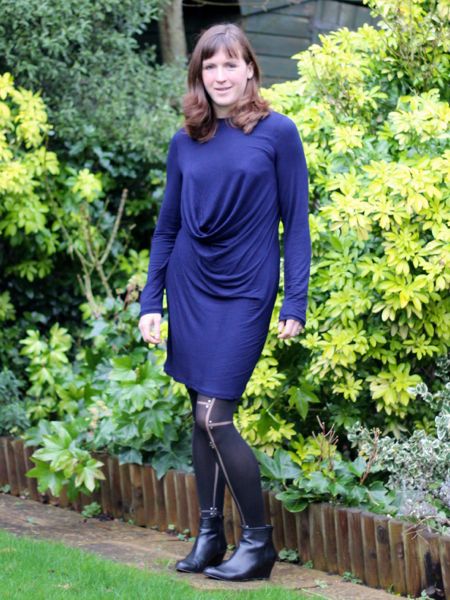
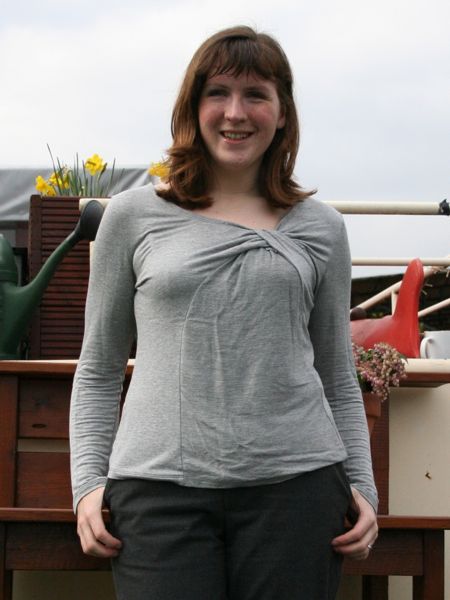
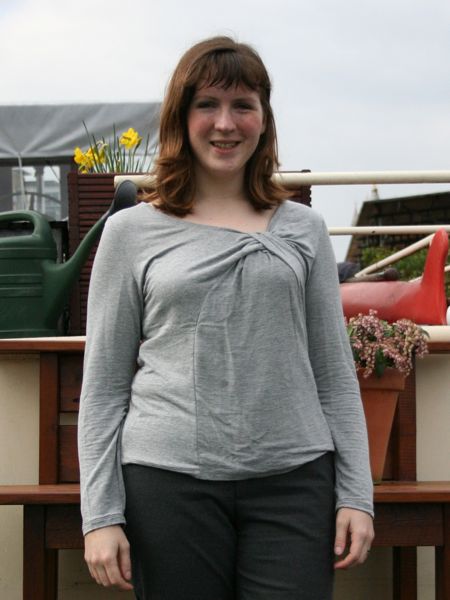
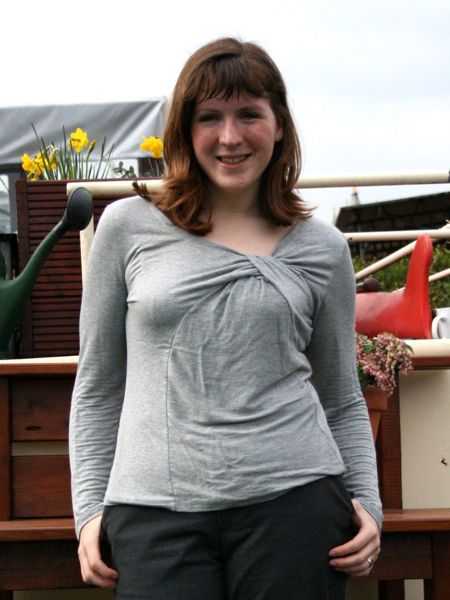
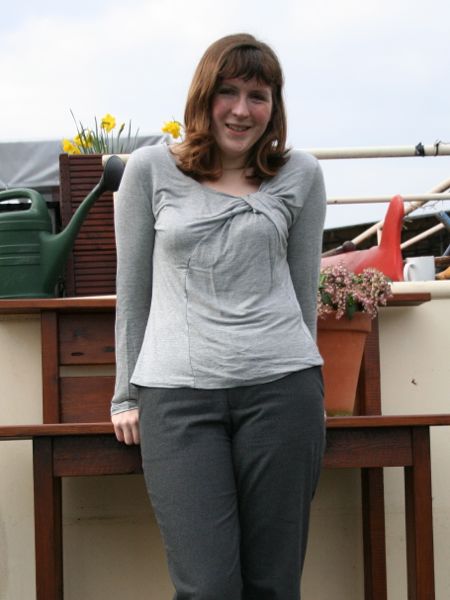
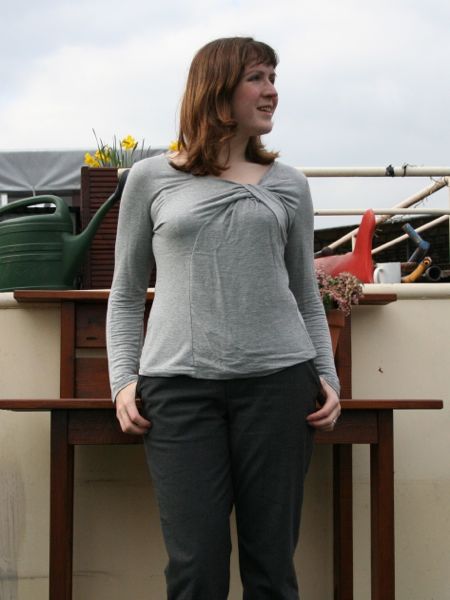
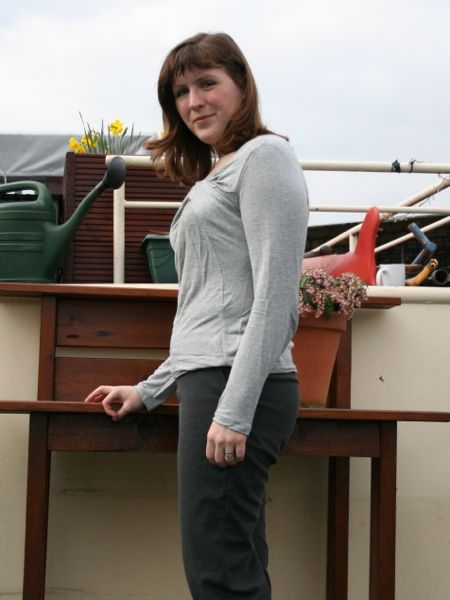
But the instructor, Moni, saw its potential, and thought that it might be nice in a softer jersey. She was totally right! The sample that was made on the course in similar, lightweight jersey had a chic cowl effect, but without a low neck like you normally get to achieve a cowl.

So I’d been meaning to make this all year, but finally unearthed my pattern pieces on Christmas Eve day, when I fancied sewing something quick that wasn’t workout gear for a change!

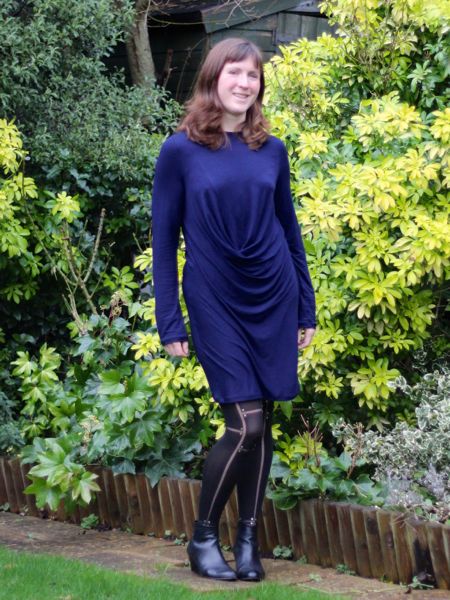
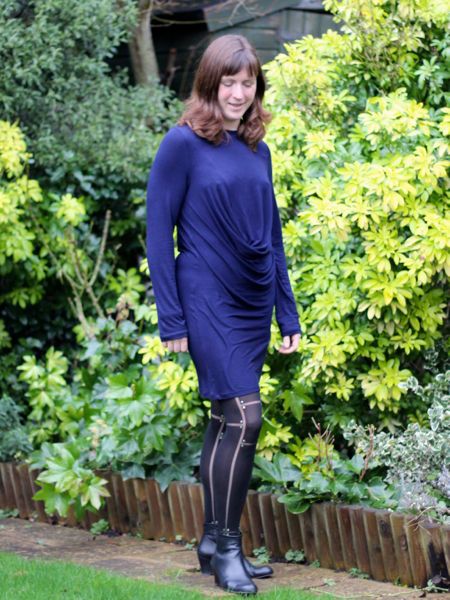
The pattern here is essentially just a long teeshirt dress, but with an added very wide (180 degrees!) dart that runs from shoulder to abdomen. It means that it’s a bit of a pain to draft, but extremely quick and easy to sew. On the course, I’d thought ahead and brought my own knit sloper so not only did I draft this to my body (at the time, anyway), but I also kept the armscye unchanged here so I could easily add sleeves!

The Swirl Sheath Dress

This dress has been an awfully long time in the making. The idea started back when I took the Pattern Magic 2 class at Morley College last winter, where we learned a technique called “Fundamentals: Create three-dimensional forms with design lines only” (it just rolls off the tongue, eh?).

Essentially what this means is you sew up a muslin, draw design lines all over it, cut along these lines, then introduce snips of ease until the pieces lie flat, and there’s your new pattern! I did all this (based on a sheath dress from the June 2012 Burda magazine, which doesn’t appear to be on the US BurdaStyle, sorry) last summer, but then the project stalled when I couldn’t find any heavyweight stretch satin anywhere in Europe, and had to import this gorgeous salmon stretch duchesse from Gorgeous Fabrics.

Then there were further delays as I didn’t have a wide enough cutting table to lay out the asymmetric and strangely-shaped pieces, until a few weeks ago when the Thrifty Stitcher invited me to pow-wow at her studio and suddenly my swirl sheath dress was back on track!

Because all the darts from the original pattern (bar one) are now incorporated into a bunch of curved seams, this means there’s a lot of easing going on, so if you don’t like easing princess seams, for example, you really won’t like sewing this. My easing motto is “pin the crap out of it”, and I’m proud to say that I didn’t have any tucks or unpicking in any of these seams. Though I did use 58 pins on just the lower semi-circular seam!

A Big Weekend for Sewing

I had an uncharacteristic free weekend – no races and not much planned, so I ended up getting lots of sewing bits done!

Sewing room clear-out

I’ve only got a small (temporary) sewing cave, and I’m a very tidy, organised person, but I’d let it get a little messy and it was feeling crowded, so after my two hour hill run on Saturday morning, I came back and had a bit of a clear out. I filled a full black bag with rubbish, but here’s what I pulled aside to swap at the Goldhawk Road meetup on Saturday!

Yes, you could be a good home to some pattern, pattern magazines, books, craft kits, or fabric that once lived on board! Now, if I can manage to be good and not fill up the space with things I pick up in the swap or fabric stores…

Skylight cover

Remember the last time I made a skylight cover (strangely, I see last time I was sewing jeans alongside it, too!)? I’d only ever made them for the back cabin, where the skylights are peaked, with windows that open like wings, but on the front deck, the skylights are flat and require grills that fit overtop for safety and security.

We had a joiner make a gorgeous new cover for the skylight over our bedroom, but it’s been shamefully covered in tarpaulins for the last few months while I procrastinated swearing my way through sewing another.

Even with a walking foot, the clear plastic is a total P-I-T-A to sew because it sticks to the machine bed, the foot, is stiff and rams into everything, and is generally just awful.

This time around, I got so sick of the stickiness that I grabbed a “newspaper” (tabloid left from our joiner) and ripped off pieces to go underneath and also under the presser foot.

This surprisingly worked rather well, and the newspaper just rips out easily afterwards. Worth remembering if a) you don’t mind newsprint on your fabrics, and b) like me, you never have tissue paper lying around

It’s not my best work, but it’s done and will allow more light into our new bedroom!

Jeans muslin

If you recall, I decided on a Burda pattern for my non-stretch denim so I sewed up a quick muslin of that on Saturday after my skylight triumph.

The triumph was short-lived.

Attention Londoners: Morley College new course list

Ooh it’s my favourite time of year! No, not new pattern announcement time, but new Morley College course details!

You can see all the fashion/sewing courses here and some of you may also be interested by the textiles courses, which include things like crochet, knitting, quilting, dyeing, and fabric manipulation.

They do the usual basic courses on using a sewing machine, drafting basic blocks, basic draping on the stand, etc, that loads of colleges offer, but they also offer some really interesting niche classes that don’t seem to be offered anywhere else.

Looking at the full lists above, there’s everything from historical wear to hats to shoes to lingerie to dancewear! Most courses only cost around £60, too, which is really reasonably priced, especially when you consider that most of the fashion courses in London start at £300! The facilities at Morley are great, too, with big tables, plenty of light, and ample Bernina machines and dummies, and there’s some seriously good pubs for lunch nearby…

You can read my review of the Pattern Magic 2 course here or my recent review of the Pattern Magic Stretch Fabrics course here.

Ones that pique my interest:

Pattern Magic Stretch Fabrics course at Morley College

Some of you may remember that last year I took a course at Morley College on Pattern Magic 2 (my first actual sewing class, believe it or not!) and it was so interesting, useful, and inspiring that I just had to take the course on the third book, Pattern Magic Stretch Fabrics. I booked this something like 9 months in advance, I was that excited to take it!

The first two books are based on woven slopers, but since this third one is all for knits, I used my own knit sloper instead of the book’s – I’m rather proud of this bit of forward-thinking! I also got to show off my pattern drafting gadgets plus it was great to see so many familiar faces and meet new ones, too (hi Clover & Ingrid!!). For the second class though, Claire had taken the initiative to digitally grade up the book’s blocks to larger, more standard Western sizes! She says she’s going to share these on her site very soon, so keep an eye over there if you want a short-cut to a bigger knit block.

Over the course of two consecutive Saturdays, we drafted three designs from the book (chosen by our amazing tutor, Moni), and a fourth of our choice, plus a bit of time at the end to sew up a sample so we got to see the range in real life.

Here you can see me & Claire from the first Saturday! (I’m totally brown-nosing by wearing a design from the second Pattern Magic book!)

The first design we all drafted was “Crescent Moon“, essentially a giant donut that you wear. It’s so avant-garde that it doesn’t even use a knit sloper, just circles!

This did look a bit better once we got out a smaller, female mannequin, but it’s still not something I’m finding particularly wearable.

The second design we all drafted was “Sharp & Snappy“, which I dubbed “the stegosaurus”. The gist here is that you shift the side seams forward and add triangular points in the seam line.

Run dem Crew Refashions – Ladies first…

This is probably the longest-running project I’ve done since my epic wedding gown refashion, but I’m really proud of the results and the fact that I can finally show them off after much hinting and whispering round these parts. This would’ve never happened at all without the spark from Charlie, the founder of Run dem Crew (the Tuesday night running family that has utterly transformed my life in the past year I’ve been a member). When he found out I sewed, he raised the idea of a refashioning project, then proceeded to gather together all the pieces to make it happen.

The idea was simple – start with 19 pieces of running clothing – some used, some promotional, and some brand new with tags on (including some ££££ Gyakusou designer gear!), and refashion them.

I started this project back in April, but stalled during the 5 weeks our boat was in drydock and I was without access to my overlocker and sewing room. Happily, I got some fantastic help with ideas from fellow RDC runner Jennie, who’s worked for years as a product designer for a well-known clothing company, and came over to sift through the clothes and it really helped for me to bounce ideas off her and vice-versa.

So her reward was some enforced modelling when the project was finished! Ha!

From the initial bag of clothes, I made 8 garments – tops and bottoms for two ladies and two men. I’ve been promised some modelled shots of the men’s clothing coming up soon, but here are the two ladies’ outfits, modelled by Jennie and I….

I had the fore-thought to take images of all the Before clothing, so I was able to do a nice collage like this, showing you what the various pieces turned into:

Pattern Magic – Apple Peel leggings

I gave you a sneak peek of these yesterday, but I doubt any of you were looking at the leggings!! You’re forgiven, though!

This design is from the third Pattern Magic book, and was super easy for me because I didn’t have to draft anything! I already had a great legging pattern to start with, from an old KnipMode magazine I’ve made a few times before. Note that you need a legging pattern with a separate front and back pieces, so the two recent Burda magazine leggings (in the June and January 2012 issues if I remember correctly) won’t work as a starting point. Or you can just draft one from scratch as the book suggests.

All the work here is in the measuring, slicing, and spreading of the pattern pieces – I very cleverly wrote the size of the spread between each of the pieces, so when it came time to do the other pattern piece, I could easily make it the same amount so everything matched up.

I’m leaning, like the book’s pose!

Sewing book review: Pattern Magic 3 – now in English!

I don’t buy sewing books very often these days, usually preferring to get my information and inspiration from the internet and sewing pattern magazines, but I’ve found so much inspiration from the Japanese design schools lately that I just can’t say no when these are translated into English.

If you recall, I reviewed the first two Pattern Magic books here, and then, just recently the first Drape Drape book was also released in English (with the second coming out later this year).

Drape Drape uses included patterns which you trace off and sew, but the Pattern Magic books all rely on instructions for altering your existing sloper, so they can work for pretty much any size or shape person.

The big difference in this third book is that all the patterns here are designed for stretch fabrics, which adds a whole new level of fun! But of course, this doesn’t mean you can’t use stretch fabrics for the designs in the first two books – I’ve already made the flip-turned top twice as teeshirts, though I did have a great boost in understanding the Pattern Magic instructions on the Morley College “Pattern Magic” course I took earlier this year (I’m eagerly awaiting the new course guide so I can sign up for the rumoured class on this new book next year!).

So enough intro, let’s have a look at some of the wonderful (and weird!) designs in this instalment!

Peach flip-turned top and slim brown trousers

In addition to my exercise gear you saw yesterday, I actually made another top and trousers the weekend I got back from Montreal! Since I wasn’t in a fit state for a photoshoot until now, I kinda feel like I’m clearing out the cobwebs here…

This top is another “Flip turned for a draped effect” top from Pattern Magic 2 (drafted on my Morley College course!), this time using the tulip sleeves from Jalie 2806 for a more Spring/Summer look. This is the third time I’ve used these tulip sleeves and I really love the look and love wearing them – they really make a top much more special than just your average short sleeve! I used a lovely orange marl viscose jersey from Tia Knight here that’s just sooooo soft and lovely to wear! Hurrah for an impulse purchase!

The trousers are from the March Burda magazine (#126), using some stretch cotton sateen I bought at Tissues Dreyfus in Paris last month. It looked black in the dark lighting of the shop, but I got it home to realise it’s actually dark brown, which was fairly annoying, as I wouldn’t have bought 3m of brown had I known!

Grey Pattern Magic "Flip Turn" top

Ever since I first opened the Pattern Magic books, a few designs have been burning a hole in my sewing brain. One of these was the “Flip Turn for a Draped Effect” bodice from Pattern Magic 2, and I was so happy that I was able to draft this on my Morley College Pattern Magic 2 course last month! It wasn’t too bad to figure out, but I’m still really pleased to have the instructor there and because I muddled through (albeit with help), I feel much more confident about tackling other designs in the books.

The only problem was that we drafted all the course designs based on the largest Bunka sloper, which was still rather a lot smaller than me, so if I wanted to actually wear the designs from the course, I’d have to create them again off my own sloper, which just seemed a bit dull.

Or maybe… just maybe… I wonder if the Bunka sloper version would fit if I eliminated the back waist darts and made it in a knit?

OMG a toile for a fashion college dressform fits me!! :O 😀

Since this was a total fit experiment, I wanted to try this first in a low-risk fabric, and I had just enough of this viscose grey marl jersey leftover in my stash from the Manequim “big shirt”.

One interesting part of this design is that the reverse of the fabric is shown on a large portion of the lower front, and in this fabric, the reverse is kinda textured and loopy, but without any major colour change from the “correct” side. It means you get a subtle texture change on that panel, but without screaming “hey! I’m the wrong side!”.

To further play up the texture change and to make it look more intentional, I used the wrong side of the fabric on the neck band, too (maybe I’ll do the sleeves on the wrong side next time, too?)