I’ve gotten as far as I can on my secret other project while I wait for supplies (mostly new labels – can you believe I’ve sewn through the last lot of 120-odd Fehr Trade labels in the past two years??), so I cut out my muslin pieces for my birthday dress. If you’ve got a good memory, it’s this luuuurrrrrvely draped number from the Feb 2010 La Mia Boutique magazine, #6:


What I normally do for foreign language patterns (La Mia Boutique is in Italian) is look at the pieces and get a brief order of construction in my head. Usually I work from the top down, starting with assembling the front bodice pieces then join to the back at the shoulders, then finish the neckline, then if it’s a knit, attach the sleeves at the armscye and sew up the side seams, or if it’s a woven, do the side seams first them attach the sleeve in the round. After sewing for a while, you begin to see that most pattern instructions have you sew things in roughly the same order, so you can just do those here to suit this particular pattern.
But for more complicated patterns like this one, I like to sit down with a pen and paper and mentally go through the whole process, visualising how the different pieces interact and the pros and cons of doing which seams in which order (like “if I do this first, is it going to make it awkward to serge that?”). It’s a great mental exercise in spatial thinking, and one of the most pleasurable aspects of sewing for me.
And it means I don’t have to type in every single word of the foreign instructions and figure out what the translator’s trying to tell me (sewing terms are not the best translated! )!
So since I was writing these out anyway, I thought my order of construction might help others who were eyeing up this pattern.
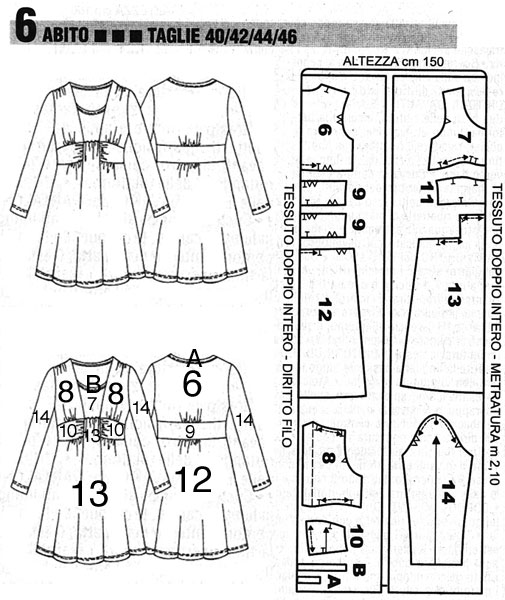
Construction order
- Gather everything as marked between the “T” notches.
- Apply vilene bias tape to: a) back shoulders, b) back neckline, and c) front neckline (#7) to prevent stretching (you could cut your own lightweight interfacing strips or staystitch or use clear elastic here instead)
- Finish the neck edges of #6 and #7 with the rectangular strips A and B, respectively (I’d personally overlock them right sides facing, flip to the inside, and coverstitch down).
- Stitch the shoulder seam “burrito style”, making sure the opening edge of #8 is folded inwards (see explanation below!).
- Attach sleeve at the armscye, treating the two fronts as one.
- Stitch the sleeve and side seams of the bodice in one go.
- Sew the short edges of waistband pieces together. Inner waistband (#9 and #11) will form a circle, but the outer waistband (#9 and #10) will form a C. (Pay close attention to which way up piece #9 goes! Ask me how I know…)
- Attach the short edges of #10 to the ungathered short edge of #13 (skirt front).
- Attach the upper edge of the waistbands (inner and outer and small bit of front skirt) to the lower edge of the bodice, aligning side seams and notches and sewing “burrito style”
- Sew the skirt side seams.
- (Optional) Sew a short length of clear elastic to the central portion of piece #11 to stabilise it underneath the skirt drape.
- Attach the lower edge of the waistband to the top edge of the skirt, treating inner and outer waistband pieces as one.
- Coverstitch or twin needle sew the sleeve hem and skirt hem.
So when I say “burrito style” what the heck do I mean? I’m referring to a technique often used in panty construction to conceal the seam edges around the crotch area, but I’m using it here to conceal seam edges in the bodice to make a nicer finish (I do this on my favourite Simplicity cowl top, too).
To make a burrito seam on the shoulders, for example, pin together the RS of the outer upper front (#8) to the RS of the upper back (#6) as you would normally. Then stack the shoulder edge of the WS of the inner upper front (#7) against the WS of the upper back (#6) and adjust your pins. You should have three layers together with the shoulder edge aligned. Sew the seam, then flip the inner upper front (#7) down so it’s against the outer upper front (#8), concealing the seam edges inside. Do the other shoulder in the same way, then treat the fronts as one when sewing the upper waist seam.
Notes:
- The waistband is double layered. In the back, piece #9 is over top of another #9. In the front, #10 is over top of #11
- The inner waistbands (#11 and a #9) are not gathered at all.
- It’s easy to get clean seams without using a lining except on the lower waist seam, side seams, sleeve seams, and armscye. Maybe you can get these clean, too, but my brain is just not seeing it right now, and I’m okay with that!
- The front bodice and waistbands are already “self lined” since there’s double layers there so if you would want to line this, you’d only need to cut pieces #6 (bodice back), #12 (skirt back), and #13 (skirt front) in a lining fabric. And the sleeves, if you’re that way inclined, but I think lining sleeves is kinda weird if it’s not a jacket or coat.
- The sleeve pattern here looks very similar to the LMB turtleneck I made – super long arms and a high sleeve cap. In addition, they want you to ease in a bunch of the sleeve cap which just seems stupid on a knit, so I’ll be shaving that cap down and folding out some length I imagine.
If you haven’t got this issue, have no fear – a French publisher has just optioned to translate every issue of La Mia Boutique into French, under the name “Ma Boutique” and if you’re quick, you can buy the single issue with this pattern in it here.
This dress is in the purple cover one that looks like this (only in French instead of Italian):

Note that this is NOT the same publisher who had been translating random issues of La Mia Boutique under the name “Idees Couture” in the past. We’re told this will be a monthly magazine, with the French edition one month behind the Italian, which is helpful if you happen to miss it the first time around!
I’m going to sew up my muslin of this dress over the next few evenings, so if I make any changes to my plan, I’ll edit it here, too. Hopefully this will be as useful to the other sewers as my instructions for that KnipMode gathered top!