Blog

Catching up…

A month on, and I’m still ravaged by the shingles attack that hit me in mid-January. Absolutely everyone who saw my torso said it was the worst case they’ve ever seen (doctors included), and lucky, lucky me, the little bugger caused nerve damage, which means the pain in my side could continue on for months or possibly a year (again, lucky, lucky me). I’m on four different prescription painkillers until the neural-specific one hopefully starts working soon, so I’ve been stuck at home Resting (I hate resting.). The good news is that the doctor says I can now go do the odd half day at work and very easy run here and there as it’s driving me crazy not to, but I’m not to overdo things. But even that’s better than being chained to a couch!

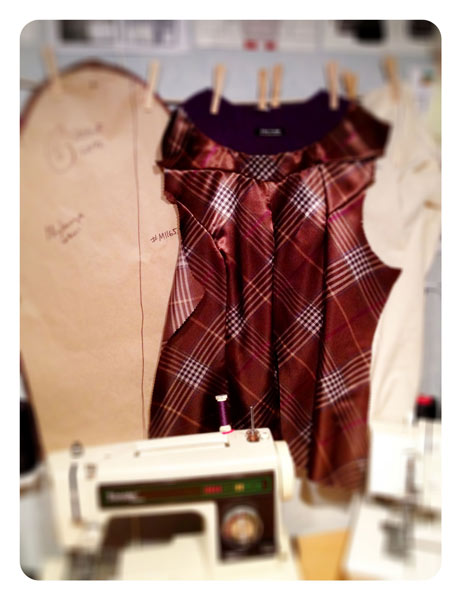
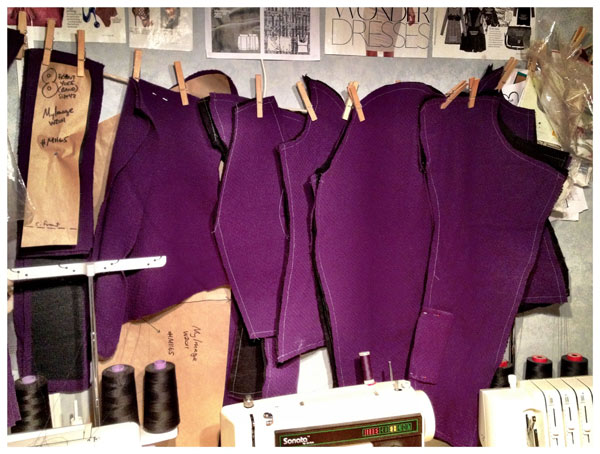
Anyway, I’ve done as much resting as it’s humanly possible for Melissa to do, which means I’ve been lying flat on my back and sleeping for most of the days, but I managed to squeeze in some sewing, almost entirely in 5 minute segments, followed by 20 minutes of rest. Rinse & repeat… These will have photoshoots and proper posts coming hopefully next week!

The amazingly simple-to-sew Style Arc Marita dress:

A grey wool “chic sweatshirt”:

A pair of pleated, My Image denim-look leggings:

A quick, gathered raglan merino wool sweater from the February BurdaStyle magazine:

Sewn Christmas gift – purple tween tunic

There was a massive sale on My Image and Young Image magazines a few months ago, and since I already own all the My Image issues, I thought I’d take the opportunity to buy all the Young Image ones for my niece Megan, who recently taken up sewing in a big way.

I figured it’d be inspiring for her to see at least one of the designs made up, so I thought I’d sew one for her before sending the magazines back to America.

My mom went through the stack when she was over in October and picked out some designs she thought Megan would like. Ultimately, I decided on Young Image FW12 Y1252 since I already had some perfect purple cotton jersey in my stash (you may also remember it from this skirt), which my mom also thought looked like her style.

Happily, most Young Image designs go up to tween sizes so I made her size 152 as the measurements matched hers almost exactly (she’s 5 feet tall already, how did this happen?!).

The gathering isn’t quite like in the tech drawing, though – the gathering on the pattern pieces is in one section in the centre front, rather than in two segments. I double-checked the pattern sheet to make sure I wasn’t just omitting a mark, and then also experimented to see if the gathering would work concentrated in two spots, but fell back on the one long stretch of gathering, which I think looks really good here.

Goings On

I know everyone goes through periods of extreme busy-ness and stress, but I feel like the past 6-8 weeks have just been nonstop with barely a pause to catch my breath! You’ll have to accept my apologies for not going into these various sewing happenings in full – I’m saving my writing time for my finished garments!

So, without further ado, a catchup on the last few weeks’ goings on…

1. The day after I arrived back from Amsterdam, my parents arrived for a visit! Among other things, they brought with them a big stash of Suziplex wicking lycra that Lakaribane bought for me by request while she was in Montreal recently! I think I’ve lost track of the number of international borders these 5 meters of fabric have crossed, but I am so happy to have more, because the three running leggings I’ve sewn with the stash I bought in March are my favourites ever.

2. I recently went on a bit of a Young Image magazines and envelope patterns binge, so I sat down with my mom while she was here and she picked out some designs she thought my niece might like for her Christmas present…

Fall/Winter 2012 Sewing Shortlist

A lot of sewers like to “Sew with a Plan” (SWAP), but I prefer to call this a “Shortlist” rather than a “Plan”, so I’m free to still change my mind and add/remove items as I go along! My main goal here isn’t so much to create a capsule wardrobe that can be worn together, but more to use up fabrics and/or that have been in my stash for a while that I’d really like to just wear.


(Click to enbiggen!)

From the top down, in no particular order:

  • KnipMode 12-2005 #10 – I’ve got some non-stretch denim aging in my stash from a few years ago, and I love KnipMode’s style lines for these. My wardrobe is in desperate need of more jeans, hence why there are two pairs in this Shortlist!
  • Altered Burda 06-2012 #129 – Now that my stretch satin from Gorgeous Fabrics is in hand, I can finally make the final version of this dress after completing the drafting and muslins back in July.

MyImage Fall/Winter 2012 & Giveaway

It’s the latest edition of the bi-annual, quadri-lingual My Image magazine! They’ve also got a new edition of Young Image magazine, too, but as I’ve not got many kids to sew for, I’m more interested in the women’s patterns.

It seems nuts that all the pattern companies and fashion magazines are into long sleeves and heavy coats already, but I suppose we’ll thank them when the weather cools down and we’ve got the perfect patterns already in hand!

This cardi is nice (but nothing particularly new), but I’m mostly into the trousers. I’m not fond of the ankle shirring detail, though, so I think I’d just leave that off for a nice straight leg instead. Maybe that makes me boring, but there’s enough interest in the top half for my liking!

Contained in this one image are my two favourites of this issue I think – the coat is just amazing and I love, love, LOVE these slim trousers!! They’ve got some fantastic seaming on the legs and have added pleats to give great texture there and really play up the extra panels. These are for stretch wovens with an elastic waistband, in case you’re wondering (like I was, eyeing up my fabrics before the issue arrived!).

The MyImage Purple coat

This coat originally appeared on my Fall 2011 sewing plans, so it feels good to finally finish it just as the weather’s starting to defrost (I hope anyway!). I’ve been wearing my muted turquoise coat for most of the winter, but I’m hoping to wear this to transition into Spring!

I’ve used “coat” in the title, but is it really a coat? Is it a jacket? Where’s the line drawn, anyway? It’s short like a jacket, but wool and warm like a coat, so I’m not quite sure what to call this.

This pattern appeared in the Winter 2011 MyImage magazine (along with that awesome cowl top!) and it’s still available to buy if you fancy it (and holy crap, it’s on sale right now for €1.95/US$2.63, too)!.

You can see some in-progress photos of this coat here and here. The nice thing about working on a project for a while is that you get to see a lot of the “guts” as I work! The downside, of course, is that I have the attention span of a gnat and I get bored when projects stretch over the fortnight mark…

The first thing you notice about this coat is that Big! Collar!! It’s a “whole lotta look”, but I totally dig it. Your mileage may vary! I’ve worn it out twice over the weekend already and the collar is great – it’s substational enough and close enough to the neck that I don’t need a scarf!

A bit of everything

Housekeeping time! I’ve got lots of little bits to update you on, either with my in-progress project, upcoming things, or small projects I managed to gloss over at the time…

So in no particular order:

My purple coat

Progress is slow on my purple jacket/coat from the Winter 2011 MyImage magazine, not because of anything to do with the coat, but because life keeps getting in the way. I’ve finished the shell and I’m onto the lining now, so I’ve just got to finish constructing the lining, attach the two together, flip, and sew the buttonholes.

I’d prefer to do the buttonholes on my vintage buttonholer attachment, but the templates I have aren’t big enough for my enormous (2.5 inch?) buttons. Anyone know a clean way around this? Can I set the buttonholer to do double-length holes somehow?

In any case, I should be able to finish this coat this weekend and (hopefully) get a photoshoot in. Not long now before I can do evenings photos again – it’s already light out when I go running before work!

Gift update

My go-to baby gift is to sew a changing mat, with a hand towel on one side, and nice fabric on the other with big, deep pockets and ties to fold it all up. I had two baby boys arrive in January, so both sets of parents got changing mats with this awesome Alexander Henry vintage robot fabric. 1 meter of it wasn’t quite enough to stretch to the pockets, too, so I filled in with some scrap denim.

MyImage Purple coat – in progress

Yesterday I mentioned that I’ve started sewing the asymmetric, collared coat from the Winter 2011 MyImage magazine, and after a prep period that felt like forever (probably exasperated by the fact that my ironing station is hovering around 0C/30F), I’ve now got some progress to show you!

I’m sewing this up in a wonderful purple basketweave/boucle coating, which was another gift from Claire (she’s so good to me!) at the end of last winter. I always like to underline my coats when I can to just add that little bit of extra warmth, but it made even more sense here as it will help to stabilise the coating fabric and prevent any bagging out that might otherwise occur with looser-weave fabrics. The alternative is to block-fuse the coating with a lightweight interfacing, like I did with my Patrones duffle coat.

For this coat, all the facings were interfaced (the usual front and back facings, plus the front and back hip band facings), and pretty much everything else was underlined in black cotton flannel. This meant there was a lot of prep – everything but like 3 pieces needed underlining or interfacing! I love sewing, but prepping is dull dull dull work!

I machine-basted the flannel underlining to the coat pieces here, because frankly, the prep work was tedious enough as it was. I normally hand baste my underlinings, but in this case, the coating and the flannel “grabbed” each other quite nicely, so this, plus the walking foot, plus a long basting stitch meant it felt okay to do it by machine. I still made sure to never turn any corners though (when basting underlinings, you always stitch to the edge, cut the threads, reposition, and stitch the adjacent side so that you don’t create puckers at the corner)!

My Image Spring/Summer 2012

Woo! It’s time again for another issue of the twice-yearly, quadra-lingual pattern magazine My Image!

This sheath dress is one of my favourites from this issue. It’s kinda hard to see the details with the print, but take a look at the tech drawing! I also really like this sleeveless cowl top which would be great in a lightweight viscose jersey, and there’s also a shorts pattern here if you wear them (I don’t!).

I also totally love this yellow cap sleeve sheath dress – check out those amazing scoop darts! (This pattern is also shown on the cover, fyi)

Here you can see a knit dresses from this issue, plus a great pair of trousers and jacket. I love the tech drawing for these trousers, but it’s really difficult to see the pocket details in any of the photos – in most cases the top is covered by a tunic top, and this pair are made up in such a wild print that it’s hard to see much…

How to finish a cowl neckline

As promised yesterday, here’s a really cool technique I used to sew the shoulder seams and get a clean finish at the neckline of my MyImage cowl tee (M1152 from the Fall/Winter 2011 issue) all in one go.

It’s a variation of “the burrito method”, and you can use it on any top where you’ve got a facing on one side, and a folded edge on the other. So it doesn’t have to be cowl necks, it’ll also work for surplice or wrap necklines with a self-facing, too!

This comes fairly early in the construction of your garment, but by this point you should have already sewn your facing (in this case, my back neck facing) to the body of the garment (the back here), right sides together. You should also stabilise your shoulder seams, either by using Vilene bias tape like I have, or with strips of knit interfacing or clear elastic – whatever your preferred method is!

In my example, I’ve got a back neck facing which is a separate piece, and a folded (ie: integrated) facing on the front.


Step 1. Pin the shoulder seams together from the shoulder edge to the back facing stitching line, right sides together. Keep the front facing and the back facing out flat (ie: don’t pin them!)