Blog

Mr and Mrs

Just a first glimpse for you all! We should get our professional photos through this week so there’ll be more to share then.

Thank you all SO much for your comments and emails! The day was utterly perfect, fantastic, amazing, and truly the happiest, most wonderful day ever. details to follow. So much you’ll be sick of hearing about it, honest.

Final wedding "in progress" update

This will be the last update you’ll get before the wedding on Saturday, so after this it’ll all be finished photos, which is rather exciting!

I almost winced trying on my gown for the final time on Monday night – I thought for certain there’d be some niggling problem I’d have to fix, but no, phew! Everything’s still good. My sister-in-law marked out a nice curve in the train, trimmed it to within an inch or so of the pins, and then I did the hem last night. As it turns out, I’ve still got a good two feet of train left, and the thumb loop is intact, so I’ll be able to easily lift it up for the dancefloor.

The original hem was just a narrow turned hem that’s stitched by machine, so I did the same thing on the new area to keep it consistent. First I folded the allowance over so the fold was at the marked hem line, and I machine stitched as close to the edge as I could get. I pressed this (with the indispensable silk organza press cloth!), then carefully trimmed away the allowance as close to the stitching as possible. I then folded over the hem again and stitched about 1/8” away from the edge, then gave it another good pressing.

But this wasn’t the only hem I sewed last night, no no! I also hemmed both bridesmaids dresses! My sister-in-law was a huge help here, too, by hand basting the hem of each dress very close to the cut edge of the fabric. So when it came time for me to send them through the coverstitch machine, not only did I have a nice line to follow, but the basting kept the silk jersey from twisting underneath like it loves to do.

Lavender confetti bags

We decided fairly early on that for our wedding confetti we were going to throw lavender buds instead of the traditional rice, birdseed, or tissue paper varieties (many of which are banned at venues these days anyway as they don’t break down readily enough). But I wasn’t quite sure how we’d portion these out to our guests until I saw this tutorial and free pdf label and got inspired to do something similar.

I ordered a ton of small glassine bags from this UK shop and we were planning on designing our own labels along the lines of the ones in the Mint Design link, but our laser printer decided to choose this point to run out of ink (after three years on the same cartridges, it’s still excellent value!) so we required a change of plans.

Stashed away in a drawer, I had a bag full of reproduction garden ephemera that my mom had bought be and thought I’d like, and I saw these old Amateur Gardening magazines, Woolworths flyers, bills of sale, and gardening catalogues as a perfect accompaniment to our vintage-inspired modern wedding. The reproductions vary in age from the 1910s to 1950s, and I just LOVE the way they look all mixed up!

DIY Wedding Fascinator – in progress

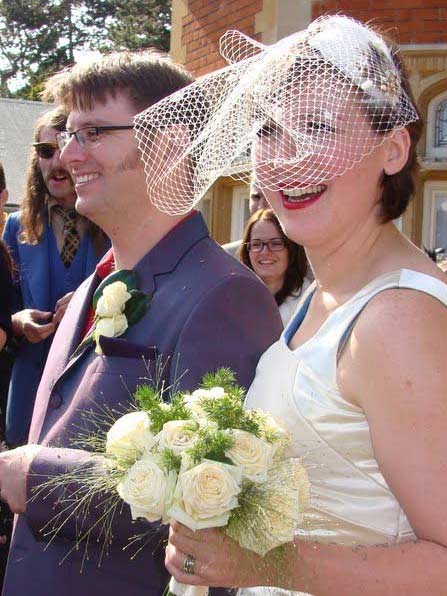
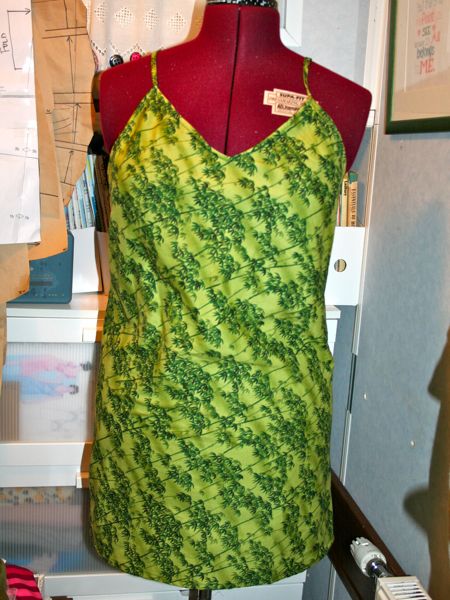
The Gown is progressing nicely, the shoes are bought and are being broken in little by little (while doing such glamorous tasks as watering the garden and taking out the rubbish!), so it’s now time to focus on my hair. In the past I’ve made fascinators (First in gold and then in silver) with a comb base that worked well for my long, thick, and straight hair, but post-chemo my hair is only two of those things so I’m using a headband for the base of this fascinator. In some strange twist of Life Imitating Art, my hair looks almost exactly like it does in the wonderful cartoon of us drawn by John Allison way back in March when I had barely any hair at all!

It appears that my “How to Make a Fascinator” tutorial vanished off BurdaStyle during one of their site moves, so I’m really glad I saved it as a Pdf a while ago so you can download it here now!

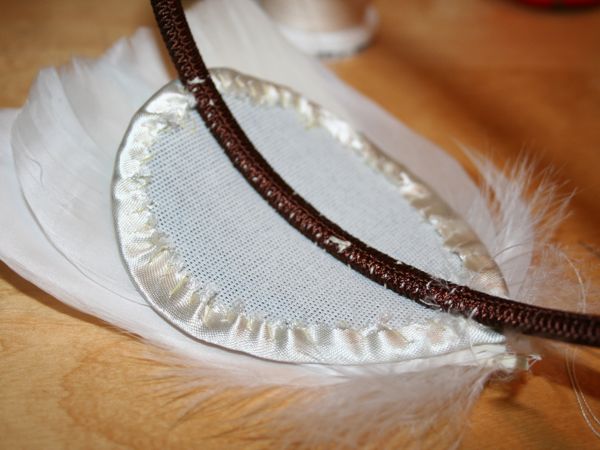
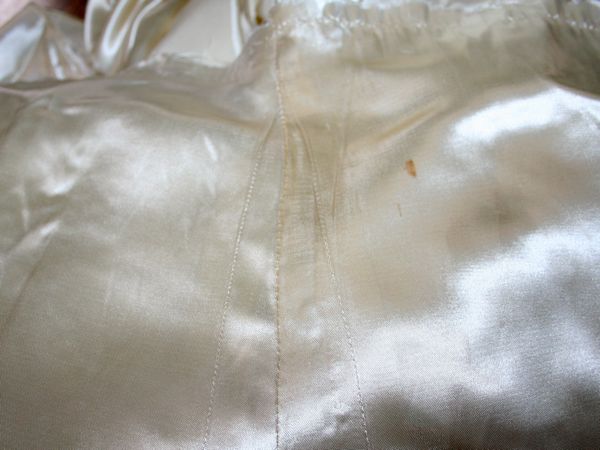
In the past my construction technique mostly centred around the glue gun, but for this one it just felt a bit wrong to do so when the rest of the ensemble is full of couture techniques. So for this base I used two teardrop shaped pieces of blue wool felt (the only colour I had on hand), with one of them stiffened with the ultra-rigid interfacing I used on my sun hat. I then covered this felt with a scrap of the vintage dress satin, stitched on the underside to prevent any puckers at the edges. You could omit this step if your felt matches the colour of whatever you’re covering it with, but the blue kept showing through the first few layers of feathers so I needed the satin layer.

I specifically chose a thin headband that had a fabric covering around it so I’d have something to anchor my stitches to, so keep this in mind while you’re shopping, as it’d be difficult to sew onto an all-plastic band (in which case you’re probably better off using glue). I then sewed the satin-covered base onto the headband, making sure my stitches went around the band each time for strength. Since the top was being covered in feathers, I didn’t bother to hide my stitches on the top side.

Once the decoration attachment is all complete, I’ll stitch the other blue felt piece to the underside of it all to hide the stitches (and band) and create a bit of grip on my hair.

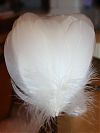
Here’s the fascinator with just the white goose feathers attached:

Sewing these onto the base was way easier than I was expecting. I just took 2 or 3 stitches over the central portion of the feather near the base, and that was enough to keep them secure. I’m leaving them unattached at the tips because as the headband stretches whilst worn, the feathers stay close to my head anyway.

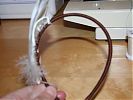
Here’s the underside so you can see my stitches and that super-stiff interfacing:

DIY Wedding Gown – Fitting

Pip came round last night for dinner, drinks, holiday food exchange (French cheese from me and Greek nougat from her!), and her final fitting on her bridesmaid dress.

If you cast your mind back to April and May, her gown is the long, purple, silk jersey Gant exclusive design gown from the Sept 2008 Burda magazine.

I’d completed the gowns back in May, but I left off the tiny covered buttons on the cummerbund and finishing the hem until closer to the day so that they wouldn’t have to worry about gaining or losing a few pounds, or deciding on different shoes before now!

Happily, Pip’s gown fits her perfectly, with minimal overlap at the cummerbund, and really her hem was just about perfect with her chosen heels. But then we realised that if she switched to her comfort flip-flops on the dancefloor, the hem would drag, so I’m going to pull up the hem by an inch.

Then Pip wanted to see me in my gown, and since I hadn’t tried it on since the skirt was attached, I felt it was a good idea. But even though I was capable of wrestling into the boned bodice before, it was proving impossible (and more than a little claustrophobic) with the attached skirt. It was apparent that I had to remove the brass bar at the top of the zipper to allow the top to fully open and give me extra room to squeeze into the gown. I’d thought I might have to, but I kept it in until now since it wasn’t a problem. So now I’ll just need to add one or more hook and eyes to the top of the zipper to keep it all in place.

Honeymoon lingerie – two more nightgown muslins

After my first muslin of a potential honeymoon nightgown knocked that pattern out of the running, I turned to the slip dress pattern (#219) from the May 2010 issue of Manequim magazine as my next candidate.

This is a simple bias dress with bust darts and bias edge on the neckline. The pattern calls for you to have two lengths of bias edging – the longer one finishes the neckline from the front bust peak, under the arms, around the back and up to the other bust peak. The shorter length of bias finishes the neckline in the centre front portion and continues up to form the straps. Since I didn’t have any suitable lightweight muslin in my stash, I sacrificed this bamboo-printed Robert Kauffman cotton I’d bought on a binge at equilter.com about 6-7 years ago. I hadn’t decided what to do with it between then and now so I figured it’d be good for a wearable muslin.

DIY Wedding Gown – attaching the bodice and skirt

Finally I can give you another progress report on the wedding gown! Don’t worry, as you can see below, I’ve been continuing to work on it on my weekends and Wedsnesdays, so I’ve got a lot of progress to cover!

For the first time I got to turn my attentions to the skirt, which is exactly as it was when it was attached to Granny’s dress, albeit separated from the bodice at the (very gathered) waist seam. But there was a prominent blue stain in the centre front (CF) panel at about thigh-height from the blue tissue paper it was wrapped in for 60+ years, so the first step was to unpick and remove that entire panel. I then moved the two triangular sections that had been on either side of it together to form a new CF:

I actually prefer the way these two look together, forming a beautiful triangular, almost art-Deco detail at the CF!

But back to the bodice, where I had completed prickstitching along the entire neck and arm edges. I just free-handed this without my post-it guide and I actually think this looks better than my zipper insertion!

Bridal bodice – a slight (but fixable) setback

Apologies for the photo-less post, but with four weeks to go to the wedding, the planning has gone from busy-but-manageable to STRESSAPALOOZA! And as a result, I haven’t had a chance to take the photos of my beautiful lining prickstitching off the camera yet.

But before I forget, I wanted to describe a slight setback I ran into in preparing to attach the skirt to the bodice. To start the process I removed the central skirt panel that contained the blue dye stain (from the tissue paper it was stored in for 60 years), and sewed the two gored sections together, which makes a really unexpectedly beautiful central detail. But as I was lining up the centre front, centre back, and side seams on the skirt and bodice to make the skirt pleats, I kept having excess fabric on one side of the front skirt.

Scratching my head, I measured the front of the skirt, and the CF is indeed central. So then I measured the seam line of my bodice, and ERRRRRRRR! the right side is 27cm to the CF point and the left is 24cm. So that’s why I was having excess skirt fabric on the left but having it match almost exactly on the right.

Bridal bodice – buttons, lining and shopping!

Ok after that little lingerie diversion (and a day spent being filmed for BBC1!), we’re back on the wedding gown!

First up was a quick fitting of the shell with all the boning pieces inserted and the waist stay hooked. And I can breathe a sigh of relief, because it’s looking good. A tiny bit of horizontal pulls around the zipper (which can be fixed by laying off the ice cream a bit) and a bit of boning show-through at the centre front (which I’m going to hold off worrying about for now, but I may just shorten that boning piece so it stops below the bust).

So I can push on ahead, safe in the knowledge that there’s no major fitting issues…

First up – I sewed on all 13 original covered buttons along the right side’s zipper, matching up with the original satin loops I placed along the overlap during the zipper insertion step.

On the surface, these look like ordinary covered buttons, but look at the underside!

I’ve never seen buttons like this before in my life! Instead of a shank with a hole, there’s a mound of stuffed fabric to sew through! What a strange vintage detail! I’ve learned so much from taking the original gown apart…

Honeymoon Lingerie – nightgown muslin

True confessions – I took a brief break from the wedding gown. I don’t deal well with long projects and I was getting really itchy to complete something (I didn’t have any completed projects in July because of the gown, aaaaagghh!).

So I took one evening out to do a test run of one of the patterns I’d earmarked for honeymoon lingerie and Shasha’s Malaysian silks, Burda 7418 (on the right in my earlier image below):

This is a brand-new Burda envelope pattern, but I just went and bought the pdf version instead because a) I’m impatient, b) the pdf patterns are way cheaper than the paper versions (we have a laser printer and printer paper is cheap!), c) piecing together pdf patterns takes only 5 minutes longer than tracing a paper pattern and I can do it sitting down, and d) no seam allowances, woooooooop!

This was my first downloadable pattern from the German Burda site, and I was pleased to find that the instructions were in nine languages, with fully illustrated instructions. I was expecting it to just be in German! But do pay attention to the print preview, though, because you may not need to print the last ten pages or so (the English instructions only take up a few pages). The only weird thing is that they decided to waste some paper giving us two side panel pattern pieces (one to be cut in lace and the other in self-fabric) and the two pieces are absolutely identical. Weird.