Bridal bodice – a slight (but fixable) setback

Apologies for the photo-less post, but with four weeks to go to the wedding, the planning has gone from busy-but-manageable to STRESSAPALOOZA! And as a result, I haven’t had a chance to take the photos of my beautiful lining prickstitching off the camera yet.

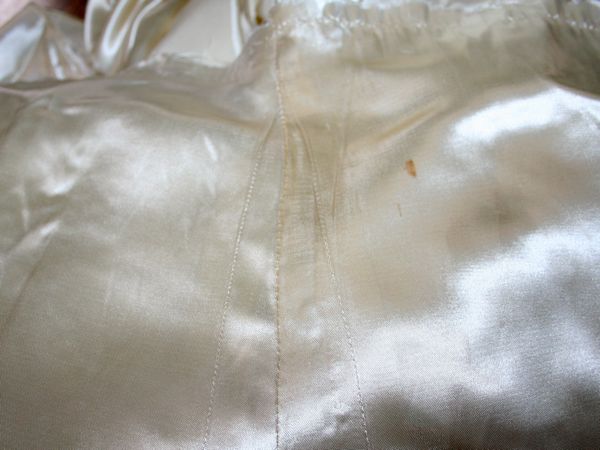
But before I forget, I wanted to describe a slight setback I ran into in preparing to attach the skirt to the bodice. To start the process I removed the central skirt panel that contained the blue dye stain (from the tissue paper it was stored in for 60 years), and sewed the two gored sections together, which makes a really unexpectedly beautiful central detail. But as I was lining up the centre front, centre back, and side seams on the skirt and bodice to make the skirt pleats, I kept having excess fabric on one side of the front skirt.

Scratching my head, I measured the front of the skirt, and the CF is indeed central. So then I measured the seam line of my bodice, and ERRRRRRRR! the right side is 27cm to the CF point and the left is 24cm. So that’s why I was having excess skirt fabric on the left but having it match almost exactly on the right.

DIY Wedding Gown – attaching the bodice and skirt

Finally I can give you another progress report on the wedding gown! Don’t worry, as you can see below, I’ve been continuing to work on it on my weekends and Wedsnesdays, so I’ve got a lot of progress to cover!

For the first time I got to turn my attentions to the skirt, which is exactly as it was when it was attached to Granny’s dress, albeit separated from the bodice at the (very gathered) waist seam. But there was a prominent blue stain in the centre front (CF) panel at about thigh-height from the blue tissue paper it was wrapped in for 60+ years, so the first step was to unpick and remove that entire panel. I then moved the two triangular sections that had been on either side of it together to form a new CF:

I actually prefer the way these two look together, forming a beautiful triangular, almost art-Deco detail at the CF!

But back to the bodice, where I had completed prickstitching along the entire neck and arm edges. I just free-handed this without my post-it guide and I actually think this looks better than my zipper insertion!

The Burda September cover dress (winter version)

I made no secret of my total love and adoration of Burda’s September issue last year. In my opinion (and many of you!) this was the standout, stellar issue in an otherwise mediocre year for the magazine. I’m slowly working my way through everything I wanted to sew from that issue (some good and some bad!) but now it was the time for the cover dress, #122.

I showed you the pattern alterations I made to “un-petite” this pattern, though I reckon I could have even added a bit more to the middle of piece 2 as my pointiroma has less lengthwise stretch as my muslin knit, making the underbust seam just barely under my bust. The horizontal seam between pieces 3 and 4 hits me right at my natural waist on the sides, which I think is just great. I also took 6 inches off the hem of pieces 7 and 8 so that this is above the knee rather than below.

KnipMode October 2010

Hot on the heels of the a-freaking-mazing Burda September issue (in which I have no less than eleven Must Sews!) comes the KnipMode October edition. It’s a bit unfair on Knip to have to follow an act like that, so I’m naturally less enthusiastic about these styles that are just good rather than incredible. Maybe I’ve been buying Knips for too long, but I’m seeing a lot of repeats in this issue that appeared a few months or years ago…

But anyway, on to my highlights!

The cover feature is all about three garments in leather – a leather blazer, an A-line dress, and this skirt. I rather like the skirt but I think the gathers would be really difficult to achieve nicely since you can’t do two lines of gathering stitches (as the lower one would leave permanent holes). And this section gave me massive deja vu from the October 2009 issue where they also had a leather jacket, skirt, and A-line dress…

Next there was a section showing lots of winter knitwear that could either be sewn, or knitted (giving me massive deja vu yet again to the January 2010 issue where they also did the same thing!). Most were either long, baggy, or both, but I rather liked this batwing tunic which could look really nice in a thin, drapey sweater knit: