Bridal Bodice update

When you last heard about my wedding gown, it was two years ago(!!) and I was leaning towards turning my Granny’s gown from 1949 into something with a cowl neck, deep back, and sleek lines, using Vogue 2965 as my starting point.

But recently I’ve been looking more closely at the fabric I’ve got to work with in my grandmother’s gown, and my recent cowl sewing adventure has reminded me that cowl necks need pretty huge amounts of fabric, can’t easily be pieced together, and on top of that, the silk satin in her gown is more of the heavyweight duchesse variety than something very drapey that would cowl nicely. And while I love a low back, it does make things awkward for bras and any sort of shapewear, too.

So I had a bit of a wake up call and told one of my bridesmaids to keep reminding me that “This is just one dress. It is not all dresses.” (thanks, Stacy!). Yes, I like cowls. But I also like other things, too. And I do not need to put everything I like into one dress!

Bridal bodice – Piping and basting

…in which I work with more piping than a plumber and more basting than a Thanksgiving dinner!

When I last checked in, I had cut and prepped all the pieces of the bodice, so it was now the point in my plan to sort out the piping if I was going to do so (and you’ve probably rightly concluded from the title that I did!). I had about 80cm of piping from the original dress’s waist seam, but I realised this wouldn’t be enough to pipe both sides of pieces #2 and #7 like I’d planned. So before I could do anything, I had to make some piping!

Luckily, the dress’s collar pieces were nice and long and on the bias, so this was a piece of cake. I cut four strips of 5cm wide and joined the edges together to make one long strip, then inserted my 2m of satin rattail and ran the whole thing through the sewing machine with the zipper foot.

But as I’ve already established, I can’t be making errant needle holes nor can I afford to use the seam ripper any more than what’s absolutely necessary, so in order to get the piping inserted perfectly on the first try, some hand basting was in order.

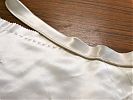
First, I basted the piping to one of the pieces, aligning the piping’s stitches with the basted seam lines:

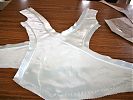
And I did that for all four piped seams:

Bridal Bodice Neckline – opinions needed!

I am very happy to report that my dress for the BurdaStyle book is completely, 100% finished, packed up in an airtight bag and ready to be FedExed this week. HOORAY!

I’m afraid that’s all you get to see until next year, to. Boo.

But it means I can now devote ALL of my sewing time to my wedding gown. So the first step is to attack the muslin. I’ve marked my waistline in green, and the possible boning positions in blue. Once I marked my waistline I realised exactly how short the bodice is so I’m elongating it all by an inch so the back and sides aren’t ending exactly at my waist. My waist is an inch higher than the standard measurements anyway so I think this alteration will help (note: I’m not short-waisted. My bust-hip measurement is standard, my waist is just shifted up a tad).

But I really, really need your help choosing the right neckline for this gown!!

Bridal planning update

Apologies but this is a bit of a “brain dump” post as I’m understandably a bit frazzled right now, with the BurdaStyle book deadline looming on top of wedding planning and everything else I seem to list every time I post (ahh, just thinking about it is starting to stress me out, sorry!).

So I haven’t done much tangible work on my gown since I last updated because I’ve been focusing on getting the BS book dress done since it has a more immediate deadline, but I’ve been doing lots of mental sewing on the gown. Which, you’ll remember, is half the battle for me. So I took an evening out to read (really read and digest!) through “Bridal Couture” by Susan Khalje and the OOP Palmer/Pletsch “Bridal Gowns—How to Make the Wedding Dress of Your Dreams” book (the former being way way more useful than the latter IMHO). I placed copious amounts of Post-It notes sticking out the edges at places I want to refer back to later.

I’m also really glad I ended up taking that PR online Underlining class a few months ago now!! Though I just looked to see if I could link to the Underlining class somehow, and I noticed Susan Khalje herself is teaching a “Wedding Gowns 101” class starting Aug 15. If it were a few months earlier, I’d have jumped all over it, but you need time to devote to the classes most evenings and I’ll need all the time I can get to work on my gown!

After reading through the two books I had everything mostly straight in my head about this dress, but the boning placement still puzzled me because my pattern doesn’t have any obvious vertical seaming to place the boning along, and all three examples in Bridal Couture had some sort of princess seaming. Luckily for me, it was easily solved on the PR messageboard and by this Susan Khalje article, so I’ve got a full gameplan in my head now for the dress!

Pick Three

If you had to choose three (and only three!) things you’ve ever sewn to best represent what you can do, what would you choose?

I’ve recently been tasked with exactly this, and I found it incredibly difficult to decide. I mean, it’d be difficult enough if I was confined to just one type of garment, like “Pick three dresses” or “Pick three casual garments”, etc, but just three, from the hundreds of garments I’ve sewn in the past nine years?! This required thought.

Pick One…

Having said that, strangely, the first of my picks was pretty easy – my Winter Coat.

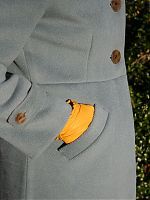
I made this coat two winters ago and I’m really, really proud of the finish on it. The wool is extremely thick, with bound buttonholes, metal buttons, single welt pockets, a thick silk lining, and (most proudly for me) I didn’t use a single bit of fusible anything in its construction. I wear it to death in winter and I love everything about it.

Pick Two…

Should I play my trump card and pick my vintage refashioned wedding gown? Well, alright then!

A linen & silver dress – ideas

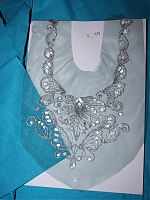
London has gone super sunny and warm over the past few weeks, so my thoughts have turned to spring sewing and using up some treasures from my stash. Remember the silver chain and sequin motif I bought in Paris last summer? Well I still adore it, and I thought it’d be a great showpiece for a spring dress.

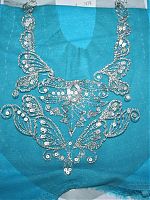
Since the motif is mounted on blue netting, I thought it’d be best to pick a similar coloured fabric for the dress, so that the little spots inside the design which can’t be trimmed away wouldn’t look too out of place. Luckily I’ve had this turquoise linen/rayon mix in my stash for a few years, so its day has come!

I thought it looked good next to the motif, but wow! it looks amazing when I actually pull some through underneath it!

Has anyone worked with motifs like this before? I’m guessing I just get silver lurex thread to match and take tiny stitches the whole way around and trim off the excess netting? Is an embroidery hoop useful (or necessary)? I’m hoping to get the piece cut out and ready to work on during our French road trip over Easter, with any luck.

The next step is figuring out which pattern I’m going to use. I used my usual method for sifting through my pattern magazines (like I did for my wedding gown and my latest winter coat) – since I’ve got all my At-a-glance pages scanned in an online gallery, I flip through them all looking for a suitable pattern, and when I find one, take a quick screenshot of that pattern (Shift-Apple-4 on Mac makes it really easy!), and rename the file to be the issue number so I can find where it came from.

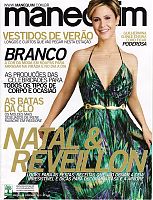
Manequim December 2010

What a wonderful surprise to find this in my postbox just after Christmas – I’d subscribed at the beginning of November, but I wasn’t expecting my first issue until January. This arrived in a strong paper envelope with the magazine inside wrapped again in a clear plastic film, so it was well prepared to stand up with anything the international postal service could throw at it!

With Brazil in the Southern hemisphere, they’re in the height of summer now, so just let your mind wander on this cold, rainy, and dreary winter day and think of summer sunshine in Rio… ahhhhh….

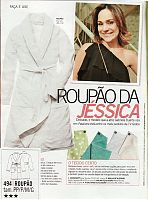
First up is a very versatile bathrobe / dressing gown pattern. I’ve seen the perfect towelling fabric on Goldhawk Road, and my robe is starting to wearing out after a good long life, so I’m keeping this firmly in mind.

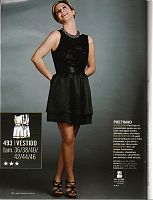
Most Manequim patterns are only offered in one size (go up one size from your Burda size), but this black cocktail dress is one of the few that are offered in multiple sizes!

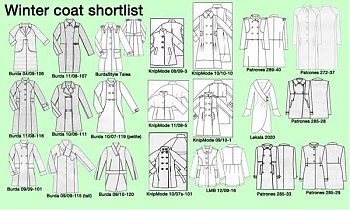
Winter coat shortlist

With the Burda/Armani coat firmly OFF my list for my winter coat (a few of you suggested I could change/fix/alter the pattern but sorry, my time is too valuable to throw after a bad pattern. I know when to cut my losses and choose a better one!), I’m now in the process of picking a different winter coat pattern for my luscious and very thick ex-Burberry wool coating.

Since I scan all of the “At-a-glance” pages for my pattern magazines and store these in a private online gallery, looking through these and creating a shortlist is much, much easier than wading through each and every one of my magazines! I went through the gallery, and when I found a coat pattern I quite liked, I took a small screenshot of it (on Macs you can Shift-Apple-4 to draw a small square and only capture just that area), and renamed the screenshot to the pattern issue and number so I wouldn’t forget where it came from. Then I pasted all these into one big image so I can see all my choices at once.

This is the same process I used to narrow down my wedding gown pattern shortlist, but I cleaned the collage up a bit nicer in Photoshop this time around!


(click to see it bigger)

Our DIY wedding – printed materials

One cost that can add up really quickly for a wedding are all the printed materials you need for the day. I’m not just talking about the invites (which can get ridiculously expensive if you go the letterpress, inner envelope, return card, RSVP envelope, etc route!), but also all the other bits of papery stuff that is forgotten until a few days before when you realise you actually do need them!

The illustration

The first step in our wedding design process was to commission a cartoon drawing of us from the illustrator John Allison (of Scary Go Round fame). James has been a big fan of his comic for ages now, and we both really liked his design style. So we sent him a photo of us, a brief description of James’s suit and my dress (at that point I was still thinking of that Vogue cowl-neck number) and to imagine 6 months’ more hair on my head. Which somehow he got eerily spot-on.

(Apologies for the awful jpg artifacting – I’ve not got the big version of the illustration in front of me to work from)

The wedding website

With the illustration in a nice, big file, we could then set about making our wedding website, which was to be the crux of our invitations. We both work in web developments, and absolutely everyone we know, right up to my grandparents, has an email address, so this way we could put the bulk of the information for both receptions on our site and be able to update it later, too. The RSVPs were all online, using a Google Spreadsheets form (easy to set up, easier for people to reply to than a trip to the post office, and we could both get access to the running tally), and all the usual venue info and registry links could be added without having to worry about word counts and layout.

I can now post a link to it for you to have a look at James’s standards-compliant coding prowess, because I don’t have to worry about you all messing up the RSVPs or gatecrashing or anything! The worst that can happen is that you decide to buy us some more insulation off our registry…

Invites

So with the website in place, all the invites really had to do was give folks the date, and point them towards the website. We ran up two sets of postcards from Moo.com (one set for the UK wedding and reception, and one for the Pennsylvania reception). And to set the tone, the wording was “James and Melissa are finally getting married!” ha!

Our DIY wedding – refashioning my grandmother's gown

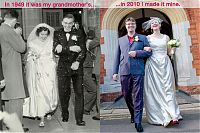
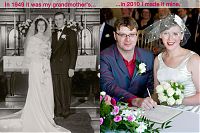
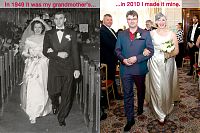
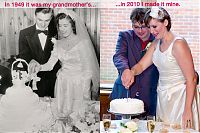
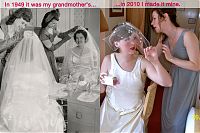
I’ve got many, many more wedding photos to come, but as I was slowly going through all the photos from friends and our professional photographer, I realised that there were a lot of parallel poses between my grandparents’ photos and ours.

Big thanks to my Dad for taking the time to scan in my grandparents’ wedding album in hi-res format, and also to our truly INCREDIBLE and AMAZING wedding photographer, Paul Tanner. I’m pretty sure he was the best money we’ve ever spent.

Confetti toss:

Post ceremony posing:

Walking back down the aisle:

Cutting the cake:

Pre-wedding girly preparations:

If you’re new to this site, let me back up a minute and explain what went on here. First of all, yes, I sewed my own wedding gown. But that would be too easy (ha!), so I decided to sew it from my grandmother’s gown.