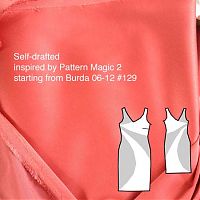
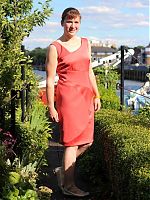
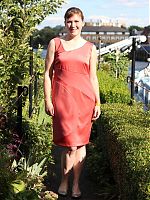
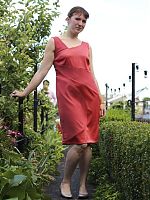
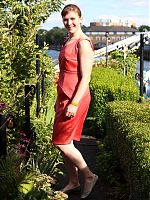
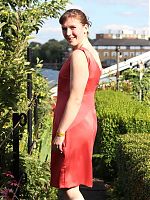
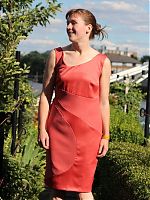
This dress has been an awfully long time in the making. The idea started back when I took the Pattern Magic 2 class at Morley College last winter, where we learned a technique called “Fundamentals: Create three-dimensional forms with design lines only” (it just rolls off the tongue, eh?).
Essentially what this means is you sew up a muslin, draw design lines all over it, cut along these lines, then introduce snips of ease until the pieces lie flat, and there’s your new pattern! I did all this (based on a sheath dress from the June 2012 Burda magazine, which doesn’t appear to be on the US BurdaStyle, sorry) last summer, but then the project stalled when I couldn’t find any heavyweight stretch satin anywhere in Europe, and had to import this gorgeous salmon stretch duchesse from Gorgeous Fabrics.
Then there were further delays as I didn’t have a wide enough cutting table to lay out the asymmetric and strangely-shaped pieces, until a few weeks ago when the Thrifty Stitcher invited me to pow-wow at her studio and suddenly my swirl sheath dress was back on track!
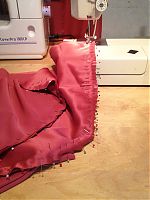
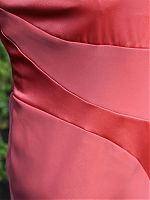
Because all the darts from the original pattern (bar one) are now incorporated into a bunch of curved seams, this means there’s a lot of easing going on, so if you don’t like easing princess seams, for example, you really won’t like sewing this. My easing motto is “pin the crap out of it”, and I’m proud to say that I didn’t have any tucks or unpicking in any of these seams. Though I did use 58 pins on just the lower semi-circular seam!
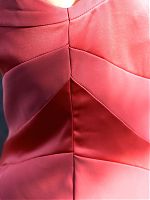
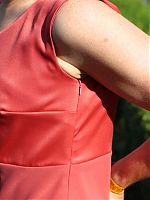
Again, with all those curves comes lots of careful clipping of seam allowances so that they’ll lie flat when pressed, but also there’s a ton of seamline matching at the side seams, which I planned out as I drew my design lines last year. The seams are much closer together on the right side seam, but on the left side seam I had to match across the invisible zipper, too, which added further challenges!
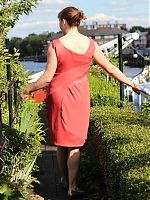
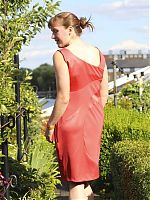
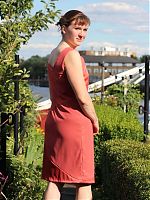
I think this attention to detail in the drafting and the construction really matters though, because you get beautiful views the whole way around this dress, not just when you’re standing still facing straight ahead!
The reason I was adamant on finding a hefty satin for this dress was because I knew from the very start that I’d be alternating the shiny vs matte sides of the fabric in the different panels. It’s something I played with in my wedding gown design, but there I used original vintage mesh over the satin to create the matte texture, whereas here I just flipped the fabric over.
I may not be a fan of prints, but I utterly love varying textures in solids, and asymmetry is pretty much my calling card these days!
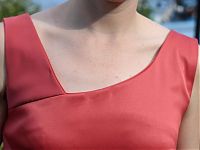
The neckline is asymmetric front and back, and again is very similar to my wedding dress neckline! I don’t think I realised how much these two dresses had in common until I saw the finished photos!
When drawing up this design, I knew I wanted the back to be as interesting as the front, so I used similar design lines there. You’d think that the pattern pieces would be very similar, but considering the different amounts of body ease that’s incorporated in the front vs the back, the pieces are actually very different!
The only place I think I could’ve improved is the curved high seam over the bum – it’s just a little too ripply there, and I think I should’ve distributed the ease around the curve a little bit more. But because of the bum, there’s a lot to be eased there, so I’m really just pleased I was able to accomplish it.
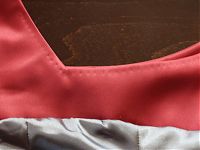
I’m a massive fan of prickstitching to hold the facings along a neckline – they look beautiful when you put on a dress and serve as a reminder of the care and skill that went into it. I’m not usually fond of hand sewing, but for some reason I really enjoy prickstitching (which is really just an uneven backstitch) and find it quite therapeutic to do.
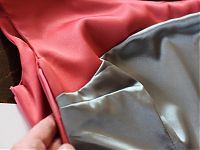
I had quite a hard time finding a stretch lining fabric for this, but I did grab this stretch silver satin on Goldhawk Road last Saturday, which is utterly perfectly for this dress. I’d drafted new facings from my altered neckline, then joined these to the original Burda pattern. So the linings have the original darts rather than swirls, which would’ve been unnecessary and really time consuming!
The lining makes the dress much easier to slip on and off, keeps all those snipped curve seam allowances from fraying too much, and also makes a beautiful finish inside. Here you can see a bust dart, the facing joining seam, and the invisible zipper seam, which I finished by machine inside (my preferred way!).
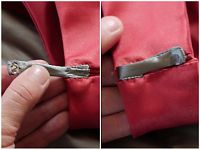
One slight issue I noticed (especially on Susan, my dressform, but also on myself) is that the right side strap is a pinch too long so it kept slipping down. I solved this by sewing a bra carrier – essentially a thin fabric tube with a snap on the end to go around your bra strap and hold the dress in place.
I selected the best photos here, but there were quite a few where the dress was really hanging off me – I’ve lost so much weight and inches in the past month on my training diet that what used to fit me like a glove is now much bigger! Of course, this design means I can’t easily just pinch it in anywhere so Ihad to just leave it as-is. I’ve got a wedding in September to wear this to, so fingers crossed it’ll still look okay then!

