Blog

Prepping for our road trip…

I’ve been super busy over the past week and weekend preparing for our upcoming road trip through France over the double bank holiday extravaganza*…

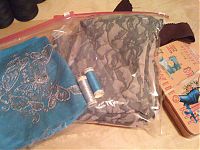
Making these packets really reminded me of all those sewing projects I prepped before I went into hospital!

Included are:

  • The silver sequin motif to hand sew onto the front neckline of my upcoming turquoise linen dress
  • Allllllll the pieces of pink viscose jersey and grey stretch lace for the summer version of my Burda September cover dress to hand baste together (cutting out all these pieces in both fabrics took all weekend!)
  • My Chinese-themed sewing tin (originally a gift from Cidell!)
  • Some purple silk to patch the lining in my Patrones duffle coat (I blame the stupid crappy jeans rivets I used to use!)

A silver & linen dress – decisions and basting

Thank you all SO much for all the feedback on my pattern shortlist earlier this week. It’s so incredibly helpful to hear from others which have worked and which haven’t, and to get me thinking on what I most like to wear (and what I don’t!).

Since I tend to email commenters personally but not put my responses in the comments themselves, I thought it might be helpful to answer a few general questions from the comments. I’m not really seeing this as an overly dressy/posh/fussy dress – for me, the linen dress on its own would be something I’d wear to the office, out to lunch with friends, or out in town, and the motif I bought in Paris is just a sort of permanent necklace. I always overdress anyway, and I’m not envisioning this as anything “left for best” in the slightest! Believe me, there’s very little I keep aside and out of my daily rotation!

Nancy K suggested a tunic might be more wearable than a dress, but I had to admit to her that I really, really don’t feel comfortable wearing tunics. There’s just something about the awkward “too long for a top but too short for a dress” length plus too many layers that just makes me feel self conscious. Whereas I wear dresses and skirts almost continuously in summer (compounded by the fact that I don’t wear shorts)!

Finally, I decided against a bunch of lovely sheath dress patterns purely for linen/wrinkle reasons, and my thinking that these would probably have more horizontal wrinkles from sitting than full-skirted numbers. I’m debating whether I’ll underline this dress or not for that same reason, but I suppose it all depends on if I can find suitable cotton or silk lightweight fabric for a good price while we’re in France.

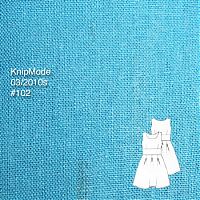
Enough with the commentary – I finally decided on dress #102 from the KnipMode 03/2010 supplement (one I didn’t even scan in my initial review! gasp!).

A linen & silver dress – ideas

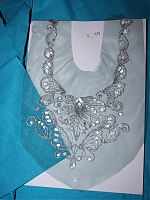
London has gone super sunny and warm over the past few weeks, so my thoughts have turned to spring sewing and using up some treasures from my stash. Remember the silver chain and sequin motif I bought in Paris last summer? Well I still adore it, and I thought it’d be a great showpiece for a spring dress.

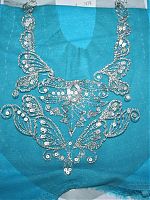
Since the motif is mounted on blue netting, I thought it’d be best to pick a similar coloured fabric for the dress, so that the little spots inside the design which can’t be trimmed away wouldn’t look too out of place. Luckily I’ve had this turquoise linen/rayon mix in my stash for a few years, so its day has come!

I thought it looked good next to the motif, but wow! it looks amazing when I actually pull some through underneath it!

Has anyone worked with motifs like this before? I’m guessing I just get silver lurex thread to match and take tiny stitches the whole way around and trim off the excess netting? Is an embroidery hoop useful (or necessary)? I’m hoping to get the piece cut out and ready to work on during our French road trip over Easter, with any luck.

The next step is figuring out which pattern I’m going to use. I used my usual method for sifting through my pattern magazines (like I did for my wedding gown and my latest winter coat) – since I’ve got all my At-a-glance pages scanned in an online gallery, I flip through them all looking for a suitable pattern, and when I find one, take a quick screenshot of that pattern (Shift-Apple-4 on Mac makes it really easy!), and rename the file to be the issue number so I can find where it came from.

(Vote for my) March Mini Wardrobe

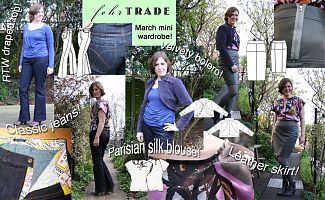
It doesn’t seem that long ago that I was first laying out my initial plans for this mini wardrobe, but now I’ve had some time to step back and have a look over what I managed to accomplish last month. I made this wardrobe mostly for myself, to use some luscious fabrics from my stash in combination with patterns that really appealed to me, but I also kept one eye on the contest requirements running over at PaternReview.com to make sure I remained within their rules, too. Here’s my entry into their contest, or you can just read on below…

I started with a blue viscose, draped knit top that I’d bought from ASOS and really liked, but I wanted to wear with both casual and dressy bottoms.

To coordinate, I sewed:

1. Jalie jeans – I’d made a muslin but the waistband was horrible so I had my work cut out for me on this pair using great quality stretch denim from Mood in NYC, plus some London streetsign fabric for the waistband facings and pockets. I used my vintage hand crank Singer machine for all the topstitching, plus I got to use my vintage buttonholer attachment and high quality rivets for the first time! I fixed all the waistband issues in this pair and these are now my favourite jeans. Read more…

Grey leather skirt – muslin

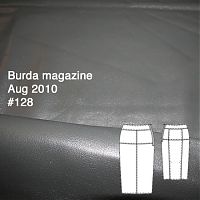
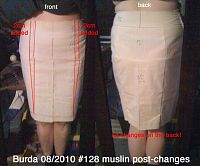
You’ll get to see my Manequim silk blouse tomorrow, but in the meantime I thought I’d give you a progress update on the fourth item in my March Mini Wardrobe, the leather skirt (Burda magazine 08-2010 #128 – though #127 is nearly identical).

I’m making this skirt in some utterly luscious grey leather I bought while on honeymoon in New York, and despite having sewn with leather loads of times before, this is my first real leather garment. So knowing what I know, I knew I had to make a muslin first because once you sew leather, it’s done – the needles holes are permanent so you can’t rip out stitches!

I made up a quick muslin at the end of February, and, unusually for Burda, the size 42 was too tight over my hips. Rather than trace a bigger size (boring!) I drew two long lines up the front of the skirt on either side of the centre front. On the waistband and yoke pieces, I added 2cm width to each line, and for the lower skirt piece, I made a triangular wedge which tapers to nothing at my marked hem.

How to use jeans rivets

I’ve sewed a bunch of jeans over the past few years, and with every single one, I’ve been disappointed by the quality of the rivets available to buy as a home sewers. I’ve tried the ones available in stores, like Prym, Hemline, etc and every single time they let me down. Even when they’re properly hammered into place, they move around and “jangle” a bit, they’ve been snagging my coat linings, and I’ve had several fall out under normal wear of the jeans. For my last few pairs, I haven’t even bothered using rivets at all. I’d rather not use any than ones that look and behave badly!

I’ve been keeping an eye out for quality rivets for a while now, and I’ve heard word that a man named Junior in Louisiana does excellent ones and will sell them in small quantities. So I took the plunge and bought a few of his high quality rivets
(and a handful of all-metal buttons while I was at it), even though it meant importing them from the States.

Seriously, these rivets are fantastic – they look just like RTW, are easier to install than the crappy ones, and once they’re in, they’re in!

Here’s the finished back pockets up my upcoming jeans:
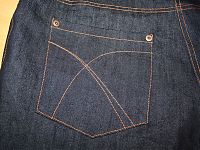
I can never go back to crappy rivets again – for real, I’m tossing the others in the bin. So as part of my grand education scheme, I’m going to show you all how easy these are to install. Just say NO to crappy rivets!

How to install jeans rivets

You’ll need an awl (an ice pick may work in a pinch though), some pliers with a wire cutter, and a big ol’ hammer.

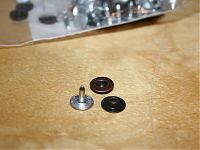
Here are the Rivets pieces. On the left is the nail, which goes on the underside of your jeans. On the right is the cap, with the right side shown at the top, and the wrong side (which connects to the nail) underneath:
Sewing pending photoshoots

You wouldn’t know it from the lack of sewing photos, but I’ve actually been fairly productive over the past two weeks.

I was a terrible auntie this year and failed to make anything nice for my niece and nephew this Christmas, and my sister-in-law said I should just send them something when I get around to it, seeing as how they’re both so overwhelmed at Christmas anyhow. So before I got started on my March Mini Wardrobe stuff, I took an afternoon to make these, which are currently in transit:

I made a fluffy pink zebra minkee bolero for my 7 year old niece, and an adapted (ie: no hood) monsters and red jersey tee for my 8 year old nephew. You’ll see more about these when they try them on, with any luck…

And while I was clearing the sewing guilt decks, I finally also made the silver silk jersey dress I’d promised (and muslined) for James’s sister over a year ago!

March Mini Wardrobe

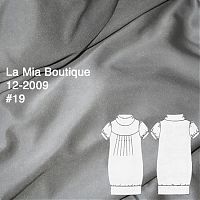
I’ve finished my post-coat winter sewing plans apart from the La Mia Boutique draped skirt which I’m feeling now is better suited for spring or summer, so I thought I’d dip my toes into the Pattern Review Mini Wardrobe contest that’s running throughout the month of March.

This is a pared-down version of their usual, sprawling wardrobe/SWAP contest, so this time around you need to create a five piece wardrobe in four weeks, using one item you already own (sewn or RTW) and be able to create at least six different outfits from this. I’m actually going one better and aiming to sew five pieces rather than four, but that may fall by the wayside depending on how the month goes.

Here’s what I’ve got in mind:

Two Trews in Progress

The next garments in my post-coat sewing plans are two pairs of KnipMode trousers to fill a quite serious hole in my wardrobe as a bunch of my trousers and jeans all seem to be wearing out at once!

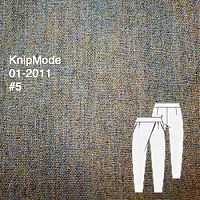
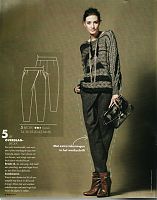
One pair is KnipMode 01/2011 #5 made in wool/acrylic flannel (bought from Fabric.com ages ago) and entirely underlined in black silk/cotton voile with a sort of satin weave to it.

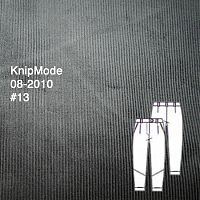
The other is KnipMode 08/2010 #13 made in steel corduroy which I bought at Goldhawk Road yonks ago!

Un-petiting the Burda September cover dress

While I wait for the weekend to photoshoot the Lekala ribbed top (either you all are too smart or I’m too predictable!), I’ve started work on creating the cover dress from the September Burda magazine. It’s a really cool, curved seam design with no side seams and designed for knits, but it’s one of Burda’s Petite patterns.

I am in NO way petite – at 5’8” (172cm), I am closer to Burda’s Tall height (180cm) than I am to the petite height( (160cm). I have a sneaking suspicion that my torso is quite compact and my height is mostly in my legs, but in any case… I’ve made a few of Burda’s petite patterns before with good results, namely, my 30th birthday dress and the blue silk cocktail dress, so I wasn’t totally scared off because it’s for petites.

I made up a muslin of the top half of the dress (the half I’m most concerned with) on Wednesday night and I’m happy with my alterations so I thought I should share what I did.

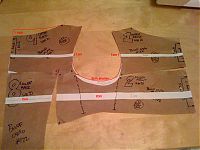
First of all, lay out pieces 1 and 2 so that their folded edges are aligned, taping the pieces together loosely. Then lay out pieces 8 and 9 so that their folded edges are aligned, and that these meet the front pieces at intersections 7 and 8. Don’t worry that the shoulders are far apart or that some of the curved seams don’t meet up whilst flat.

My alterations are the white pieces shown below: