Thinking ahead towards summertime, I really like to wear casual day dresses around the moorings at weekends (and this year, during the week, too, I suppose). A few years ago my friend Jess bought me a really simple 70s day dress at a vintage shop, and I’ve worn that so much I realised I’d like a few more to fulfil the same function.
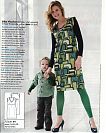
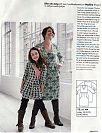
So for this day dress, I blended two similar dresses from the Feb 09 issue of KnipMode together into one! I took the top half of #15 (on the left) and the bottom of #18 (on the right) and joined them together at the waist seam to make a really comfortable, casual dress for lounging around the moorings.
The fabric is a really super soft cotton-lycra jersey from Totally Fabrics, but which has now, understandably, sold out (I looked a few days ago to see if I could buy more – it’s that good!). The neck and arm bands are just a bit of black lycra to give a bit of contrast to such a busy print.
The big scoop pockets on the front are really only good for putting your hands in, or for light things like tissues or ticket stubs. As with most knit pockets like this, anything heavier would just bounce its way out, like a big trampoline!
The only real change I made to these patterns was to omit the back darts on the bodice and also the invisible side zipper (the top half was originally was meant for wovens, but in a wonderful stretchy knit it’s unnecessary). Others might want to raise the neckline a bit on this – it is quite low, but perfectly okay for me. The bodice front is just cut on a fold, so you’d only have to redraw it a few inches higher and use a shorter neckband if you’d rather.
Like with most banded V-necks, I folded the band in half (right sides out) and serged it onto the neck edge, treating the point of the V just as if it were a curve (and you certainly don’t need a serger/overlocker for this – I survived perfectly well for years just zigzagging on my sewing machine). Then, when you’re all done and the side seams and everything is finished, try the dress on and pinch a bit of that band to the inside so it now forms a V and lies flat. Pin it, then run to the sewing machine (don’t walk, ha) and just stitch at that pinned angle to complete your V. It also helps if you mark somewhere where the point of the V is before you apply the neckband, as it can be hard to see afterwards (I just attached a small safety pin to the dress a few inches down).
Coverstitch tips
I think I also briefly mentioned that I went and bought a coverstitch machine with the last of my birthday money. For those of you who don’t know what a coverstitch machine is – if you’re wearing a teeshirt, look at the hem. You’ve got two little lines of stitching on the front, and flip it over and you’ve got lots of threads on the back, right? A coverstitch machine does that. And pretty much just that. But it does that really well.
Digression aside, I’d been wanting and saving for one since I bought my overlocker last summer, and I mostly wanted it to do beautiful twin hems since my twin needle stitching tends towards tunnelling (where the bit of fabric between the two lines raises up, no matter how loose your bobbin thread), and also to topstitch straddling a seam, like where a neckband meets other fabric. So I figured this would be a good first project for my new Janome CoverPro 1000.
But I discovered it has a much steeper learning curve than I was expecting – super easy to thread and use, but I still got tunnelling all over the place, even with the bottom tension as loose as it would go, and when I tried to straddle the band seam with topstitching, it slid around everywhere! You know I’m a steady hand with topstitching (all my recent jeans are just done by eye), but this made me look like I was drunk!
So after consulting with the Coverpro gods at Pattern Review I learned:
- Don’t use woolly nylon in the looper, no mater what you may have heard. There’s no real advantage, and the machine’s tensions just can’t go low enough to accommodate it and you get tunnelling.
- If you want to topstitch, you really do have to fork out the cash for the centre guide foot. Unlike most sewing machine feet, that, in my opinion, just create a shortcut that you’re better off just doing the long way rather than faffing about with the “time saving foot”, the foot here is necessary to keep everything in place. Boo.
But, lessons learned for next time. As this is just a lounging dress with a busy print, I’m perfectly happy to wear it with a dodgy hem and a drunken neckline, and have done twice in the last week already, as it’s been so nice and sunny!
(I never thought I’d be the sort of person who owns four sewing machines. How did this happen??)


