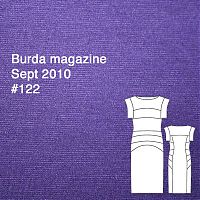
While I wait for the weekend to photoshoot the Lekala ribbed top (either you all are too smart or I’m too predictable!), I’ve started work on creating the cover dress from the September Burda magazine. It’s a really cool, curved seam design with no side seams and designed for knits, but it’s one of Burda’s Petite patterns.
I am in NO way petite – at 5’8” (172cm), I am closer to Burda’s Tall height (180cm) than I am to the petite height( (160cm). I have a sneaking suspicion that my torso is quite compact and my height is mostly in my legs, but in any case… I’ve made a few of Burda’s petite patterns before with good results, namely, my 30th birthday dress and the blue silk cocktail dress, so I wasn’t totally scared off because it’s for petites.
I made up a muslin of the top half of the dress (the half I’m most concerned with) on Wednesday night and I’m happy with my alterations so I thought I should share what I did.
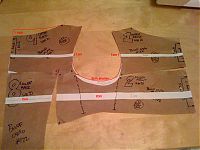
First of all, lay out pieces 1 and 2 so that their folded edges are aligned, taping the pieces together loosely. Then lay out pieces 8 and 9 so that their folded edges are aligned, and that these meet the front pieces at intersections 7 and 8. Don’t worry that the shoulders are far apart or that some of the curved seams don’t meet up whilst flat.
My alterations are the white pieces shown below:
- I drew a horizontal line in the middle of pieces 1 and 9, cut this open, and added 1cm
- With a curved ruler I pulled the bottom of the armscye up so that the edge was 2cm shorter (if you’re not adding sleeves you can leave this step out, but you’ll instead want to either shorten the dashed lines by 2cm or add 2cm onto the length of piece A so the bands are the right size)
- Near the bottom of pieces 2 (so it’s under the armscye), I drew a horizontal line right across and through to piece 8, too. I added 2cm in there.
- I found it really helpful during the muslin construction to also mark where seam intersection #7 lies on Piece 9, too, so you can line up the seam there.
NB: These aren’t necessarily the fixes for ALL Burda petite patterns – just for this dress with its unorthodox seamlines.
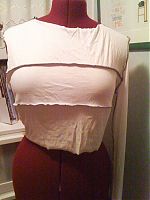
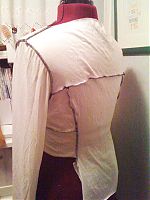
I’ve turned my muslin inside out on Susan so you can clearly see the seamlines. I thought it was helpful to see the intersections at the back, too, as you don’t see a back view in the magazine.
The muslin fit great, and most importantly, piece 2 was nicely centred over my boobs rather than having a horizontal seamline right across them (the main thing I was trying to avoid!). The only other change I made is to lower the back neckline by 1” at the CB (tapering to nothing at the shoulders), because it’s weirdly high. If you do this, too, then remember you’ll need to use your altered piece 9 to draw a new back facing! I’ll probably chop some length off the skirt, though, too, to get it above the knee rather than below.
I’ve got my purple pontiroma jersey all cut out and ready to sew now! (Only with long sleeves – I couldn’t be bothered to alter the tech drawing this time around) It all fits nicely into 2m of fabric, too!


