I mentioned briefly back in December that, for James’s birthday, I gave him the promise of a custom-made coat in the style of the one Benedict Cumberbatch wears in Sherlock. Or as it will henceforth be known, “the Sherlock coat”.
A few others online have made this coat (including a few FehrTrade readers, hello!!), but I found the most helpful resource to be this livejournal entry from a lady who sketched and measured a lot of the details after analysing screen grabs. This was a big help in taking James’s TNT short jacket pattern and adapting it to look more like the coat on screen!
I first made an approximation on his paper pattern and sewed up a muslin. From this the only real fitting problems were that the upper back was too tight, and the Centre Front needed to be shifted by about an inch, but it was otherwise fine. I guessed a bit wrong on the collar and lapel shape though, but it was fairly easy to just draw a nicer shape onto the muslin itself and transfer it to the pattern.
Once the muslin was settled, I then bought the wool coating (delayed a bit as Crescent Trading were closed over the holidays) – not the exact black and grey small houndstooth used in the original (simply because I couldn’t find any locally), but instead a black/grey/brown check which still had the same feel. I also bought the black acetate lining at the same time, but the black cotton flannel for underlining came from Minerva.
I then settled in for the mammoth task of cutting out all the pieces in wool, underlining, interfacing, and lining, then fusing the crap out of everything that needed interfacing. With two patch pockets (and flaps), plus two welt pockets, two back belt pieces, sleeve cuffs, and a collar, (not to mention facings!), there was a good day taken up just by fusing alone!
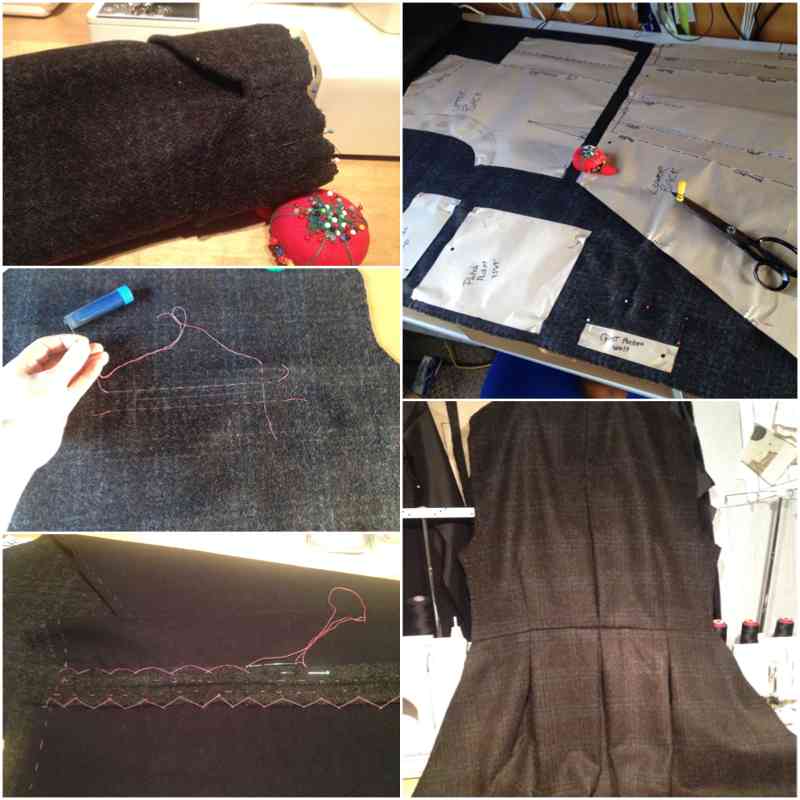
The next step was to carefully baste the flannel underlining to the wool pieces. I’ve underlined quite a few of my coats in flannel, and the extra bit of warmth and windblocking it provides is well worth it even though it’s extra work and bulk. We agreed here to only underline to the waist, though, as the voluminous back skirt didn’t really need either warmth nor bulk.
The underlining also provides a nice place to hide handstitching, and with bulky coating seams, it’s a really good idea to catch-stitch the seam allowances flat, especially on places like the long sleeve seams where you can actually feel a ridge there if you don’t!
I forgot to take photos of the patch pockets, but I’m super pleased with the finish on them – instead of just turning the seam allowances under, I turned the top of the wool back to form a self-facing, stitched it to a lining piece (leaving an opening for turning), then stitched the other three sides, flipped, and pressed. I could’ve used a blindstitch to attach it 100% invisibly as Kenneth King directs in “Cool Couture”, but the original jacket has it topstitched on, so I did that instead.
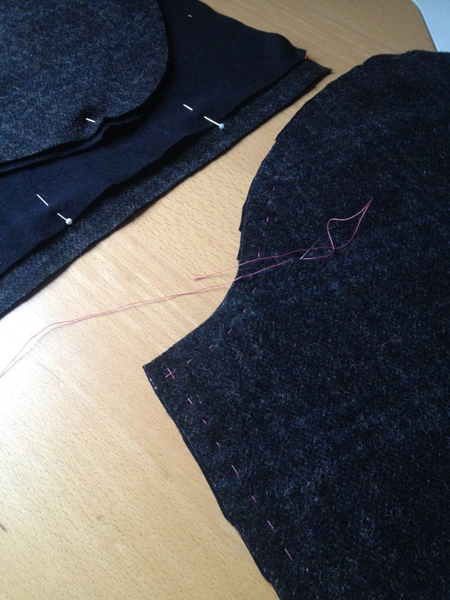
I was really dreading inserting the chest single welt pockets even though I’ve done them a bunch before, probably just because it involves cutting and I didn’t have enough fabric leftover to recut the entire neck-to-hem front piece if a screwed it up. I got the first one in and looking spiffy, and after some thought I even got the lining pieces aligned correctly (the flipping inside always messes with my brain so I’m glad the lining doesn’t have a right/wrong side).

The second chest welt pocket was going really well, too, until I went to flip it around and realised I’d applied the welt to the wrong side, so it opened from the centre rather than from the side! ARGHGHG!!
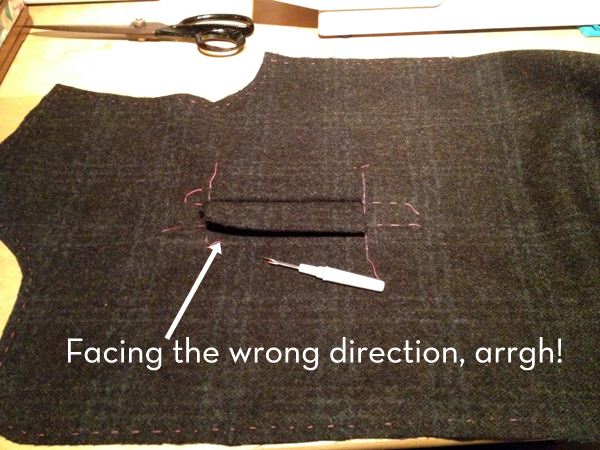
After a few minute maelstrom of swearing and a proper little tantrum, I very carefully unpicked the lot, thanked Previous Me for remembering to interfacing the coating so it didn’t shred where I’d already cut the opening, and verrrrrrrrry carefully restitched the whole thing, this time with the welt facing the right direction!
Other details I didn’t mention above:
- The lined, curved sleeve cuffs
- The overlapping half-belt in back which covers up my nicely-matched pleats and darts, boo!
- The box-pleat from the mid-shoulder to waist in the back, secured at the top with triangular topstitching
- The back skirt box pleats which must align with the upper back darts and pleats (and tartan, since I’m nuts)
James has got some replica buttons on order, but they won’t be ready til February. Luckily, since the original has stitched keyhole buttonholes (the front ones all in red!), the buttons are literally the last thing to be done so I can finish the rest of the coat and just do those when they arrive.
Apparently the tv costume department also adapted the original coat to make the collar more easily stand up, adding corset wire into the collar piece. I don’t think I’ll go so far (mostly since I only had rigid boning which isn’t really the right choice), but I might add in some extra topstitching to the undercollar to make it a bit stiffer, but still retain flexibility.
And then of course there’s the whole lining to sew, shoulder pads and sleeve heads to insert… I always maintain that coats are a lot of work (which is why I only ever do one a year at most!), but I want to do this one right since it’s his now-very-belated birthday gift. It does make you see how the replica coats for sale totally justify the $1200 price tag!
Brits – the last episode of Sherlock is still on iPlayer for the rest of the week. Americans – the excellent third series is just starting on PBS this week, if I recall…