(Belated) Christmas gift – red leather handbag

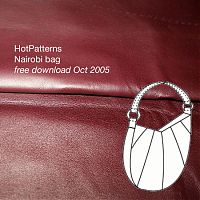
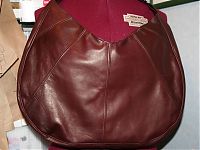
We were supposed to meet up with my friend (and former bridesmaid!) Pip and her boyfriend back in mid-December to celebrate Christmas, but we had to reschedule due to my swine flu, so I’m only just now able to show you her present – a Nairobi bag made up in gorgeously soft red wine leather, bought in NYC from Global Leathers (I find it interesting that Americans would call this colour “burgundy”, whereas in the UK it’d be “claret”).

I sewed this up before Christmas (so you saw a sneak peek in my 2010 roundup), but she asked me to hold off posting about it until she received it. I actually made this same bag for her a few years ago in black corduroy, and she famously texted me later that night exclaiming “I can fit a whole bottle of vodka in here!”

When I made the Nairobi bag for myself, I usually leave out the strip that joins the two halves together as I find the bag is just too big for my liking with it in, but Pip asked me for the bigger size, and bigger she got!

Post-coat winter sewing plans

Now that I’ve got my big winter coat sewing out of the way, I can turn my attentions to filling in a few gaps in my winter wardrobe. Sewing these things now means I can get another good 3-4 months of wear out of them before moving on to short sleeves and lighter jackets (no really, for the past few years we’ve had flurries and hard frosts in April or May).

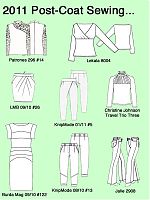
So I’ve gathered together the patterns I’d most like to sew along with fabrics I’ve got in my stash that would help fill my wardrobe voids…

Starting at the top of this collage, we’ve got:

DIY Wedding Fascinator – in progress

The Gown is progressing nicely, the shoes are bought and are being broken in little by little (while doing such glamorous tasks as watering the garden and taking out the rubbish!), so it’s now time to focus on my hair. In the past I’ve made fascinators (First in gold and then in silver) with a comb base that worked well for my long, thick, and straight hair, but post-chemo my hair is only two of those things so I’m using a headband for the base of this fascinator. In some strange twist of Life Imitating Art, my hair looks almost exactly like it does in the wonderful cartoon of us drawn by John Allison way back in March when I had barely any hair at all!

It appears that my “How to Make a Fascinator” tutorial vanished off BurdaStyle during one of their site moves, so I’m really glad I saved it as a Pdf a while ago so you can download it here now!

In the past my construction technique mostly centred around the glue gun, but for this one it just felt a bit wrong to do so when the rest of the ensemble is full of couture techniques. So for this base I used two teardrop shaped pieces of blue wool felt (the only colour I had on hand), with one of them stiffened with the ultra-rigid interfacing I used on my sun hat. I then covered this felt with a scrap of the vintage dress satin, stitched on the underside to prevent any puckers at the edges. You could omit this step if your felt matches the colour of whatever you’re covering it with, but the blue kept showing through the first few layers of feathers so I needed the satin layer.

I specifically chose a thin headband that had a fabric covering around it so I’d have something to anchor my stitches to, so keep this in mind while you’re shopping, as it’d be difficult to sew onto an all-plastic band (in which case you’re probably better off using glue). I then sewed the satin-covered base onto the headband, making sure my stitches went around the band each time for strength. Since the top was being covered in feathers, I didn’t bother to hide my stitches on the top side.

Once the decoration attachment is all complete, I’ll stitch the other blue felt piece to the underside of it all to hide the stitches (and band) and create a bit of grip on my hair.

Here’s the fascinator with just the white goose feathers attached:
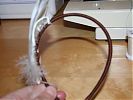
Sewing these onto the base was way easier than I was expecting. I just took 2 or 3 stitches over the central portion of the feather near the base, and that was enough to keep them secure. I’m leaving them unattached at the tips because as the headband stretches whilst worn, the feathers stay close to my head anyway.

Here’s the underside so you can see my stitches and that super-stiff interfacing:
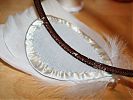
Sewing Gift Guide

Christmas is coming up, and so I thought I’d offer a helping hand to all the friends, relatives, and significant others of the sewing obsessed looking for sewing gifts this holiday season. I’ve tried to roughly break this down into “beginners” and “everyone else”, but it helps if you can snoop around their sewing area first to have an idea of what they’ve already got before buying something off this list.

And if you’re reading this and are feeling truly overwhelmed, then:

  1. Print this page.
  2. Google for your nearest sewing or fabric store
  3. Give this page to a store clerk with a smile a “Can you help me please?” and let them show you what some of this stuff is…

For beginners

If you know someone who’s very new to sewing or is getting their first machine this Christmas, it’s a great idea to create a little bundle of all the necessary tools for someone just starting out. You can often find these pre-packaged at sewing shops, or to create your own for a new sewer, I’d recommend placing the following in a zippered pouch, box, or (if you yourself are a sewer) a sewn case:

  • Dedicated sewing scissors (write “fabric only” on the blades with a marker!)
  • Glass-headed pins (plastic-headed pins melt on contact with an iron!)
  • Clear ruler or hem gauge
  • A pack of standard sewing machine needles
  • A pack of hand sewing needles
  • A seam ripper
  • Spools of Sew All (polyester or cotton-coated polyester) thread in black and white (and also grey, beige, red, and navy if you’re feeling flush)
  • A tomato pin cushion