Book Review: Demystifying Bra Fitting & Construction

While I’m away on holiday I thought I’d keep you all entertained with a series of posts on books I’ve bought over the past year or so and never really quite talked about. Not a single one of them is a “beginning sewing book”, either, so for those of you who are a bit sick of seeing the same books being released over and over, well, you’re in for a treat this week.

First up is a book which I talked about a while back when it was released as an e-book, but I thought it was worth a revisit as it’s just been released in print.

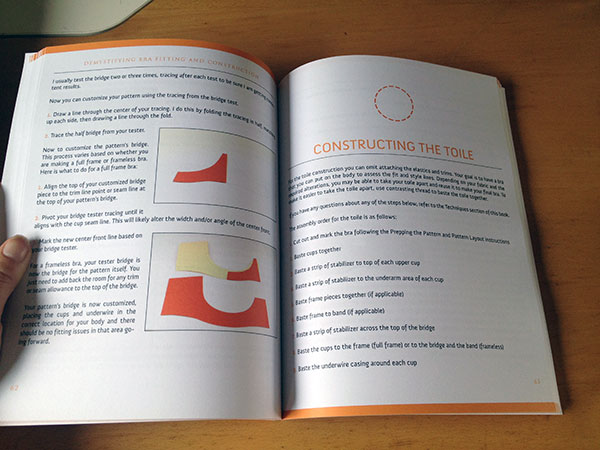
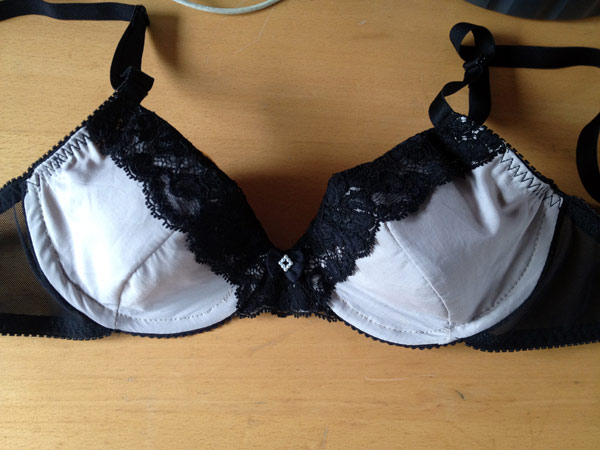
The print edition has the same content as the e-book, with full colour photos and really very excellent advice on both fitting and construction that I just haven’t seen elsewhere, in print or online. If you missed my earlier review, the condensed version is that this is really what you need in order to make a bra pattern fit you, and then sew it all together. I’ve sewn with Kwik Sew bra patterns before and even though their instructions are held up to be really good, it doesn’t even come close to the level of detail in this book.

Plus, she tells you how to make a muslin (toile) so that you don’t get all the way to the end of sewing a gorgeous bra, only to find out in the final step it doesn’t fit properly. Which is what I usually end up doing, and then getting discouraged and not sewing another one for months (speaking of, I’m probably due for another spate of bra sewing soon!)

Coming soon: the VNA Top pattern!

I’m very pleased to report that my next sewing pattern will be ready for sale within the next week! I literally only have the final photoshoots to do (lined up for tomorrow evening), and the Copy Shop versions to tweak and that’s it!

Many of you will be pleased to hear that it’s another top pattern, and this one works for exercise or casualwear! It’s called the “VNA Top” because it’s inspired by a Vionnet evening gown (say “VNA” fast and it sounds like… yup!).

My official description:
This is a pattern for a close-fitting, sleeveless workout top inspired by a 1930s Vionnet evening gown. It features a front V-neck, curved under bust seam, and distinctive angular seaming in back. Neckline and armhole edges are finished with binding, and there are no side seams.

Manequim magazine April 2014

I hadn’t realised that this issue arrived so late until May came nearly a week after it, but it means I’ve got two issues to show you in rapid succession. It’s always about this time of year that Manequim do their famous “Oscar dress special”, too, and squeeeeeee! this is it!

See? Brazilians do wear sweaters in winter! pfff. But seriously, despite it’s cropped proportions, it’s got some nice colourblocking, and the skirt lines are great, too.

Bomber jackets are huge this year, but I do believe this is the first sequined one I’ve seen – and here I thought I’d seen every variation possible in my pattern magazines so far! The skirt is also interesting, though I don’t think I’d be confident enough to put all my trust into a zipper like that…

Normally I’d be awfully excited to have a bodysuit pattern in my size, but frankly, it’s nowhere near as exciting as Closet Case Files’ Nettie pattern, which is already in my sewing queue. The trousers look like good basics, though, and they’re offered in a few sizes, too.

I must’ve flipped past this at least three times before I noticed that this boring shirt has actually got an asymmetric twist – the collar is rotated and the opening shifted off-centre. So what was boring is now highly interesting!

Assorted updates

Argh I’ve done that thing again where I get really busy in my sewing cave (and elsewhere!), ignore my laptop altogether, and end up accumulating a full week’s worth of posts that I can’t face writing. This usually bogs me down mentally for a few days until I realise I have to face the laptop at some point, and I work a “computer day” (I much prefer “sewing days”!) to clear the slate.

But a-ha! I gotcha, “internet day”, because I’m going to cram together all the updates I really should write about in one big go. Didn’t see that coming, didja?!? (frollicks off to the sewing cave…)

Birthday gifts

Thank you again so much for all your compliments on my galaxy print birthday dress last week! I’m not sure what I did right, but I ended up getting an awful lot of lovely sewing gifts this year…

Clockwise from upper left:

  • An amazing, handmade pressing ham and stand from Claire (protip: she’s selling these right now in custom fabrics so get in touch with her!). The ham is a funny shape because she’s cleverly designed it to mimic a crotch curve so you can really get in there and press it well, and the stand essentially acts and a hands-free for it! She also got me some royal blue ponte knit that was just so me that I cut it out the same day (seen in the upper right and below…)
  • From my friend Jennie, Liberty gift coins! They’re like gift cards, but because Liberty are so damned classy, you get a gorgeous purple suede bag with special coins instead. Mmmm, shopping!
  • From James, a Marfy dress pattern I’ve been lusting after for ages (Marfy 2935)
  • From my inlaws, the Style Arc Steffi Jacket (and March freebie pattern, Nancy) and Clover fork pins (which hold silks in place better than anything else, apparently!). I’m particularly pleased with the Steffi jacket as I love the design and it saves me the trouble of drafting it myself!
  • From James and my parents, an Eva Dress reproduction of a 1933 Katherine Hepburn jacket that I’ve literally had on my WishList for 3+ years (hurrah!), and a brand new Men’s drafting book that came recommended from Fashion Incubator and has better, modern designs included than anything I’ve seen actual patterns for. So I’ve got high hopes for that, even though it doesn’t contain a tight-fitting stretch block.
  • (I also got a bunch of books and running stuff, too, but I do attempt to keep this blog on topic!)

    Marfy dress

    On my birthday itself, I decided I wanted to do some “fun sewing” and not “work sewing” (you make this distinction when you start doing this for a living, I’ve found), so I actually ended up cutting out Marfy 2935 in the blue ponte knit – surely a new record for both pattern and fabric to be used in less than 24hrs!

    The first snag was that there was no pattern piece included for the horizontal waist drape on the green version – I emailed Marfy saying it was missing, but that I presumed it was just a gathered rectangle and could I please have the dimensions. Several days later, I got a vague and partial reply saying that I was correct and it was important that it’s cut on the bias. That’s it – no “yes, you should’ve received that piece” or “here’s the dimensions”, oddly.

    But I had already carried on with my dress using guestimated dimensions for that piece, and got to a try-on stage with basted side seams:

Little bits of sewing

I’ve come to that point near the end of the year where I want to gather together a bunch of little projects I’ve made recently, but yet didn’t quite seem big enough for their own post… You’ll see my traditional, year-end roundup tomorrow (I hope! I haven’t actually started it yet, eep!), but before then, let’s finish off the last little bits of the year…

Twin clutches

The most exciting of these are undoubtably the Cake Patterns Red Velvet Mini Clutches I made for James’s twin, teenaged nieces. They’ve pretty much only wanted cash or gift cards for a few years now, but this year I fancied giving them a little something extra to hold their gift.

The Cake Red Velvet Mini Clutch is a smaller version of the full pattern without the illustrated instructions, but on the plus side it’s free, super cute, and easy to whip up in a few hours with scraps. Here I used satin scraps leftover from my Matthew Williamson birthday dress and my swirl sheath dress and a bit of floral lining leftover from the former, too.

These are big enough to hold your average mobile phone, keys, lippy, and credit card, but not much else, but most of the times I want a little bag to match a dress this is all I really need to carry anyway. These were certainly one of those gifts I’d have liked to have kept for myself, especially since they match my dresses!

Bolster pillow covers

I’m totally less excited by home dec sewing, but we really wanted some bolster pillows for lounging in our big, new bedroom on the boat – now that I’m working from home, I especially need one under my knees while I work on my laptop! When we bought our bedding from IKEA, the duvet cover sets came with four pillowcases, and since we only use one regular pillow each, the others were just sat on a shelf.

I'm in Burda magazine!

I’m in the German edition of Burda Style magazine this month! I’m so excited!!


See? There I am right in the middle, along with the quote “I was immediately entranced by the draping”!

Someone at Burda HQ dropped me an email months ago asking if they could have some hi-res versions of my pale pink twist dress photos to use in the magazine, but it was so long ago that I’d assumed they dropped the feature or something. But no, a German edition of the fabulous November issue appeared in my postbox on Friday!

I had already scanned my subscription English edition for my review (going live tomorrow – it’s worth waiting for, I promise!), so I flipped through the German version to see what differences there were. The first thing I noticed is that it’s a heftier magazine, and there are ads in it, along with more editorial pieces (like a feature on a Philadelphian artist), more fashion spreads (like this season’s ankle boots), and that all the pattern instructions and pattern sheets were pushed to the back, and in their own separate magazine!

An incredibly simple skirt

Last night I reconnected with the magic of sewing. I’d already done a bunch of boat chores, done some alterations to take in a pair of leggings that are now too baggy (great result, but so tedious!), and I wanted something quick to wear. Since I upped my training regime for the British Transplant Games track race tomorrow (omg), I’ve lost a rather incredible amount of weight and girth so nothing fits me anymore. Which feels nice for about 5 minutes, and then it’s annoying because you have nothing to wear in the morning!

So I pulled out a bit of the black and silver lurex ribbed knit that I’d had leftover from my Marie jacket. The fabric was originally from Minerva, but is sold out now in this black colourway. I nearly gave it up in the Goldhawk Road swap, but then I had second thoughts and pulled it out of the bag. I’m glad I did, because it’s become a cute and very simple skirt!


Sorry about the quality – quick photos before work and it was raining, and my hair’s wet from the shower still!

This is literally the quickest, simplest skirt you could possibly make. Not only is there no pattern, but there’s no measuring or drafting, either! I simply took the fabric, wrapped it around myself like a skirt, marked with pins where the overlap was, then cut along the pins.

This gave me a long rectangle, and I sewed the sides together to form the only major seam of the skirt. I wear the seam at the back, but it could easily go at the sides or front since it’s all the same!

The "Eyelash" black lace bra

After I completed my world tour, I had four and a half days at home to recuperate, so I of course spent a good portion of that in my sewing cave! The first of my finished garments is this bra, which I’m calling the “Eyelash” one because the layer of black lace on the top just made me think of the bra batting its eyelashes at me!

I used the same self-drafted/traced pattern as my third muslin, but with zero-stretch silk-cotton woven leftover from the slip I made almost exactly a year ago, and some black stretch lace I’ve had in my stash (not the same as I’d used in the slip, but that’s only noticeable if you squint really hard!).

The cups are fully lined and the wings/backs are made from a black power mesh that was in my lingerie sewing stash.

First I made each cups separately (two fronts and two linings). Then I basted the lace across the fronts and joined the fronts to the linings along the top edge. I could’ve then topstitched, but I opted to understitch instead, then basted around the other edges so the fronts and linings could then be treated as one for the rest of the construction.

Here you can see the cups as I was constructing them. You can see that the lace is hanging free, only really attached at the top edge, and for an inch or so at the sides. I carried on the lace motif over the bridge so it looks fairly seamless from afar.

Easter Weekend sewing and beyond!

Thanks very much for all your birthday wishes! I had a brilliant day, and the dress fared very well indeed at my mystery dinner – the waitress complimented it the second I sat down!

With the dark colour of the dress, I really need daylight for a photoshoot, though, so the first opportunity is tomorrow (Friday). I’ll try to get the post up later that day as I know you’re all waiting patiently to see it on me!

My thoughts are definitely drifting towards the upcoming long Easter Weekend, and what I’d like to sew during it. As usual, I’ve got mental plans for way more than I can possibly get completed in four days, but here’s what I’m hoping to make…

Leggings

I need to draft up leggings for two friends from my running crew, and sew samples/muslins for each from some cheap lycra I’ve got on hand for the purpose. One of them is popping over late in the weekend so I’ve really got to get hers ready by then!

I’d also really like to sew up two pairs for me based on my own draft, one in black supplex (with the aim of using that fishnet trim on them afterwards), and one in the tribal print from Funki Fabrics.

Once a pattern is set and ready, I can churn out a pair of leggings in a few minutes, though, so I’m not too concerned about fitting these in, it’s the drafting that will take the time (and desk space!).

Style Arc’s Marie Jacket

My main task for the weekend, though, is to make Stye Arc’s new Marie jacket, especially since I’ve gathered all the necessary supplies over the past week or so – some fabulous black and silver heavy jersey from Minerva and a big separating zipper from Our Patterned Hand

Lacey Thong panty – construction tips & photos

Continuing on with Lingerie Week, I wanted to give you some extra construction tips on my Lacey Thong pattern that wouldn’t quite fit in the pattern itself (if you start adding in large photos, the Pdf filesize goes up really quickly!).

First of all, I wanted to start with two areas I’ve had some questions on:

“The 4cm ruler isn’t 4cm when I print it”. If the ruler on page 3 isn’t measuring exactly 4cm when you print it, then the print software you’re using is scaling the pattern! I use Preview on OSX, and I know it’s got its quirks – on this particular programme, if you enter in 100% and just click Print, it’ll still print at whatever the settings were before you changed them. You need to enter 100%, tap elsewhere in the print preview to watch the thumbnail resize, and then click Print. I’m sure other programmes have their quirks, too, but the bottom line is, if your ruler doesn’t measure 4cm, the pattern is not at the proper scale!

“Which size should I choose?” Sizing if difficult from a pattern creator’s perspective, because so many bodies wear a full range of sizes. I’m most confident of the Burda sizes recommended (much less so for the Big Four), so if you know your Burda size, go with that. The finished half-hip measurement is probably less helpful, but it’ll save some of you measuring it yourself.

If you’re unsure of your size, another approach to take it to “try on” the elastic before you start. Measure the waist elastic for the different sizes (pin or mark it, don’t cut!) and try it out by checking the feel around your half hip area (these panties sit over your hip bones, well below your belly button). The elastic should be snug and partially stretched, but not tight or loose.

During the construction of my black pair I took some photos of the trickier construction tips so those of you who prefer photos to diagrams can have a better look (though perhaps choosing a black fabric with similar-looking right and wrong sides wasn’t the best idea, sorry!).

I’ll use the numbers from the steps in the Pdf pattern’s Sewing Instructions below so you can easily refer back. As usual, click any of these to view the larger versions.

1. Join the Crotch to the Front

2. Join the Crotch to the Back