Patrones 343

What a nice surprise! I wasn’t expecting this magazine at all, but my in-laws were visiting Spain recently, saw it on a newsstand, and grabbed it for me. I’m so glad they did, too, as not only is it a great issue with a bunch of wearable separates (much better than dozens of holiday dresses), but it also sees the return of the designer names!

Granted, it’s been a while since I’ve had a Patrones magazine (18 months by the look of things??), and to be honest, I’d gone off them a little bit. But this one has me excited again that they might be turning things around and getting back to their heydey of a few years ago… But let’s not get ahead of ourselves – let’s take a peek inside, shall we?

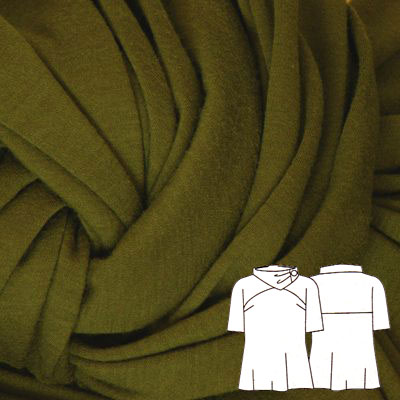
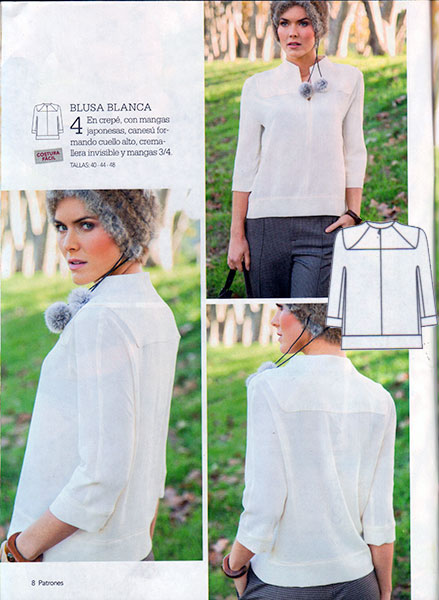
There are a ton of button-down shirt patterns in this issue – some traditional, some more blouse-like for flowing fabrics, and some more unusual, like this one with the attractive yoke panelling, dolman sleeves, and unusual centre front invisible zipper. I’d need to do a muslin first, of course, but I’m keeping this one in mind for the unusual Liberty lawn I bought earlier this year, especially since this shirt needs less than the 1.5m I bought.

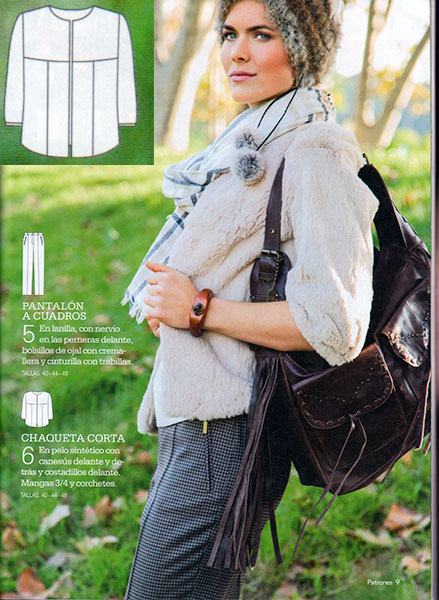
To run the risk of sounding entirely predictable – ooh! A short coat! Yes, I know I’m consumed with short coat/jacket patterns right now, but this one is a good example of a design I rarely see outside Patrones (and the seamlines are really similar to the grey tweed jacket I made a few years ago that I’ve worn to death!).

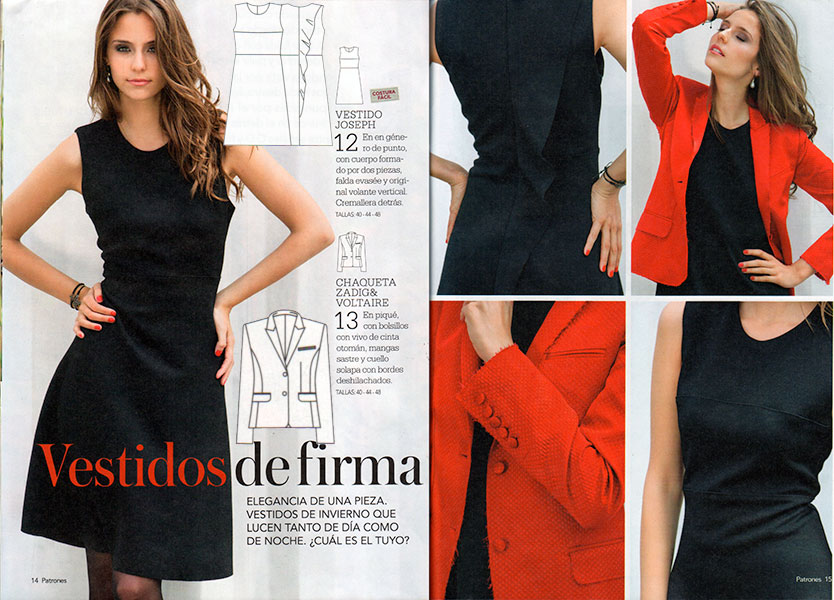
There’s a fantastic feature in this issue which contains a ton of designer dresses and jackets, but ones that would be not only quick to sew, but could easily work for office attire. First up is this Joseph sheath dress – quite plain in the front with only two horizontal seams, but the back features a flounce from shoulder to knee. Also shown here is a Zadig & Voltaire jacket, which has a pretty traditional tech drawing, but made more interesting for leaving some of the edges unfinished to fray.

A Week in a Day

I’ve been a bad blogger this week. I’ve been doing lots (as you’ll soon see), but working every weekend for the past three, plus the weeks in between, and some out-of-town trips have all really sapped my enthusiasm to write! So I’m taking the lazy option out and catching you all up with a little roundup – a week’s worth of posts in a day…

Like the Wind workshop

Cult running magazine Like the Wind approached me a few months ago to ask if I’d like to run a “sew your own leggings workshop” at the week-long popup they were throwing together at the end of October. I’d known one half of the husband-and-wife team that run the magazine, but I’d never met Julie before this. Once I found out that she not only owns her own overlocker, but bought it when she sewed her own wedding dress with it(!), I knew we’d get along just fine.

We had five runners who’d only done a small amount of sewing before, but had never touched an overlocker before, and certainly not a coverstitch either! They each picked their own fabric from FunkFabrics’ range, and walked home in some very stylish leggings at the end of the afternoon!

Georgina picked a “Gotham” print, so of course she just had to pose with the Batman art in the gallery!

And here’s the finished set! I saw quite a few little “omg I’m so happy in my leggings” dances at the end, which really reminds me why I love teaching so much. Lucy posted a great writeup of the street art tour and my class, too.

There may be another Like the Wind workshop in the new year if we can work out the logistics, but there will definitely be more up at the Thriftystitcher studio in January and February, to be announced very soon! The classes are very similar, so if you’re a runner you can come learn at Thriftystitcher, or non-runners vice-versa at Like the Wind.

But I was so jealous of all their finished leggings that I treated myself to some Funkifabrics lycra this week (it was difficult, but I settled on this geometric aqua number in the end, because it reminded me of a Lamb album cover!).

Random sweatshirt sewing

When I was pulling out supplies to bring along to the workshop, I came across pieces for this sweatshirt that I’d cut out in February when I was trying to deplete random bits of leftover sweatshirting that was taking up too much room in my little sewing cave. The lavender “sacrificial sweatshirt” came out of that same cull, but for some reason I never quite got around to sewing this blue one together at the time.

A matching green Cake clutch bag

Wow, what a busy week last week! Thank you all so much for your support and orders of my new VNA Top pattern (remember you can still get 10% off everything by using code “LASEREYES”)! The big wedding I was attending was actually last weekend, but I was so swamped I’m only just able to share these details with you now…

Remember the green cropped blazer I’d sewn for the wedding? I’d shown you how it looked with casual clothes, but I can now show you how I wore it on the day, along with the dress I’d planned it around:

You can really see how the green piqué works alongside the texture of the dress in this closeup shot I took in the car on the way to the wedding…

And you can also see that I did indeed manage to sew up a matching Cake Patterns Red Velvet Clutch from the same fabric and lining as my jacket! The whole look was a success, IMHO, and the chilly evening meant I kept my jacket on almost the whole night, only taking off my jacket (and exposing my bare back in the dress) when we hit the dance floor.

The Most Beautiful Bra in the World

…is one that finally fits after days and days of muslins and tweaks!

You see, this is the third muslin of my latest attempt to sew a Bra That Actually Fits and I think I’m finally happy with this one.

I started off by tracing a well-fitting RTW bra and I sewed up a muslin of it according to the fabulous instructions in Demystifying Bra Fitting and Construction. From that, I could see that the bottom of the bra cup was too long for my underwires, and, as I suspected, the straight legged dart was too pointy and I needed some room in front of it, so I made the front leg curved.


Apologies that the orientations are opposite between the two!)

Then I ripped out the basting stitching of my muslin, sewed up new cups according to the second cup pattern, and reused all the other pieces from the muslin that were absolutely fine, namely the wings, bridge, straps (gingham ribbon here!), and underwire channels:

The cup shape of the second muslin seemed good (though it’s hard to be subjective in the mirror and selfies), but I had a bit of excess fabric along the top edge of the cup that needed pinching out. I didn’t want to create a dart at the top edge as I eventually want to make this bra from lace, so Norma suggested I take it out from the sides (bridge & underarm), making sure those lengths didn’t change as I did so.

My refashioned Paris race tee

As I mentioned earlier this week, one of the projects I wanted to work on was refashioning the free (but too large) shirt given out at the Paris half marathon a few weekends ago. Pretty much every race these days gives out a shirt, and usually they’re in nice wicking fabrics, but very rarely are they nicely designed, or vests. I prefer to run in vests instead of teeshirts (even if I’m wearing a jacket over top), so after I finished sewing my mom’s latest chic sweatshirt, I set to work on the race tee.

Here’s a “Before” shot, with my friend Daniel holding up his at the race expo (this is the “Medium”, but it’s massive, like a men’s large!)

I really like the Paris logo, so I wanted to keep that on the front, but I didn’t care about the adidas stripes on the sleeves or “boost” on the upper back (the new shoe they’re promoting). So the first step was to carefully cut along the sides of the shirt and sleeves, so I could lay the shirt out, folded along the centre front and centre back and pin my (self drafted but based on the Kristina Shin sloper) vest pattern pieces down:

I then cut the pieces out, with seam allowances at the sides and shoulders, but none at the neck and arm edges, since I planned to bind those with some of the black technical strips I used with the disco running top.

These were the only bits of the shirt I didn’t use!

First step is to use my little pizza wheel measuring device along the bound edges to work out what length strips I need…


I caught my mistake before binding – the neckline length needs doubling, as I measured both on the fold!

The grey vintage midi skirt

Remember my my pinup sheath dress? Well, I made good use of the remaining 2 meters of so of the ex-designer charcoal grey flannel and made a midi skirt with it!

I used this vintage New Look/Maudella midi skirt pattern I bought in Sheffield not long ago:

I made View 2 (seen in my attempted tech drawing above), and the pattern pieces for it and View 1 were already cut to size 18 (my size, judging by the pattern, eep!), which made it easy to just lay on the fabric and cut. There are only three pattern pieces (skirt panel, yoke, and waistband), so it was a really quick skirt to construct, though the hem sat ready to be handsewn for a week or two before I had time to do it!

At first I was concerned that the front and back pieces were exactly the same, but I haven’t noticed any problems in the fit while wearing it. I think this might be down to my pancake butt, but someone with a more pronounced derriere might have issues.

Tricky pattern? Build a paper model first!

After a weekend of tracing patterns and sewing kids clothes (some you’ll see later, but others are Christmas gifts not to be ruined), I finally got a chance this evening to cut out the fabric for the wool jersey top from the latest Patrones, #285, that I wrote about last week:

I came across some gorgeous ex-Prada wool jersey at Ditto Fabrics (you’ll remember them from earlier in the summer when I visited their Brighton shop) and knew I was destined to pair fabric and pattern together! (NB: if you’re planning on making this top with this fabric, buy 2m instead of the 1.5m called for in Patrones as it’s ever-so-slightly narrower than Patrones’s and I had a real tricky time fitting everything into 1.5m!) I also bought some dark turquoise ex-Burberry coating, some I-can’t-believe-it’s-not-silk ex-Prada polyester jersey with trompe l’oiel sequin print, Paul Smith grey marl jersey with stars, and some black stretch denim (all pictured at the bottom of my fabric stash gallery if you fancy a perv!). Honestly, I’m beginning to think the owner Gill is a bit like the UK version of Gorgeous Fabrics, she has such an eye for quality ex-designer stuff!

The funny this about this pattern is that on first glance, it looks like a really easy garment – just a basic blouse with dolman sleeves and some horizontal seaming in the front and back, topped off with a triangular collar with a bit of gathering detail and a covered button. Or so it’d seem. Look a bit closer at the pattern pieces and start chucking bits of the instructions through Google Translate, and it all starts to become a bit more interesting…

Welts and Hives

I’ve sewn as far as I can now on the KnipMode Weekend Bag without the extra laminate – I’ve finished the lining, the three exterior pockets, and joined the two main pieces, but the next step is to attach the zipper to the long strips adjacent to it, and those are the bits I ran out of laminate for (oh, I decided to be lazy/cheap and forego the piping, btw).

So rather than twiddle my thumbs while I wait for the postal strike to run its course, I thumbed through my fabric stash instead to get some inspiration for some “me sewing”, after making so many christmas presents (which I can’t show you til December since the recipents visit here, sorry). Funny, but the two fabrics that jumped out at me the most were two I didn’t buy at all – a browny tweed tartan wool and a royal blue tartan sheer silk. Both are remnants, and both were gifted to me by my neighbour Helen.

My next step was to go through my pile of pattern magazines and find suitable patterns for them both, and I ended up with:

A Room Of One Sewn

After a bit of hard labour with some power tools and brute force, I was able to clear three of the little hotel rooms on our boat two weekends ago. One became a walk-in wardrobe, one will very shortly become James’s office, and the third blossomed into my (temporary) sewing room (all the little hotel room walls will be ripped out to make way for our living room, two bedrooms, and two en-suites. The fate of a sewing room in the new plans is still unclear!).

But let’s move on to a tour of my sewing room, since this is probably the tidiest it’ll ever be…

Here’s the overview shot of the whole room. It’s about the size of two single beds side-by-side, with light coming from two halogen lamps and the porthole (which puts out a surprising amount of light during the day).