Vintage wiggle dress – pattern notes

My latest project is this vintage sheath dress from the November Burda magazine (which you can purchase as a pdf here if you missed the magazine)!

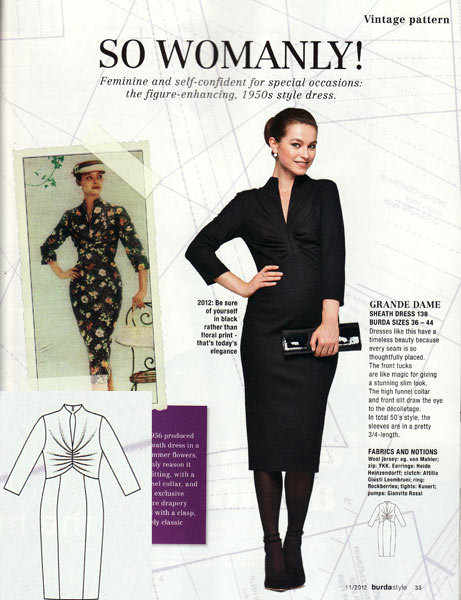
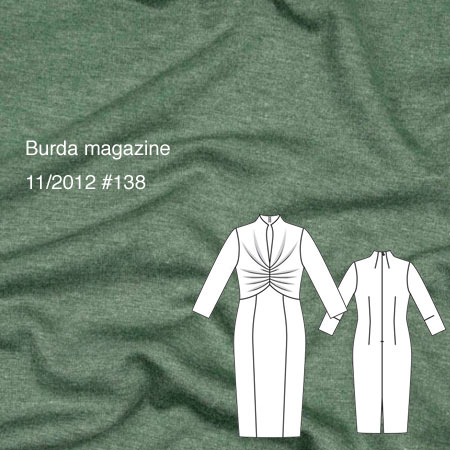
It’s a reprint of an original pattern Burda printed in 1956, and one of my favourite running features that Burda magazine have been doing this year. Since the company’s had a very long history, it makes sense that they should look into their archives, dust off a few gems, grade up the sizing to their usual modern range, and translate the instructions!

Contrary to popular belief, this particular one is not a maternity dress, despite the fact that the model clearly looks like she’s “showing”. I can assure you that I do not look pregnant in it one bit, so let’s move on with the catty remarks…

In any case, I finished this one on Sunday night, but considering that it gets dark at 4pm here now, I won’t be able to do a photoshoot until this weekend, meaning you won’t see it on me until next week. By which time I’ll have probably forgotten all the construction details, boo!

So by way of a reminder, I thought I’d type up my thoughts now, then you’ll see the finished design next week. So the “Tell”, then the “Show”!

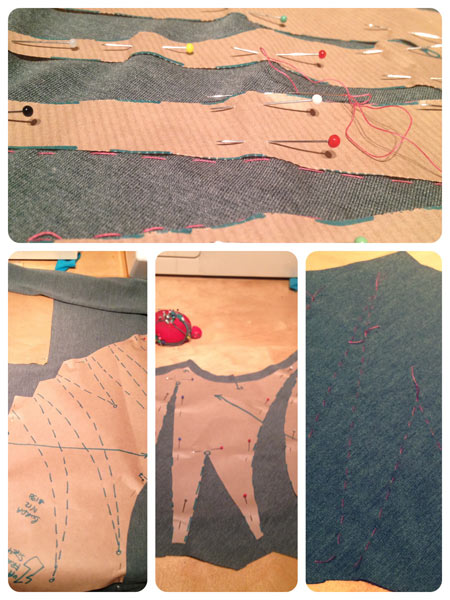
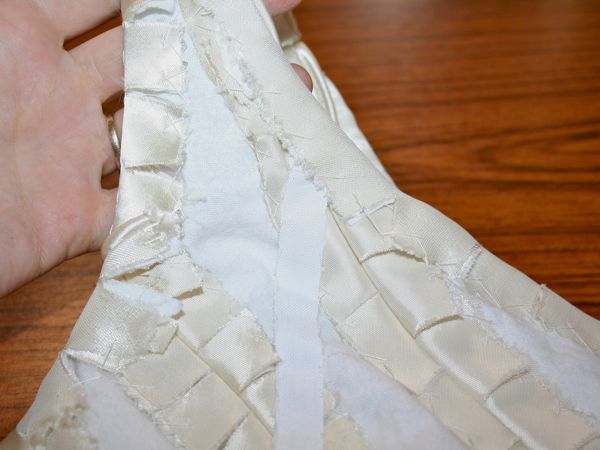
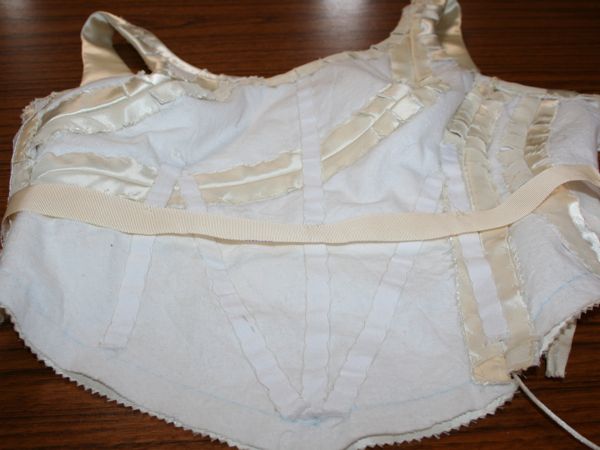
1. The bodice has seven monster, curved darts, all of which needed to be accurately marked onto the fabric. If you have carbon paper, I suggest you make good use of it, but for me, I remove the inside of the darts with scissors, then thread trace each dart with silk basting thread so I can see it on both sides. Then repeat for the other bodice piece. This took a few evenings, but it was important to get them right, as it’s the focus of the entire dress!

First running gear muslins

I love it when different areas of my life start overlapping! I’ve been a runner for about 7-8 years but I’ve only really sewn running gear a few times (mostly because my mom knows what I like and gets good stuff on sale for me!). But I’ve got the itch to sew the lycra again, and so I made the first steps towards making my own running gear designs a reality.

First step was to make quick and dirty muslins to check the fit and mark style lines. The Jalie 3135 skinsuit pattern was my basis for my running leggings (minus the top half and the front zipper opening!). I used the “silk touch” lycra jersey from Tia Knight as my muslin fabric here since it was the cheapest 4-way stretch she had, but it’s surprisingly really nice! It’s got a hand like a silk jersey, but seems a bit too drapey to be ideal in exercise gear, though it should be fine for the occasional accents or panels if I want to.

So I made my muslin, tried it on, and while I was wearing it, drew lot of placement and design lines straight on the fabric with a Sharpie:

  • I drew in my waistline just under the pattern’s torso double line
  • I marked the knees on front & back, and also where the curve of my bum lies (helpful for placing design lines later!)
  • I took out some excess in the ankle (no cankles here!) and about 4 inches off the length (the legs are reeeeeeeeally long – maybe to cover skates?)
  • And then, finally, I drew in some curved design lines where I thought they might look nice around my thighs and calves

The end result looks a bit like a liposuction patient (which is why I’m not modelling it!!), but it definitely served its purpose!

The MyImage Purple coat

This coat originally appeared on my Fall 2011 sewing plans, so it feels good to finally finish it just as the weather’s starting to defrost (I hope anyway!). I’ve been wearing my muted turquoise coat for most of the winter, but I’m hoping to wear this to transition into Spring!

I’ve used “coat” in the title, but is it really a coat? Is it a jacket? Where’s the line drawn, anyway? It’s short like a jacket, but wool and warm like a coat, so I’m not quite sure what to call this.

This pattern appeared in the Winter 2011 MyImage magazine (along with that awesome cowl top!) and it’s still available to buy if you fancy it (and holy crap, it’s on sale right now for €1.95/US$2.63, too)!.

You can see some in-progress photos of this coat here and here. The nice thing about working on a project for a while is that you get to see a lot of the “guts” as I work! The downside, of course, is that I have the attention span of a gnat and I get bored when projects stretch over the fortnight mark…

The first thing you notice about this coat is that Big! Collar!! It’s a “whole lotta look”, but I totally dig it. Your mileage may vary! I’ve worn it out twice over the weekend already and the collar is great – it’s substational enough and close enough to the neck that I don’t need a scarf!

Flashes of gold and silver

the gold

Yesterday I ran a 10km running race to celebrate my 2nd rebirthday of my bone marrow transplant (well, it’s a month early but this race is so much nicer than the July one I ran last year!).

The race went really well, and I truly gave it EVERYTHING I had, running the first 4 kilometers at an astonishingly fast 5min per km pace, and then I tailed back to a bit more realistic 5:30/km pace until the last 200 meters, when I gave an all out sprint for the finish!

Like last year, I ran with the memory of my three departed BMT friends firmly in my mind – this was for Vera, Rob, and David, who fought so so hard, and who even today inspire me to push and fight even harder on their behalf.

I wasn’t quite sure how well I did until I viewed the official chip times on the website last night… 51:21!! That’s only 7 seconds off my pre-illness Personal Best! I really was only trying to beat last year’s time of 53:38, and I honestly didn’t think I’d come anywhere close to that magical 51 minute point for me!

Our French road trip

Ahh, what a fabulous, gluttonous, relaxing, and wonderful holiday! If it weren’t for arriving back into an extremely busy work and social life, I’d probably be the most chillaxed, freckled, and happy woman on earth right now.

Our road trip lasted 11 days, and took us from Calais down to the Loire Valley (Canault and Saumur, mostly), through Poitiers and Limoges, through the Lot and the Midi-Pyrenees to Toulouse, then over to Montpelier and Sète, up through the Rhone valley to Tournon and Tain L’Hermitage, then up to Lyon, and finally making pitstops in Cluny and Auxerre on our way to Paris before heading home.

Sewing-related towns driven through:

  • Alençon (that’s just a display inside a roadside rest pictured above!)
  • Couture
  • Cluny
  • (Though I swear there were more I just can’t recall right now!)

A silver & linen dress – decisions and basting

Thank you all SO much for all the feedback on my pattern shortlist earlier this week. It’s so incredibly helpful to hear from others which have worked and which haven’t, and to get me thinking on what I most like to wear (and what I don’t!).

Since I tend to email commenters personally but not put my responses in the comments themselves, I thought it might be helpful to answer a few general questions from the comments. I’m not really seeing this as an overly dressy/posh/fussy dress – for me, the linen dress on its own would be something I’d wear to the office, out to lunch with friends, or out in town, and the motif I bought in Paris is just a sort of permanent necklace. I always overdress anyway, and I’m not envisioning this as anything “left for best” in the slightest! Believe me, there’s very little I keep aside and out of my daily rotation!

Nancy K suggested a tunic might be more wearable than a dress, but I had to admit to her that I really, really don’t feel comfortable wearing tunics. There’s just something about the awkward “too long for a top but too short for a dress” length plus too many layers that just makes me feel self conscious. Whereas I wear dresses and skirts almost continuously in summer (compounded by the fact that I don’t wear shorts)!

Finally, I decided against a bunch of lovely sheath dress patterns purely for linen/wrinkle reasons, and my thinking that these would probably have more horizontal wrinkles from sitting than full-skirted numbers. I’m debating whether I’ll underline this dress or not for that same reason, but I suppose it all depends on if I can find suitable cotton or silk lightweight fabric for a good price while we’re in France.

Enough with the commentary – I finally decided on dress #102 from the KnipMode 03/2010 supplement (one I didn’t even scan in my initial review! gasp!).

Black flannel pyjama bottoms

James isn’t normally the pyjama sort, but it’s been particularly cold this winter and he’s been in need of some PJ bottoms for quite a while. He only has one pair and it’s kinda sad to be wearing Santa Homer Simpson in February:

(Note to family – please don’t take this as a plea to send more. He really only needs and wants this one pair!)

So I took pity on him and said I’d sew him a new pair to wear, and Burda magazine 12-2010 #134 was particularly handy. There are tons and tons of unisex pyjama trouser patterns out there, but this one was easy to find, and I know Burda’s sizing is so consistent that a 52 would fit him fine.

We were going to use the grey knit fabric we bought at Ditto, but I greatly underestimated the width of that so there was nowhere near enough (totally my fault as Gill asked “are you sure that’s enough?”). In a sea of insipid cutsey prints, Chawla’s came through with this solid black cotton flannel for cheap (3m for £11 shipped and I’ve got extra for jacket interlining if I like now, too). Chawla’s may not have the widest selection of natural fibre fabrics, but they are consistently the fastest shippers ever – I ordered this on a Tuesday, and it arrived in Thursday’s post!

The Winter Coat – construction

About a year ago I bought some gorgeous, ex-Burberry wool coating fabric from Ditto with plans to eventually make another winter coat. The muted turquoise wool has a patterned herringbone weave on one side but it’s also very thick and un-drapey but has the advantage of not fraying at all (almost like a boiled wool or Melton).

The fabric is so thick that I knew had to choose my pattern wisely, leaving out coats with lots of pleats or gathers that would’ve meant lots of bulk here.

As soon as I saw the Armani knockoff coat in the September Burda issue, I thought I’d found the match for my fabric, but as you recall, that pattern was just downright awful. So I started looking through my coat patterns again for something suitable, and Claire (Seemane) suggested I combine Patrones 285 #29 with some elements of the other coats in that issue, which is more or less what I ended up doing (though I need to change my tech drawing here to show the applied welt pockets I finally decided on rather than buttoned welts).

Bridal bodice – finishing the edges, waist stay, and zipper

The next step in my epic wedding gown project was to properly finish the neckline and armhole edges in advance of the lining. Instead of most lined garments where you construct the outer shell, construct the inner shell, then place the two together, right sides facing and sew around the opening edges, in this case Bridal Couture advises us to construct the outer shell, fold in the opening edge seam allowances, then create the lining, with the opening edges similarly folded inside, and then place the two together wrong sides facing and very carefully fell-stitch along the opening edges, prickstitching the lining where necessary.

So here are the neckline and armhole opening edges, nicely clipped, pressed, and catchstitched:

The next step was to add the waist stay, tacked to the boning channels with bottom edge of grosgrain on the marked waistline:

Bridal planning update

Apologies but this is a bit of a “brain dump” post as I’m understandably a bit frazzled right now, with the BurdaStyle book deadline looming on top of wedding planning and everything else I seem to list every time I post (ahh, just thinking about it is starting to stress me out, sorry!).

So I haven’t done much tangible work on my gown since I last updated because I’ve been focusing on getting the BS book dress done since it has a more immediate deadline, but I’ve been doing lots of mental sewing on the gown. Which, you’ll remember, is half the battle for me. So I took an evening out to read (really read and digest!) through “Bridal Couture” by Susan Khalje and the OOP Palmer/Pletsch “Bridal Gowns—How to Make the Wedding Dress of Your Dreams” book (the former being way way more useful than the latter IMHO). I placed copious amounts of Post-It notes sticking out the edges at places I want to refer back to later.

I’m also really glad I ended up taking that PR online Underlining class a few months ago now!! Though I just looked to see if I could link to the Underlining class somehow, and I noticed Susan Khalje herself is teaching a “Wedding Gowns 101” class starting Aug 15. If it were a few months earlier, I’d have jumped all over it, but you need time to devote to the classes most evenings and I’ll need all the time I can get to work on my gown!

After reading through the two books I had everything mostly straight in my head about this dress, but the boning placement still puzzled me because my pattern doesn’t have any obvious vertical seaming to place the boning along, and all three examples in Bridal Couture had some sort of princess seaming. Luckily for me, it was easily solved on the PR messageboard and by this Susan Khalje article, so I’ve got a full gameplan in my head now for the dress!