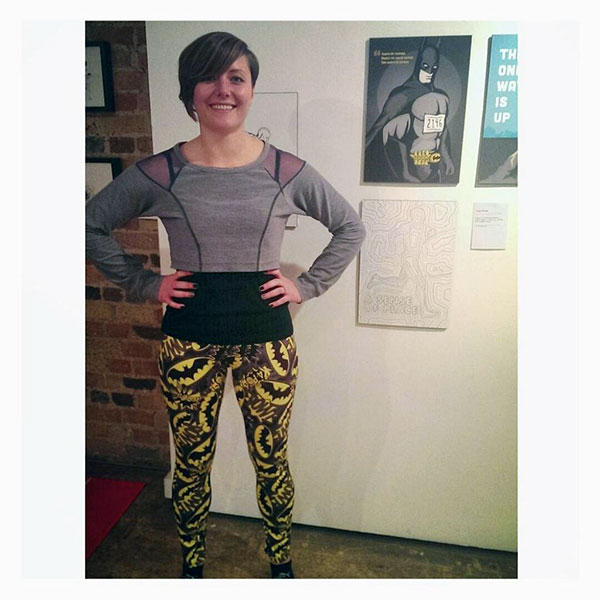
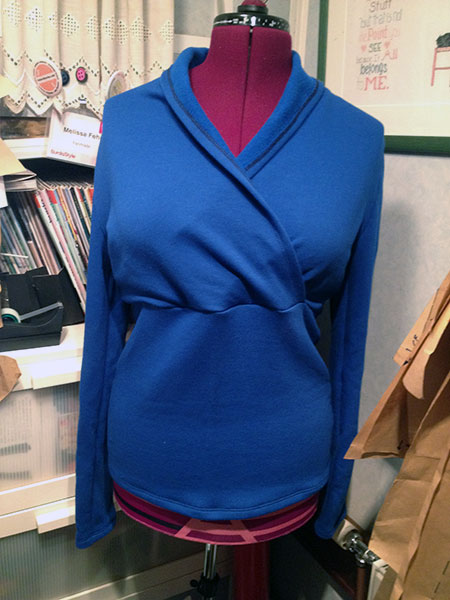
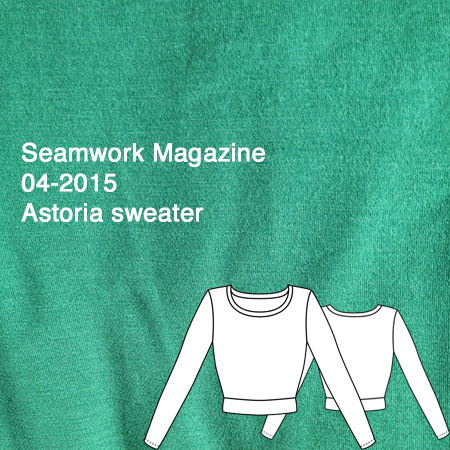
A green merino Astoria sweater

I’ve been a subscriber of Seamwork magazine since issue one back in December, and can I just say that they are killing it with the digital format, pattern bundling, and freemium vs add-on price point? Seriously, this is the future of not just sewing magazines, but magazines. I’m proud to be both a subscriber and a contributor (look out for more of my writing in the June issue!), to be honest! When I saw the cropped “Astoria” sweater in the April 2015 issue, I just knew I was going to sew it! The nice thing about Seamwork (which is made by the Colette Patterns team) is that subscribers get both patterns on the 1st of the month, but if you’re dawdling and don’t notice a great pattern until someone like me sews it up a month or two later, you can still go back and buy the pdf pattern on its own (and they include Copy Shop versions, too).

All the Seamwork patterns are designed to be sewn in an hour, and, just like the Oslo cardigan I made back in January, this one came together in a single evening. Also, I appear to only make Seamwork patterns in wool jerseys, ha!

I couldn’t believe my luck when this pattern appeared, as I’d just bought some gorgeously soft green merino wool jersey at Mood in NYC mere days before! I’d only bought 2 yards (which I’d regretted once I got home!) for $18/yd, but happily there was enough there to cut the long-sleeved version of this plus still have enough leftover for a winter running buff.

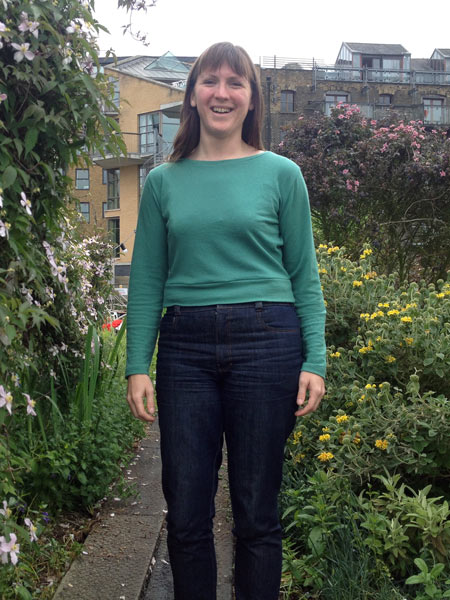
I made size Large since my waist and hips corresponded best to that size, though my bust is a Medium on their chart. At first I made size Large with no alterations, but I wasn’t 100% sold on the fit. It took a whole day of me wearing it to decide that it’d be better with the sides taken in by 2cm (an inch) on each side. In hindsight, I could’ve gone with the Medium, I think.

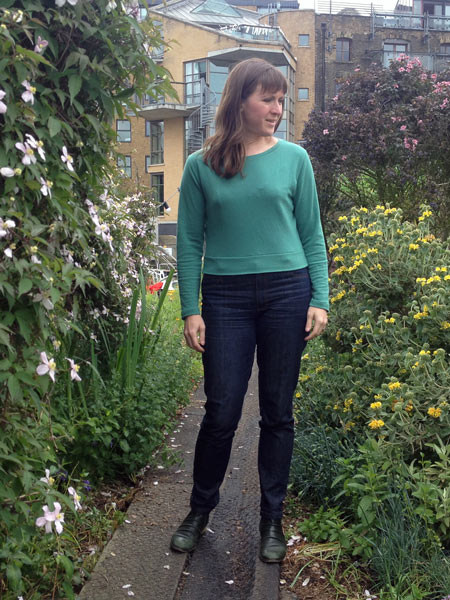
So I cut off the hem band, took in the sides from the armpits down (taking off the same 2cm from each of the hem band seams, too!), and overlocked the hem band back on, this time with only the minimum seam allowance to avoid shortening the hem any more than necessary. And the fit is waaaaaaaay more to my liking now!

Two Weekend Reads

There are many, many great articles on the web right now for activewear inspiration, and I am desperately overdue in showcasing all the amazing versions of my patterns that you guys have made over the past few months, but I wanted to bring two articles in particular to your attention…

The first is a fantastic tutorial Maria (Velosewer) posted on how to create a secure, zippered pocket for insertion into the back pocket of my Surf to Summit Top pattern. It works equally well with the men’s or ladies’ versions, and only requires a little extra bit of fabric and an invisible zipper. It’s all kinds of genius, and I’m totally going to try it out myself on my next cycling version!

The other exciting read is that my first article for Seamwork magazine is out now, A Guide to Activewear Fabrics. I talk about how to shop for different tech fabrics, what names they can be found under, why cotton is terrible, and how to avoid that horrible smell after repeated washings.

KnipMode magazine – December 2014

What a blast from the past, right?? Some longterm readers may recall that I used to subscribe to the Dutch pattern magazine, KnipMode, but the quality of the designs really went downhill when they appointed a new editor and I let my subscription expire back in 2012. It was an easy choice, since it was the most expensive of my magazine subscriptions, but when I get the opportunity, I still pick up the odd issue from continental newsstands.

Well, we were in Brussels shortly before Christmas for a festive weekend at the Christmas market, and on our drive back we stopped in at a Belgian supermarket. I was surprised to find KnipMode on the magazine rack, and I couldn’t resist seeing what KnipMode were up to these days. Clearly loads has happened since 2012, as they’ve not only had a complete redesign, but have a new publisher as well! The editor I blamed for the downhill spiral is still there (grumble grumble) but the designs look decent in this one, so I’ll hold out hope…


“Knip” means “cut” in Dutch, so I think the new scissor logo is quite cute!

First up is a green party dress with lots of gathering and a nice surplice neckline. It’s not a million miles away from my 30th birthday dress, which is probably why I was drawn to it!

This tie-hem shirt is styled for a party here, but I think this could be a really great casual top, too. It’s made for wovens, and with the kimono sleeve it means there’s only two patterns pieces plus the hem binding, so it’d be super quick to sew it! It reminds me a little of a Pattern Magic design that I drafted and muslined but haven’t quite sewn up yet, though the tie on that is in a different position.

A Week in a Day

I’ve been a bad blogger this week. I’ve been doing lots (as you’ll soon see), but working every weekend for the past three, plus the weeks in between, and some out-of-town trips have all really sapped my enthusiasm to write! So I’m taking the lazy option out and catching you all up with a little roundup – a week’s worth of posts in a day…

Like the Wind workshop

Cult running magazine Like the Wind approached me a few months ago to ask if I’d like to run a “sew your own leggings workshop” at the week-long popup they were throwing together at the end of October. I’d known one half of the husband-and-wife team that run the magazine, but I’d never met Julie before this. Once I found out that she not only owns her own overlocker, but bought it when she sewed her own wedding dress with it(!), I knew we’d get along just fine.

We had five runners who’d only done a small amount of sewing before, but had never touched an overlocker before, and certainly not a coverstitch either! They each picked their own fabric from FunkFabrics’ range, and walked home in some very stylish leggings at the end of the afternoon!

Georgina picked a “Gotham” print, so of course she just had to pose with the Batman art in the gallery!

And here’s the finished set! I saw quite a few little “omg I’m so happy in my leggings” dances at the end, which really reminds me why I love teaching so much. Lucy posted a great writeup of the street art tour and my class, too.

There may be another Like the Wind workshop in the new year if we can work out the logistics, but there will definitely be more up at the Thriftystitcher studio in January and February, to be announced very soon! The classes are very similar, so if you’re a runner you can come learn at Thriftystitcher, or non-runners vice-versa at Like the Wind.

But I was so jealous of all their finished leggings that I treated myself to some Funkifabrics lycra this week (it was difficult, but I settled on this geometric aqua number in the end, because it reminded me of a Lamb album cover!).

Random sweatshirt sewing

When I was pulling out supplies to bring along to the workshop, I came across pieces for this sweatshirt that I’d cut out in February when I was trying to deplete random bits of leftover sweatshirting that was taking up too much room in my little sewing cave. The lavender “sacrificial sweatshirt” came out of that same cull, but for some reason I never quite got around to sewing this blue one together at the time.

Book Review: Two Pattern Grading books

I’ve got not one, but two books to talk about today, both on the subject of pattern grading, which, to be honest, has hardly any books published on the topic and seems to be a bit of an industry secret or something.

If you’re not familiar with what pattern grading is – it’s the process of taking one pattern and adding or subtracting amounts at various points to make it another size, or multiple sizes. This isn’t just a simple equation of “well, size Y is twice as big as size Q” because humans’ shapes don’t grow at the same rate (ie: the difference between a size 0 and a size 18’s shoulders aren’t likely to be as great as the difference in hip sizes). In general, the measurements around the body change much more than the vertical measurements, so you need to follow some rules to know how far to move different points and in which directions.

Now, there’s an old-fashioned way of doing this with paper patters, scissors, tape, a special “grade ruler”, and several hours of your time, and this was covered pretty extensively in the September 2014 Threads Magazine (#174). In my personal opinion, this is fine if you only want to change one pattern to one other size, for instance if you have a vintage pattern but want it in your own size. Doing more than one size this way is a great way to end up throwing everything into the bin after several hours of swearing.

In my opinion, the far less stressful way to do pattern grading is digitally. You select a point, tell your software (like Adobe Illustrator) to move it xx cm vertically and yy cm horizontally, and you do that to all the points around the pattern. No taping, no cutting, and no weird ruler. Plus it’s way more accurate. So with this in mind, my reviews of both books are skewed heavily towards how they deal with digital drafting.

Let’s look at “Grading Workbook” by Connie Crawford first. It’s been out as a print book for a while, but I bought an early edition of the pdf ebook last year, which has been extensively cleaned up and digitised. I checked about a month ago, and there haven’t been any revisions so the copy I’m reviewing here is indeed current.

The book is targeted at someone who has some knowledge of pattern drafting, but is a beginner at pattern grading – most home sewists would be able to follow along with the introductory chapters which explain the methods and theory, and how to select different grades.

For each of the grade tables (ie: bodice, skirt, sleeve, stretch, child, etc), there are a few pages which show which point is being selected and which direction to move it, shown in a series of diagrams, like these two:

Sanchia's Sunshine Yellow Threshold Shorts

Wow, thank you all so much for your compliments and love over my new Threshold Shorts sewing pattern! I always start my patterns with something I’d love to sew and wear myself, so it’s always great to find that others have been wanting the same thing, too!

As I mentioned earlier this week, I sewed a lot of versions of these shorts during the development process, but also in the road-testing phase so I could cover all the different pocket and runderwear options. But also then because I loved running in them and wanted more pairs! So you’ll get to see a bunch more versions on me, but I thought first I’d share a pair I made for Sanchia, my athlete model and amazingly inspiring runner friend.

Beyond having the most enviable hair (why is it that we always want the hair we can’t have?!), Sanchia sews, she runs, and she never fails to crack me up every time I talk to her! She’s also pretty much the only person I know who got a PB at the sweltering Hackney half marathon earlier this year, of which I’m just in awe (I got a Personal Worst that day!).

I usually see Sanchia on Tuesdays at Run Dem Crew, but it was really great to have a quiet chat when we met up at lunchtime to take these photos. There’s been lots of debate over the past few years about the lack of black and mixed-race ladies on the fashion runways (and rightly so), but I hadn’t really thought about it being the same way in the exercise fashion industry. As Sanchia put it, “When I started running, there wasn’t anyone running who looked like me”. But she’s learned a lot over the years, especially about advice for black and mixed race girls on beauty and hair care while sweating, and she’s hoping to start up a site soon sharing what she’s learned (rather than just keeping it secret among the Gyal Dem, ha!).

Now, a word on the shorts I made for her here. I’d actually recommend her going up a size – they look great for photos, but having them fit this close means there’s not enough room for forward leg movement in running. It’s my own fault – I didn’t have my tape measure with me and had to guesstimate based on her RTW size, and I got it slightly wrong. She’s wearing size XS here but I’d recommend she goes up to a size S for running. If your first pair has a similar fit, I’d advise the same!

On sale now: Threshold Shorts pattern with bonus runderwear!

Please welcome the newest Fehr Trade sewing pattern… the Threshold Shorts!

A running short designed for lightweight wovens or mesh fabrics with three optional pockets, curved seamlines, bound hem, and elastic waist. An optional runderwear brief or thong can be attached at the waistband or worn separately.

So why am I releasing a shorts pattern in September?? Well, this particular pattern has been in development since May, and it’s been my most technically challenging pattern to date. Anyone can design shorts that look good standing still, but it’s another matter entirely to design shorts that look good while you’re running at threshold pace. And well, this is how long it took me until I was happy with the result.

I’m not just saying that, either – I will be running Berlin marathon in two weeks in a pair of these shorts. Quite honestly, I wouldn’t be doing this if I had any doubts about their performance or comfort, because a marathon is a very long time indeed to be annoyed with a garment!

Sewing Indie Month: An interview with Hannah from Sinbad & Sailor

As part of the wonderful Sewing Indie Month celebrations, each of us are collaborating and getting to know each other throughout the month of May. In the planning stages, I’d asked to partner with Sinbad & Sailor for a whole bunch of reasons – I’d been following her on Twitter for ages, I love the timelessness of her designs, and she also lives in London, yet somehow we’ve never managed to meet up!

Of course our first thought was to meet up in a pub somewhere and do the interview in person, but then we realised it’d probably be a lot more coherent if I interviewed her over email and celebrated with a drink later instead! So go grab a drink of your choice and come get to know Hannah!

1. How did you come up with the name Sinbad and Sailor? Do I sense a maritime connection at all?
No maritime connection in the S&S story it’s all land-based I’m afraid… When I was starting out it took me a long time to find the perfect name as I wanted something which reflected East London, where I’m based, living just one road away from where my Granddad grew up and also sewing (of course!). One friend suggested I look at Cockney Rhyming Slang (which is a fairly modern slang where phrases are derived from taking an expression which rhymes with a word and then using that expression instead of the word – ie. apples and pears = stairs) and see if anything had the right ring to it. I discovered that ‘Sinbad and sailor’ is cockney rhyming slang for tailor and I knew straight away that was perfect.

2. What gave you the push to start your own pattern company? Did you train in fashion, or did you segue from another career?
I have been sewing since school and studied fine art sculpture at UAL after which I went back to sewing in earnest. I’m a recipe following kinda gal and was always using patterns but found that the offerings felt very dated, hardly reflecting any current trends or styles which combined with their confusing instructions format created a frustrating sewing experience. Walking to work one day it struck me that if I was getting frustrated by the current shortfalls in sewing patterns perhaps other people were too. Rather than waiting and hoping that someone else would create these patterns I decided to be proactive and start making them myself.

3. In your mind, who is the quintessential S&S customer? What is her style?
The quintessential S&S customer is a woman who values her independence and likes to express herself through the way she dresses. Her style would be her interpretation of current trends and she’d be bold in her use of colour and prints when sewing (after all how are you going to rake in compliments with a plain back top?!)

Grey Donna Karan leggings (Vogue 1378)

I don’t sew many “Big Four” patterns these days, but when I do, they’re invariably Vogues, and even then, they tend to be the designer patterns. The Big Four are really bad value in the UK, for starters, but then I also hate fighting with massive sheets of tissue paper, playing the “how much ease?” roulette, and dealing with outdated construction techniques. Give me a magazine maze to trace or pdf to tape together any day!

But I do love great and interesting seamlines, so when the Donna Karan coordinates pattern, Vogue 1378 was announced, I immediately wanted to make those leggings (the wrap top? Meh. I’ve seen a thousand like it).

Since there was a sale on Vogue patterns a few weeks before I was due to visit my parents last November, Stacy very kindly bought it for me at sale price (even without shipping, it was like a third of what I’d pay here) and it was waiting for me when I arrived! Thanks Stacy!

But for all the aforementioned reasons, I never quite got around to making it until now – the thought of unfolding all that tissue to trace the tons of pieces just made me choose other patterns instead. But eventually I realised that I really needed some basic, all-around trousers, so out they came! By my measurements, I should be a size 16, but I opted to throw all caution to the wind and make a size 14 instead, as I wanted them to be close fitting, like leggings. Having gone down a size, I now think the ease is just right – not stretched tight, but not baggy either.


(Photos shot whilst holidaying in the medieval Breton town of Dinan, in France! Paired with my Manequim birthday silk blouse)

Dozens of Duathlons!

I’m not entirely sure where the time went since my birthday and the release of my latest Duathlon shorts pattern (oh yeah, I ran that marathon thing…), but the internet has simply exploded with amazing finished versions of the Duathlon Shorts and capris in only a few short weeks.

If you’re looking for inspiration to sew up your own activewear or join in the Spring Race Challenge (open through 4th July weekend now!), then settle on in…

Kathy’s capris

Kathy’s one of my pattern testers so she had a bit of a head start on the rest of you, but she liked the pattern so much she went on to make two versions of the capris, both with really nice contrasting fabric choices:

Kathy also shows how to alter the pattern to increase the back crotch length, which can be really useful if you’re a visual learner like me! One thing to note though is that Kathy’s showing the test version of the pattern – in the final version the little bump is smoothed out and I’ve added 2cm to the upper back to account for the seated posture of cyclists. Otherwise the fit should be exactly the same as my PB Jam Leggings, so if you made fit alterations to those, you can confidently do the same to these!

Kathy also turned a mistake into a great design feature – if you flip the upper side panel to the inside, you can have a pocket that opens against your body for extra security! She has one opening out for easy access, and one opening in for stuff like keys and ID.

Katherine’s bikers & gathered-side swimmers

Katherine’s another one of my pattern testers, so her first biker shorts pair are pretty much straight off the pattern to test for me (though I really like having the top side panel be the only contrast!), but then for her second pair, she’s gone and done one of the most exciting adaptations ever!!

She’s taken the booty short length, but shortened the side panel and gathered the front and back to match – making the panel stand out just by the texture change! She’s also completely lined these and made them in chlorine-resistant lycra so she can swim in them. Omg, do I now have to change the name to Triathlon Shorts??

Sandra’s sunny capris

I love that by total coincidence, Sandra has made the inverse of Katherine’s colourblocking on her capris! You can really see how the whole look changes when you change the colours of the three main sections.

Sandra makes some great points about the pocket in her post, too – when I was designing these I tried to adopt a “cycle first” mentality, and the pocket illustrates this perfectly. Instead of placing the pocket anywhere along the side seam, I sat down, saw where the crease of my leg was, and made sure the pocket didn’t cover this area – if it had, the contents would dig into your legs every time you pedaled! So it may feel a little low if you’re not cycling, but it’ll make sense when you sit down.