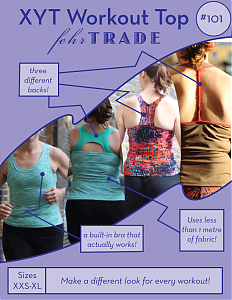
FehrTrade patterns – now in size XXS!

Apparently all I need to do to spur myself into a frenzy of activity is set a reasonable goal like I did yesterday when I stated the updated patterns would be ready “later this week”, because I buckled down and finished them that very day!

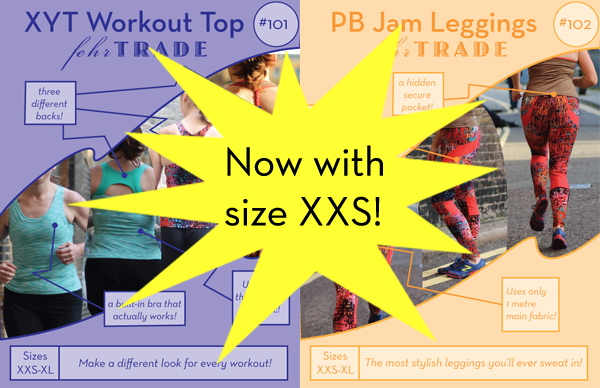
I’ve graded down to a size XXS using the same size grades as before, which puts this new size’s measurements at Bust 84cm (33in), Waist 63cm (24.5in), Hips 90cm (35.5in). And remember, both my patterns are drafted to be 90% of body measurements, so if you’re an inch or two smaller than this, the finished garment should still be snug against the body.

If you’ve already purchased one or both of my patterns, you should be able to log into Etsy and download the updated file from Your Account > Purchases (if someone could confirm this for me, that’d be great!). I’ve only done some minor cleaning up on the other sizes, though, so if you don’t need the XXS then it’s probably not worth re-printing, re-trimming, and re-taping (although I timed myself yesterday and the XYT pattern took me less than 15min!). Oh, and I fixed a minor numbering issue on the XYT Workout Top pattern which meant there was no Piece No.5. Oops!

Happy 2014! (My Sewing Year in review)

As I do every year, I like to spend the first of a new year to take the opportunity to look back on what I’ve sewn in the previous year. So without further ado, here’s a visual reminder of 2013!


Click the image to see it better, or right-click here to see it in a new tab to get a better look!

Tip: If you’d like to skim back through the posts for the above projects, you can click Gallery in the upper left menu, which will only show you finished projects, without all the magazine reviews and in-progress reports getting in the way!

The Year in Stats

In terms of pattern companies used this year, I made: 15 Self-drafted (including Pattern Magic), 11 Burda Magazine (aka Burda Style), 8 FehrTrade, 4 Style Arc, 4 Cake Patterns, 3 Christine Jonson, 3 MyImage, 2 Pattern-Scissors-Cloth, 2 Jalie, and 1 each from Elan, KnipMode, Papercut Patterns, Drape Drape, Lolita Patterns, Kwik Sew and Simplicity.

So that’s precisely one garment made from any of the Big Four, but a whopping 23 items I either drafted myself or drafted and then released as a pattern! It’s no surprise Burda is otherwise up in the 2nd place position, and I’m pleased to see Style Arc and Cake ranking highly this year, since I discovered both companies this year. It is a bit disappointing that I failed to make a single Manequim pattern this year, despite reviewing my monthly copies! I must try harder next year to justify the subscription cost.

By my count, I made: 22 tops, 13 trousers (including leggings), 9 dresses, 9 pieces of lingerie (bras, panties, slips, etc), 3 skirts, 3 jackets or cardigans, and 3 bags.

Little bits of sewing

I’ve come to that point near the end of the year where I want to gather together a bunch of little projects I’ve made recently, but yet didn’t quite seem big enough for their own post… You’ll see my traditional, year-end roundup tomorrow (I hope! I haven’t actually started it yet, eep!), but before then, let’s finish off the last little bits of the year…

Twin clutches

The most exciting of these are undoubtably the Cake Patterns Red Velvet Mini Clutches I made for James’s twin, teenaged nieces. They’ve pretty much only wanted cash or gift cards for a few years now, but this year I fancied giving them a little something extra to hold their gift.

The Cake Red Velvet Mini Clutch is a smaller version of the full pattern without the illustrated instructions, but on the plus side it’s free, super cute, and easy to whip up in a few hours with scraps. Here I used satin scraps leftover from my Matthew Williamson birthday dress and my swirl sheath dress and a bit of floral lining leftover from the former, too.

These are big enough to hold your average mobile phone, keys, lippy, and credit card, but not much else, but most of the times I want a little bag to match a dress this is all I really need to carry anyway. These were certainly one of those gifts I’d have liked to have kept for myself, especially since they match my dresses!

Bolster pillow covers

I’m totally less excited by home dec sewing, but we really wanted some bolster pillows for lounging in our big, new bedroom on the boat – now that I’m working from home, I especially need one under my knees while I work on my laptop! When we bought our bedding from IKEA, the duvet cover sets came with four pillowcases, and since we only use one regular pillow each, the others were just sat on a shelf.

XYT Workout Top Pattern

This is a pattern for a close-fitting, sleeveless workout top with front scoop neck, and choice of three upper back designs. An optional built-in bra is included, and neck and armhole edges can either be finished with hidden elastic or bound using a coverstitch binder.

$10.99USD (£6.90)
buy!

Pattern Magic Stretch Fabrics course at Morley College

Some of you may remember that last year I took a course at Morley College on Pattern Magic 2 (my first actual sewing class, believe it or not!) and it was so interesting, useful, and inspiring that I just had to take the course on the third book, Pattern Magic Stretch Fabrics. I booked this something like 9 months in advance, I was that excited to take it!

The first two books are based on woven slopers, but since this third one is all for knits, I used my own knit sloper instead of the book’s – I’m rather proud of this bit of forward-thinking! I also got to show off my pattern drafting gadgets plus it was great to see so many familiar faces and meet new ones, too (hi Clover & Ingrid!!). For the second class though, Claire had taken the initiative to digitally grade up the book’s blocks to larger, more standard Western sizes! She says she’s going to share these on her site very soon, so keep an eye over there if you want a short-cut to a bigger knit block.

Over the course of two consecutive Saturdays, we drafted three designs from the book (chosen by our amazing tutor, Moni), and a fourth of our choice, plus a bit of time at the end to sew up a sample so we got to see the range in real life.

Here you can see me & Claire from the first Saturday! (I’m totally brown-nosing by wearing a design from the second Pattern Magic book!)

The first design we all drafted was “Crescent Moon“, essentially a giant donut that you wear. It’s so avant-garde that it doesn’t even use a knit sloper, just circles!

This did look a bit better once we got out a smaller, female mannequin, but it’s still not something I’m finding particularly wearable.

The second design we all drafted was “Sharp & Snappy“, which I dubbed “the stegosaurus”. The gist here is that you shift the side seams forward and add triangular points in the seam line.

Bridge the Gap refashioned race tee

Following on from yesterday’s Boston Street Running refashioned top, I thought I’d show you the other refashioned race tee I made from my starting pile, the “BTG” one in the centre:

This one has a whole lot of meaning for me – the urban running crew I’m part of, Run dem Crew, has a bunch of sister crews all over the world with a similar ethos, so when we go to races in other countries, the host crew lays on parties, sightseeing, and pre-race hospitality. When crews get together like this, it’s called “Bridge the Gap”, and the Copenhagen crew even designed special shirts to commemorate the Copenhagen marathon weekend.

But I was a bit late to the Expo, and they ran out of Medium shirts, so I asked to be given the largest size they had, which was XXL! (Why they thought they needed to print any that big for marathon runners is another question entirely!). So this one was ripe for refashioning, and I had a lot of fabric to work with, which was great.


When I Bridge the Gap, I really bridge the gap!

The original shirt had the blue NBRO man on the front, with BTG and the date underneath, and the back had “The Peloton of Awesome” and all the participating crew logos across the shoulders. There were also mesh panels running down the sides, which I used in the Boston Street top instead. Unlike that top, however, here it was absolutely essential that I preserved the original designs.

Mustard and Grey slouchy Ivy tee

How great are Style Arc patterns?? One thing I love about them is that each month there’s a free pattern that comes with every order. In February, it was the Ivy tee. With its angled side seams, dropped shoulder, slightly forward shoulder seam, and banded sleeves, it’s so great for colourblocking that I just couldn’t resist! The good news is, like all of their freebies, it’s available to buy after the month is done, so you can go and get your own now, too.

I ordered a size 14 as per usual (I’m a Burda 42, for comparison), since StyleArc patterns are single-sized. This is my 3rd Style Arc pattern and I can totally understand how they’ve gained so many fans so quickly! Each one has come together beautifully, and is as comfortable and enjoyable to wear as it was to sew.

I did have a bit of trauma in the making of this, however. I did something I haven’t done in 9 years of sewing – I lost a pattern piece!! I checked everywhere, but I think the sleeve piece must’ve accidentally gone into the recycling when I threw out the paper scraps. This pattern has a dropped shoulder, otherwise I would’ve just used the knit sleeve off my Marita dress or Marie jacket patterns, so in desperation I emailed Chloe at StyleArc asking if she could possibly send me just the sleeve piece by pdf… and she did, so quickly, saying she knew I’d probably want to work on it at the weekend! How great is that?? Anyway, her scan plus some added measurements worked like a charm, and I have a completed Ivy tee!

I used two of Tissu’s viscose lycra jerseys here (again!!) – the Mustard colourway leftover from my Drape Drape tee, and 1m of Marl Charcoal I bought specifically to coordinate with the mustard.

Spring 2013 Sewing Ideas

Thank you all so much for your lovely comments on my asymmetric Drape Drape teeshirt! A girl could get used to that level of flattery…

It also marks the start of my sewing short sleeves, which means it must finally be Spring, and hence, time to start thinking about marrying up the patterns and fabrics I’d like to sew for the next few months. I really do these only for my own benefit, and so they’re not a “SWAP” in the sense that everything must coordinate against each other (lord knows I have enough clothes that I don’t have problems putting combinations together!).

This is more just a set of ideas towards which I’d like to work, so when I get to the end of a project, I can quickly refer to this image and go “oh yeah, I want to sew that next!”

For the first time I’m also including running/exercise gear in my plans, since I’m wearing lycra as a significant portion of my weekly wardrobe, and I want to contain all of my sewing ideas together. So you’ll find all the running stuff on the bottom row, and the rest of life’s wear on the upper two rows!

Top row:

Baltimore & DC

Last week we flew over to the States for a week – not in Pennsylvania where I grew up (no offence, but I’m kinda sick of visiting there!), but to Baltimore, with a day in DC at the end. We got a lot of strange looks from British friends when we said where we were going – “Baltimore? Really? Why??”, and we’ve been mounting our own Baltimore Tourism crusade since we got back, because it was fantastic!

The reason we were over was because James was speaking at a prestigious tech conference, but I took the opportunity to meet up with loads of friends and family, including the chance to finally meet some fellow sewing bloggers!

I’ve been speaking to Cidell & Trena for at least five years now I reckon, and even weirder is that I already knew their voices from their earlier sewing podcasts (please bring them back!), and there was zero awkwardness when we met up for dinner! It really was like we’d known each other for years, which I suppose we have!


(Note: Jack’s Bistro did not pay us for their product placement!)

Cidell puts me to shame – she posted about our meeting like the same day!! I was also very excited to get more of the Under Armour Cold Gear fabric she’d previously sent, because during the last few months I’d been doing laundry twice a week in order to wear my Cold Gear leggings on both my Tuesday night runs and my Saturday long runs because they’re seriously the warmest leggings I own. Next winter I’ll be much better prepared now!

But they weren’t the only sewists I met – I’d also planned a run with Kathy in Patterson Park near my cousin’s house in Baltimore, which she’s already posted about here!

We both wore running gear we made ourselves – she’s wearing McCalls 6435 adapted for running as her top and the Jalie sports skirt lengthened into leggings, and I’m wearing my disco top and my new self-drafted leggings with that fishnet insertion from Tissu in the front thighs and back calves, which you can see a bit better here:

Book Review: Patternmaking for Underwear Design, by Kristina Shin PhD

You’ve heard me mention this book a few times as I’ve been experimenting with various drafts, but I felt it deserved a full review because, frankly, I’m a little obsessed with it right now. My mom surprised me with this when I was ill with shingles and the subsequent nerve damage pain, and it gave me something to focus on right as I was in the midst of my last bout of lingerie sewing.

It’s “Patternmaking for Underwear Design”, by Kristina Shin, PhD, and here’s a (pretty bad) shot I took of it’s cover:

It’s primarily a book for drafting your own bras and lingerie (but much more, too), and the biggest difference I’ve seen here in that these bra drafts all start with the underwire shape, and build from there. Every other bra draft I’ve seen starts with a bodice sloper, which is then adapted into a bra shape. The approach taken here makes a lot more sense to me for getting an accurate fit, since there’s so much variation in breast shape and distribution for women who even wear the same size bodice. As anyone knows who’s ever sewn a bra, finding the right size underwire is absolutely key, so it really seems right here to use that as a starting point. And it helps that most women can make a small incision in a well-fitting bra and just trace off one they know fits them!

There’s not really any construction or sewing instructions included in this book, but there are a few pages at the beginning with stuff like tips on cutting lace…

…and the wide variety of bra backs you can use once you’ve got your basic draft sorted out…

…plus several pages of various tables of measurements for different sizes, and exactly what to measure, both for the breasts and the rest of the body.

Here’s an example page from the leggings draft so you can see the style of instructions and diagrams. I personally found these easier to follow than Metric Pattern Cutting and WAY easier than any of the Pattern Magic books!