Blog

How to line the Burda peplum top

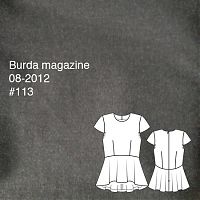
Peplums are a major AW12 trend and one that’s well within reach of most home sewists and high street shoppers. There are plenty of patterns out there, but one of the nicest I’ve seen so far is the cover design from the August 2012 Burda magazine, which is also available to purchase as a pdf download here (and you can look at the full instructions and layout diagrams on that site for free).

A lot of peplum dresses just feature a ring of excess fabric around the hips, but here, the curved waist seam plus the sloped hemline and bias-cut peplum on this particular pattern really sets it above the rest. I also like that it’s separates, so I can pair my top with a skirt, slim trousers, or leggings and get much more wear from it than just a single dress.

One thing I don’t love about this pattern, though, is that it’s unlined. Or rather, it has lined cap sleeves, a narrow bias edge on the underarms and a neck facing, but nothing further. It’s pretty straightforward to make lining pattern pieces from the shell and facings (see below), but the construction was more challenging to figure out. It is possible to do a nice clean finish almost entirely by machine (you still have to sew the hems by hand), but you have to do a bit of clever reordering of the construction…

Luckily for you, I made notes as I sewed so I can share my clever order of construction with you!

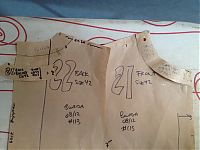
As mentioned above, you’ll need to modify your bodice pattern pieces after you’ve cut out your shell fabric. Place the neck facings on top of the bodice pieces (annoyingly, in this case they must be face-down so the shoulder seams and CB/CF edges line up), trace the neck facings onto your front & back bodice pieces and then cut these off before cutting your lining pieces. Remember to add seam allowances to these new cut edges, too!

Be sure to interface the facing pieces, then attach them to the lining pieces and treat as one for the rest of the construction.

Instructions for a clean-finish lining!

  1. Sew all darts, attach peplum pieces to bodice on the shell, and sew at shoulders (but keep it open at side seams and centre back!), ie: the follow the first few steps of Burda’s instructions, but stop before the zipper insertion!
  2. Do the same for the lining
  3. Sew the sleeve shell pieces & sleeve lining pieces together at the bottom edge of the sleeve. Understitch, then baste around the other (armscyce) edge
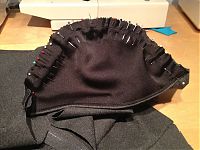
  4. Baste the sleeve onto the shell with right sides together (beware of excess ease!! Don’t skip this basting step!)


Honeymoon Lingerie – nightgown muslin

True confessions – I took a brief break from the wedding gown. I don’t deal well with long projects and I was getting really itchy to complete something (I didn’t have any completed projects in July because of the gown, aaaaagghh!).

So I took one evening out to do a test run of one of the patterns I’d earmarked for honeymoon lingerie and Shasha’s Malaysian silks, Burda 7418 (on the right in my earlier image below):

This is a brand-new Burda envelope pattern, but I just went and bought the pdf version instead because a) I’m impatient, b) the pdf patterns are way cheaper than the paper versions (we have a laser printer and printer paper is cheap!), c) piecing together pdf patterns takes only 5 minutes longer than tracing a paper pattern and I can do it sitting down, and d) no seam allowances, woooooooop!

This was my first downloadable pattern from the German Burda site, and I was pleased to find that the instructions were in nine languages, with fully illustrated instructions. I was expecting it to just be in German! But do pay attention to the print preview, though, because you may not need to print the last ten pages or so (the English instructions only take up a few pages). The only weird thing is that they decided to waste some paper giving us two side panel pattern pieces (one to be cut in lace and the other in self-fabric) and the two pieces are absolutely identical. Weird.

Black microfleece three ways

I had a few metres of black microfleece leftover from interlining my winter coat and I thought I’d put it to good use since it takes up so much room in my limited stash (and as you read yesterday, I have lots of new fabrics coming in!)

So to start off, I made yet another of my favourite BWOF sweatshirt, which I’ve already made before in red velour and also in blue fleece (twice, actualy, as I made one for a neighbour, too).

(My neighbour Lucie was hosting our mooring’s craft night so I thought we’d do a photoshoot in a finished boat for a change!)

Patterns To Trace

Recently I’ve been doing more batch tracing rather than tracing one pattern, sewing it up, then tracing the next. I find my sewing bottleneck is often in the tracing step (even though it doesn’t take much time), so by doing a bunch at once I can always have something on the go to work on in the mornings and evenings.

I’ve been mentally matching up my patterns to fabrics in my stash and tracing an awful lot the last few nights. Here’s what I’ve got coming up in the next few weeks, though you can see my plans have had to change somewhat to focus more on comfortable knits…

Reprinted Burda patterns

I’m a huge fan of Burda World of Fashion magazine (BWOF) (elsewhere in the world known as Burdamode), but because the patterns are only available for one month only, sometimes it’s frustrating to miss a really good pattern when you seen it sewn up months later. I’m guilty of that myself, but Burda thankfully choose a few patterns each year from all the hundreds (if not thousands?) published in the magazine to reprint and repackage as Burda envelope patterns.

Burda envelope patterns have the same drafted patterns as appeared in the magazine, but they include seam allowances and have much better sewing instructions, with helpful diagrams and tips. The good thing is, these stick around for much, much longer than just one month, and are sometimes easier for people to buy in stores than the magazines.

So in the interests of friendly copycats inspiration I thought I’d fill you in on some of the garments myself and others have made from BWOF that are now more widely available in case you missed that magazine issue…


My tweed kick skirt is now Burda 7895


My tuxedo inspired suit is now Burda 7762

Purple wool sweater

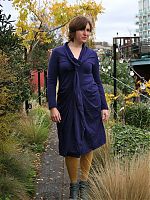
It’s definitely the chilly season here again, and since I’ve had the pattern and material for a few weeks and I hit a lull in my Christmas sewing (I’d finished everything I could and I’m waiting on patterns and fabric for the last gift!) it seemed the perfect time to make Burda 7724. I used the purple and black flecked wool sweater knit I bought for £7.50 from A to Z Fabrics on Goldhawk Road here in London (and I’ve got a little left for mittens and a hat!). It’s just so warm and comfortable that I (shh!) wore it three days straight after I made it!

Silver linen shift dress

This dress has been fully formed in my mind ever since February, when I bought Burda 7783 and this beautiful linen/lurex blend at Hickeys in Dublin. Luckily, they print the fabric content and washing instructions right on the receipts, so I can tell you with some degree of accuracy that this dress is 53% linen, 44% rayon, and 3% lurex. As far as I’m concerned, this fabric is 100% gorgeous – it’s got a subtle bit of shine under bright lights that really makes it special.

Party Princess

Why is it that we have to stop playing dress-up once we reach a certain age? Sometimes it’s good to have a special dress that makes you feel like the prettiest girl in the room, the one all eyes are on — like a princess, really.