Blog

Patrones spring coat – muslin & alterations

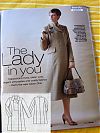
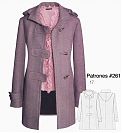
Since I’m not entirely confident of how Patrones patterns fit me, and I’m equally not confident that I am a size 44 anymore (well, I was when I traced it 18 months ago, argh), I decided to play it safe and make a bedsheet muslin for my Patrones spring coat before cutting into the basketweave wool. If you remember, this is the coat:

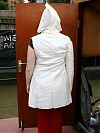
And this is how the muslin looks straight off the pattern sheets:

Prepping for Patrones

Now that I’ve finished all my other spring projects (the Colette dress is coming, sorry for the delay!), I can now devote all my available energy toward making my spring coat, Patrones #261-17, as voted on by all of lovely you!
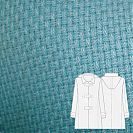
Also sewing along with me are Zoe (whom I borrowed and traced the pattern from originally!) and Houkje, who’s also tracing and joining in a bit later on, creating our own London-Patrones micro-Sewalong!

First off, Zoe says:
I took a quick photo this morning of the fabric I’m using for the coat.
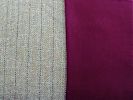
The wool on the left is a remnant from the cloth house and not enough
for the whole coat. The velvet on the right is for the hood, button
tabs and possibly the collar if I don’t have enough of the wool for
that. I bought some great brass toggles on Walthamstow market (couldn’t
find them a 6am without waking the family up), but forgot about the tabs
on the sleeves so I need to get back soon to get some more. I’m looking
for a two tone lining in beige and turquoise to match the stripes in the
wool, but no joy so far. Need to find time to get over to Shepherd’s
bush I think.

Whereas for my coat, I’ll be using that great, soft teal basketweave wool, bulk fusing it with lightweight interfacing, before cutting, then overlocking all the cut edges to prevent fraying and unravelling.

I’ve got 4 yards of the wool, but only ordered 3 metres of the Vilene H180 lightweight interfacing. Only I forget it was super narrow, so by the time I laid it side by side on the wool, I only had about 1.5m of the wool covered. So I’m waiting to see if I can lay out all the pattern pieces that wouldn’t normally be interfaced onto the bulk fused section, and the pieces like the collar, facings and button tabs onto a section that I’ll cover with heavier interfacing to avoid having to buy more. Confused? Don’t worry, this plan might fail anyway…

Spring coat choices

I’ve got lots of turquoise basket weave wool coating that I bought from Fabric.com on a deep discount the same time I bought that gorgeous faux fur, and I’m envisioning it as a great spring coat (believe me when I say it’s the perfect weight for London springtime, okay?). But I’m torn between three different coat patterns, so maybe you all can help me decide?

1. Patrones #261-17 – Pros: It has a hood, and big pockets, and it’s already traced, since it from an issue I borrowed from Zoe ages ago! Cons: I’m not as confident on Patrones’s sizing so a muslin is a must, and it’s not got any pockets (Wtf?) so I’d have to add on some patch pockets.

Super furry animal

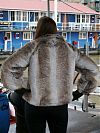
Let me just start off by saying I love this coat. I would jump up and down on Oprah’s couch like a crazy woman for this coat. It makes me happy just to look at it, and to touch it makes my day. I love it so much that I actually feel paranoid wearing it out for fear that some Peta idiot is going to pour paint on me because it looks and feels absolutely like real fur. But wear it out I do, because I love this coat!

I mean, seriously, look at this faux fur, is it not fabric porn?

To refresh your memory, I made BWOF 10/08 #102 in faux chinchilla fur from fabric.com (at $21.98/yard, it was worth every last penny in shipping and customs charges!).

And the end result is just love at first sight!

Tips for sewing with faux fur

I’ve finished sewing together the furry exterior of my luscious long pile faux fur coat, and now, as I set about creating the lining for it, I thought it’d be a good time to share all the tips and tricks I picked up along the way. Some are from the special “sewing with faux fur” supplemental lesson in the October 2008 Burda WOF magazine, but others are from my own experience.

Faux fur sewing tips!

  • Only cut one layer of fabric at a time, with the wrong side facing up. Be sure to cut through the backing only and NOT the fur itself! I used the very tip of my tailor’s shears, but an exacto knife would also work. A flat layout also means you need to duplicate any pattern pieces that would normally be placed along the fold, and other pieces must be cut out as mirror images (ie: one sleeve needs to be cut pattern face down and the other cut pattern face up so you end up with a left and right

The warmest winter coat ever

I joined The Great Coat Sew Along all the way back in May because I’d never made a coat before and it seemed like a great opportunity to gather together with like-minded people and learn an awful lot, too! Even though I (and others) really fell behind on the timeline, I’m really proud to have finally finished my coat while it’s still cold out and to have learned a huge amount of techniques that I never would’ve on my own! So I owe this coat to Marji, really, for setting up and organising the Sew Along, and I’m already planning my next coat…

But for this coat, the pattern was BWOF 09/2005 #102:

I made a huge amount of alterations on the pattern: raised the waist by 1”, lengthened the arms by 1.5”, added a wedge to the lower centre front for walking ease, widened the top sleeve (and shoulder seam) by 1”, and increased all the vertical seams below the chest by about 1/2”. And then on top of all that I changed the pockets and added the interlining, too! It’s probably more alterations than I’ve done on all my other 2008 patterns combined! But as much as BWOF usually fits me straight off the sheet, this pattern didn’t really have enough wearing ease to fit big sweaters underneath…

Previous posts about this coat

Ok, ok, enough with the backstory, here’s the photos!

Conquering bound buttonholes and interlining my winter coat

Cast your mind back to the heady days of May, when I decided to join hands with the internet and start in on The Great Coat Sew Along, with this beautiful long coat pattern from BWOF 09/2005 #102:

(There are two similar views – mine’s using the exposed buttons and sleeve tabs of 102, but the in-seam pockets of 101.) Anyway, I got as far as the material gathering, muslin fit and alterations, and even sewed together the body pieces of the coat before I lost momentum in August. The half-finished coat has hung in my sewing room ever since, taking up valuable space and making me feel bad every time I glanced at it, but the abnormally freezing cold temperatures we’ve had in London have made me jump back in with both feet to get this finished, because I could really use this on my daily walking commute to work. I’ve got a RTW long wool coat, but with the wind and extreme cold we’ve had, I can feel the cold through what I’ve got now (the papers are gleefully reporting that, at -10C, London is colder than Antarctica right now, and I’ve lost count of the number of Russian-style fur hats I’ve seen out and about).

London haberdashery shopping

Since we can’t really afford to take a proper holiday this year, what with the boat renovations and wedding to save for, I’ve opted to take a few days off here and there to just spend at home or around town. My first “holiday at home” day I took on Thursday, starting with a decadent breakfast at The Chop House (which I walk past every single day and drool over) and then moving on to pick up a bunch of haberdashery supplies at the stores around town that are normally best visited (or only open) during the work week.

I did really well, starting at McCulloch & Wallis around 10, and finishing up at Borovick around 1, with a quick jaunt around Uni Qlo‘s sales (navy chinos and a white cotton/cashmere jumper for less than a tenner total!) and a pit stop at the Japan Centre thrown in there, too. The shops were nearly empty and at some points, there were more staff than customers. It was a revelation that shopping can actually be fun if you go on a midweek morning, as it’s usually the 9th circle of hell in that area on the weekends…

Been up to…

Phew! It’s been a very busy week, both in my sewing room and elsewhere on the boat. Parties, film nights, more deck grinding, music selection for a friend’s wedding, gardening, broken water pumps, gifts, muslins, and BIG shopping, but to name a few!

The deadline for the finished instructions and my bio for the “Pillowcase Challenge” book were also due this week, so I devoted a big chunk of Sunday to getting that perfect, and then the rest of the weekend was spent making a twin blue KnipMode shirt for my mom:

Coat interlining

As part of my project to sew my winter coat, I’m finding it tricky to source suitable interlining and lining fabrics here in the UK without resorting to expensive overseas shipping prices.

Following Kay Y’s experience with the 150gsm Thinsulate, I rang up Pennine Outdoor who stock it here in the UK and got their advice on suitable warm interlining fabrics. They stock a huge range of outdoor and sport fabrics, so I spoke to a lovely lady on the phone who helped me through my choices. She ultimately recommended microfleece as the best warm, lightweight, and draping choice for me, but conceded that it wasn’t windproof (but that using a silk twill lining would probably help the wind anyway). The only windproof fabric they stock is very bulky and doesn’t drape nicely, and when I enquired about Meraklon, she said that it was tubular and stretchy and also had a bad drape and that it was more suitable for linings of close-fitting garments.