The “Sew Your Own Activewear” Winter Base Layer

The UK release date for “Sew Your Own Activewear” is less than a week away – it’s out on Friday you guys!! I’ll be shipping out all the signed pre-orders later this week (as soon as I receive the books myself!) regardless of where you live, so some of you may be getting it a few weeks before everyone else in your country, you lucky darlings, you!

I’m also throwing a bit of a launch party here in London on Friday night, so if you’re local and would like to attend, please leave a comment and I’ll send you the details – there’ll be complimentary punch plus the opportunity to buy signed copies on the night plus meet me and the athlete models from the book, too. And of course the dress code is activewear!!

So with it being launch week, I wanted to choose one of my favourite designs to focus on this week – the Winter Base Layer top!

Surf to Summit Top – Three Cycling versions

I’ve got quite a few different versions of my latest Surf to Summit Top pattern to show to you! It’s such a versatile pattern with so many different options, which meant that I had to sew samples of all the different features over the past few months. Today I want to focus on the cycling features of this pattern, for both the men and ladies.

Let’s look at the ladies’ version first, which is again modeled by my friend and multi-talented athlete, Emily, whom you met earlier this week. I made this version using some navy wicking nylon from UK Fabrics in the body, and some “triathlon” printed lycra from FunkiFabrics in the sleeves. The 1.25m I bought of the latter was enough to make leggings for myself and have enough over for the short sleeves here, and probably a sports bra, too! I finished off this top with some turquoise FOE bought on eBay around the hem and back pocket.

This top was one of the very last samples I made of the pattern, a few days before its release, and it uses the exact same version that you buy – it was sewn up to test that the final changes to the pattern were good. I’m pleased to say that the improvements I made to the half zip, facing, and zip underlay in particular are ones I’m particularly proud of – this came together really smoothly!

A Week in a Day

I’ve been a bad blogger this week. I’ve been doing lots (as you’ll soon see), but working every weekend for the past three, plus the weeks in between, and some out-of-town trips have all really sapped my enthusiasm to write! So I’m taking the lazy option out and catching you all up with a little roundup – a week’s worth of posts in a day…

Like the Wind workshop

Cult running magazine Like the Wind approached me a few months ago to ask if I’d like to run a “sew your own leggings workshop” at the week-long popup they were throwing together at the end of October. I’d known one half of the husband-and-wife team that run the magazine, but I’d never met Julie before this. Once I found out that she not only owns her own overlocker, but bought it when she sewed her own wedding dress with it(!), I knew we’d get along just fine.

We had five runners who’d only done a small amount of sewing before, but had never touched an overlocker before, and certainly not a coverstitch either! They each picked their own fabric from FunkFabrics’ range, and walked home in some very stylish leggings at the end of the afternoon!

Georgina picked a “Gotham” print, so of course she just had to pose with the Batman art in the gallery!

And here’s the finished set! I saw quite a few little “omg I’m so happy in my leggings” dances at the end, which really reminds me why I love teaching so much. Lucy posted a great writeup of the street art tour and my class, too.

There may be another Like the Wind workshop in the new year if we can work out the logistics, but there will definitely be more up at the Thriftystitcher studio in January and February, to be announced very soon! The classes are very similar, so if you’re a runner you can come learn at Thriftystitcher, or non-runners vice-versa at Like the Wind.

But I was so jealous of all their finished leggings that I treated myself to some Funkifabrics lycra this week (it was difficult, but I settled on this geometric aqua number in the end, because it reminded me of a Lamb album cover!).

Random sweatshirt sewing

When I was pulling out supplies to bring along to the workshop, I came across pieces for this sweatshirt that I’d cut out in February when I was trying to deplete random bits of leftover sweatshirting that was taking up too much room in my little sewing cave. The lavender “sacrificial sweatshirt” came out of that same cull, but for some reason I never quite got around to sewing this blue one together at the time.

Pattern Magic Stretch Fabrics course at Morley College

Some of you may remember that last year I took a course at Morley College on Pattern Magic 2 (my first actual sewing class, believe it or not!) and it was so interesting, useful, and inspiring that I just had to take the course on the third book, Pattern Magic Stretch Fabrics. I booked this something like 9 months in advance, I was that excited to take it!

The first two books are based on woven slopers, but since this third one is all for knits, I used my own knit sloper instead of the book’s – I’m rather proud of this bit of forward-thinking! I also got to show off my pattern drafting gadgets plus it was great to see so many familiar faces and meet new ones, too (hi Clover & Ingrid!!). For the second class though, Claire had taken the initiative to digitally grade up the book’s blocks to larger, more standard Western sizes! She says she’s going to share these on her site very soon, so keep an eye over there if you want a short-cut to a bigger knit block.

Over the course of two consecutive Saturdays, we drafted three designs from the book (chosen by our amazing tutor, Moni), and a fourth of our choice, plus a bit of time at the end to sew up a sample so we got to see the range in real life.

Here you can see me & Claire from the first Saturday! (I’m totally brown-nosing by wearing a design from the second Pattern Magic book!)

The first design we all drafted was “Crescent Moon“, essentially a giant donut that you wear. It’s so avant-garde that it doesn’t even use a knit sloper, just circles!

This did look a bit better once we got out a smaller, female mannequin, but it’s still not something I’m finding particularly wearable.

The second design we all drafted was “Sharp & Snappy“, which I dubbed “the stegosaurus”. The gist here is that you shift the side seams forward and add triangular points in the seam line.

Copying a favourite bra

You may have noticed that one of the items on my Spring Sewing Ideas list was a “self-drafted/copied from RTW” bra. I’ve sewn countless bras before, but really only been happy with the fit and look of one (a foam cup muslin, of all things!). I really want to try and get away from moulded foam cups for a number of reasons (which Orange Lingerie discusses here), so my dream bra drawer would be entirely lacey, gorgeous, self-made, frameless, underwired bras, with one nude moulded foam cup bra for when I really need a seamless look.

The problem is, I’d been buying foam cup bras for so long that I didn’t really have any non-padded ones I could clone, and on a whim last year, I bought a few M&S bras and was amazed to find that two (identical, apart from colour) all-lace, single-darted, frameless, underwire bras, fit me perfectly and gave me a great shape.

So in the back of my mind I’ve been wanting to clone these, since my last bra using the Elan pattern ended up fitting well (at first I thought I’d cracked it finally!!), but the cup shape looked B-A-D. Boobs like duck-bills, oh god no!

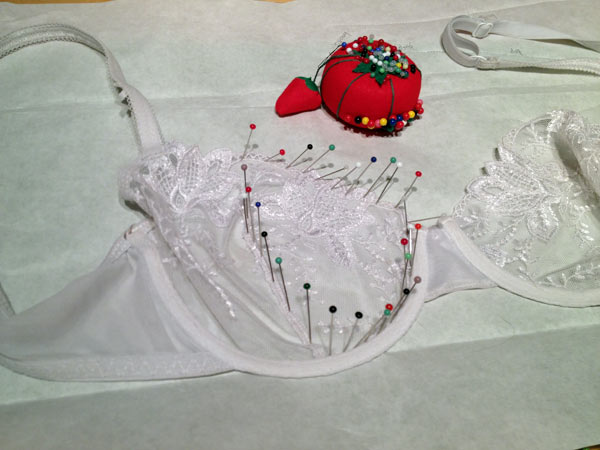
Anyway, so I started the process of cloning the white version of the M&S bra last night, by using my method of tracing patterns – placing the bra down on top of paper and running my serrated tracing wheel around it. This worked well for the band, but I wasn’t convinced I got an accurate trace for the cup, so I looked up an old Threads article, “Clone Your Favorite Bra” (Issue 99, Feb/March 2002 if you’ve got the archive DVDs), which suggested stabbing lots of pins around the bra edge until you got to a point where it would no longer lie flat. Then you unpin the first pins you put down, and re-shift everything using the latter pins (in my case, along the dart) as an anchor so it lies flat and you get all the edges pinned.

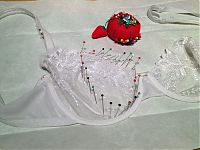
Then, in my case, because the dart stayed in place and everything shifted around it, I had to cut through the dart and open it back up. Because the top edge of mine was the lace edge, I knew this had to be straight, so it made it easy to re-adjust.

Asymmetric Plum Lace Top

The latest installment in my post-coat winter sewing plans is the asymmetric pleated turtleneck, Patrones 296 #14.

In this design, you’re given the pattern pieces for a turtleneck top, where the front has been cut diagonally across the front. So if you’ve not got this issue of Patrones, just go and draw a curvy line across your favourite turtleneck pattern!

In the magazine photo, the sleeves and upper front piece are pleated and underlined, but I chose to overlay lace on mine instead. Patrones provide the pattern pieces for the post-pleated fabric (allowing you the fun of working out exactly how much fabric you’d need for whatever size pleats you choose!), so it was super simple to just use those finished pieces to cut out the lace overlays instead.

The plum fabric here is a gorgeous bamboo/lycra jersey that I bought from Ditto in Brighton last month, and it’s so unbelievably soft, and with a nice, beefy weight and good stretch. I loved Wazoodle’s bamboo years ago, but this stuff is even better as it’s thicker and doesn’t wrinkle anywhere near as readily. I am utterly in love with this fabric! I’ve got another of their bamboo/lycras in red and I’m itching to make something from that now, too. The green stretch lace I bought at Tissues Dreyfus in Paris last summer, and I love how the two together give a bit of an antique look….

Burda floral crossover dress

The second of my winter knit dresses is the cross-bodiced Burda WOF 06/09 #129. I’ve had my eye on this pattern ever since it came out, but I was amazed to see that no one had reviewed it yet on PR, so it’s definitely an undiscovered gem as far as I’m concerned!

I recently ordered a big batch of fabrics from Totally Fabrics (more on that later) in their 40% off everything sale including this brown floral viscose jersey print with shades of teal, fuschia, and grey thrown in. I only ordered one metre (of 1.5m available stock) but when it turned up, it turns out they gave me the whole 1.5m rather than have an awkwardly short leftover! Score! Even so, there was no way I could squeeze this entire dress out of the yardage available, so I had to do a clever amount of fabric Tetris, shorten the hem by 2 inches, make the sleeves 3/4 length, and sew the hidden front bodice piece from a constrasting grey marl jersey.

Khaki KnipMode puzzle trousers

I’ve been doing more sewing “on the inside” – this time I’ve made these curvy-seamed trousers (#12) from the May 09 KnipMode which should come as no surprise since you already know that I prepared them in advance as an activity pack.

I sewed most of these last Sunday, but took my time handsewing the invisible zipper, waistband, and hems, which I’ll explain later… Once again, apologies for the iPhone photos, but I’m planning on doing a nice & crisp DSLR photoshoot again once they and I!) am finished. But for now…

Pink guitar pyjamas

Twas the day before Christmas and all through the boat, all the creatures were stirring, especially Melissa at her sewing machine and Bosco with his catnip mouse!

We were invited to breakfast on Christmas morning at a neighbour’s and she kept saying how we should all just come in our pyjamas for some bucks fizz, scrambled eggs and smoked salmon, so I thought it’d be fun to whip up some brand new pyjamas to wear! Christmas has always meant new pyjamas to my mom in particular – growing up, she and her brother and sister would always wake to find a new pair at the top of the stairs which they’d then be expected to change into so they were wearing new PJs in the christmas photos! I didn’t take it that far (I changed into the blue silk cocktail dress in time for dinner!), but it was awfully nice to wake up and put on new, comfortable clothes!

Sleeping beauty mask

I was in such a buzz of sewing activity on this bank holiday Monday that I finally got a chance to make BurdaStyle’s Marcel sleep mask pattern that I’ve been meaning to sew for ages now!

One sleep mask is for myself, but the second one is a surprise for my friend (and will-be bridesmaid) Gez (who got it slipped through her letterbox last night!).

The adorable kitties fabric is from a tunic she gave me that was a bit too long for a shirt but too short for a dress, so I chopped off some length and saved the offcut to make something for her. The grey fabric is from a skirt her auntie gave me years ago that I completely forgot I even had until I dived into my scraps bin looking for something to use here. The dark grey backing was the skirt itself, and the shiny (silk?) casing used to be the waistband of the skirt. So it’s an entirely recycled sleep mask!

There aren’t any instructions for the pattern, but it’s very easy to make one and would be a great project for beginners: