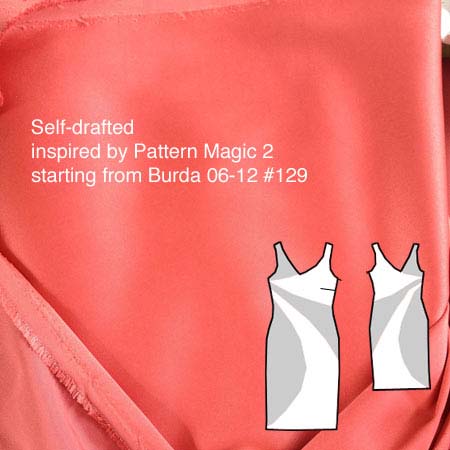
The Swirl Sheath Dress

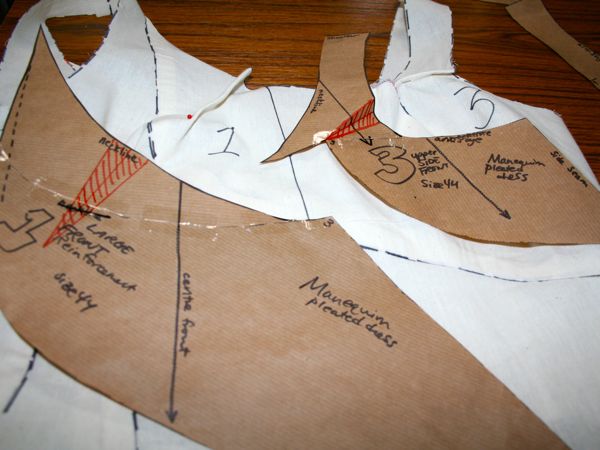
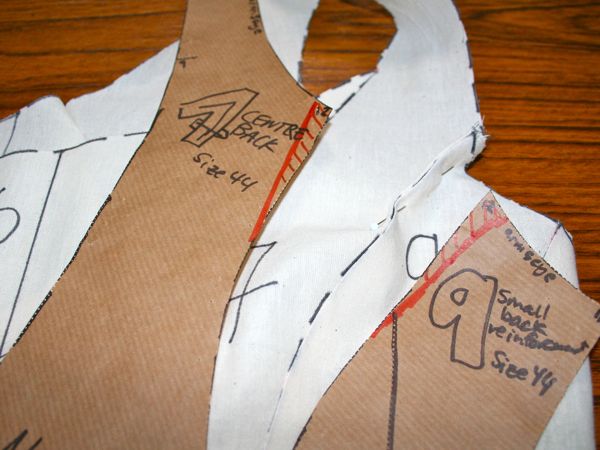
This dress has been an awfully long time in the making. The idea started back when I took the Pattern Magic 2 class at Morley College last winter, where we learned a technique called “Fundamentals: Create three-dimensional forms with design lines only” (it just rolls off the tongue, eh?).

Essentially what this means is you sew up a muslin, draw design lines all over it, cut along these lines, then introduce snips of ease until the pieces lie flat, and there’s your new pattern! I did all this (based on a sheath dress from the June 2012 Burda magazine, which doesn’t appear to be on the US BurdaStyle, sorry) last summer, but then the project stalled when I couldn’t find any heavyweight stretch satin anywhere in Europe, and had to import this gorgeous salmon stretch duchesse from Gorgeous Fabrics.

Then there were further delays as I didn’t have a wide enough cutting table to lay out the asymmetric and strangely-shaped pieces, until a few weeks ago when the Thrifty Stitcher invited me to pow-wow at her studio and suddenly my swirl sheath dress was back on track!

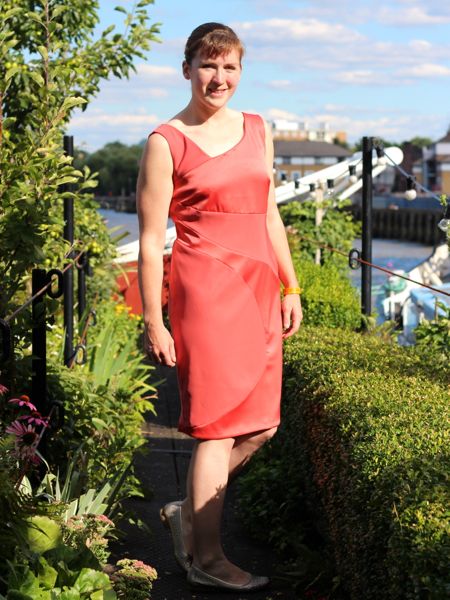
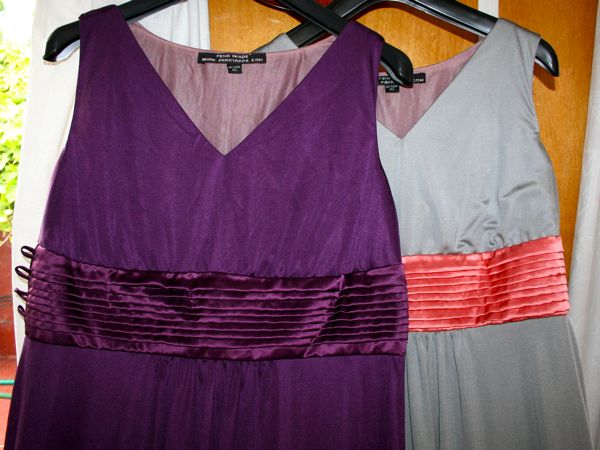
Because all the darts from the original pattern (bar one) are now incorporated into a bunch of curved seams, this means there’s a lot of easing going on, so if you don’t like easing princess seams, for example, you really won’t like sewing this. My easing motto is “pin the crap out of it”, and I’m proud to say that I didn’t have any tucks or unpicking in any of these seams. Though I did use 58 pins on just the lower semi-circular seam!

In America…

Having an international relationship (even when the expat half is as firmly ensconced as I am) makes weddings a bit tricky. We’re lucky that we didn’t have to take immigration laws into account, but even so, we needed to have wedding celebrations on both sides of the Atlantic to include as many people as possible. So a few days after the wedding, we flew over to Pennsylvania, spent a few days at my parents’ house in Perry County, then had our celebration dinner in Lancaster, taking the train down to Philly to catch up with my Man of Honour, then the Acela train up to NYC for a week of a proper honeymoon before flying back home to London.

So to start, I decided that I wanted to give my Granny a nice memento of her gown, since she had given it all to me, and I ended up with some medium-sized scraps of the really nice silk satin after finishing my gown. So before I left I made up four sachets filled with lavender buds I’d grown on deck, and during the flight I embroidered a silk square for each of these with the initials of her four grandchildren and their spouses, plus the year they were married. It just worked out nicely that my cousin Charlie was the last of us to wed, having their wedding two weeks after ours!

I then finished up the sachet construction at my parents’ house and presented these to Granny before the Lancaster reception dinner.

There was also a nice surprise of a massive box of vintage haberdashery she’d found in a charity shop. I only picked a few things out of it, but I just couldn’t resist some of this glorious packaging!

Then my mom insisted on driving me out to this Amish fabric shop she knows in Perry County – it was only a little ways past my old high school, but I was just blown away by the prices!! I went NUTS in the zippers – tons of really long invisible zips for 75 cents or a dollar (when I’d pay at least £3-4 each for these in London), buttons for as low as 2 cents each (when’s the last time you saw anything for 2 cents??), tons of ricrac and trims, embroidery floss for 30 cents, and (of course!!) they had the bobbins for my hand crank vintage Singer. For 15 cents each!

Bridal bodice – buttons, lining and shopping!

Ok after that little lingerie diversion (and a day spent being filmed for BBC1!), we’re back on the wedding gown!

First up was a quick fitting of the shell with all the boning pieces inserted and the waist stay hooked. And I can breathe a sigh of relief, because it’s looking good. A tiny bit of horizontal pulls around the zipper (which can be fixed by laying off the ice cream a bit) and a bit of boning show-through at the centre front (which I’m going to hold off worrying about for now, but I may just shorten that boning piece so it stops below the bust).

So I can push on ahead, safe in the knowledge that there’s no major fitting issues…

First up – I sewed on all 13 original covered buttons along the right side’s zipper, matching up with the original satin loops I placed along the overlap during the zipper insertion step.

On the surface, these look like ordinary covered buttons, but look at the underside!

I’ve never seen buttons like this before in my life! Instead of a shank with a hole, there’s a mound of stuffed fabric to sew through! What a strange vintage detail! I’ve learned so much from taking the original gown apart…

Bridal bodice – finishing the edges, waist stay, and zipper

The next step in my epic wedding gown project was to properly finish the neckline and armhole edges in advance of the lining. Instead of most lined garments where you construct the outer shell, construct the inner shell, then place the two together, right sides facing and sew around the opening edges, in this case Bridal Couture advises us to construct the outer shell, fold in the opening edge seam allowances, then create the lining, with the opening edges similarly folded inside, and then place the two together wrong sides facing and very carefully fell-stitch along the opening edges, prickstitching the lining where necessary.

So here are the neckline and armhole opening edges, nicely clipped, pressed, and catchstitched:

The next step was to add the waist stay, tacked to the boning channels with bottom edge of grosgrain on the marked waistline:

Yet another bridal bodice muslin

I’m no big fan of muslins and fitting tweaks, so the title is really reflecting my impatience at still being in the fitting stage. I want to get on with the fun stuff! But I also really want to get the fit and design perfect here as I can’t really go unpicking the vintage satin (the needle holes remain), so here I am, still soldiering on, though hopefully not for much longer…

Yesterday was my day off so I devoted pretty much the entire day to this dress. Right after breakfast I made up Muslin #2 (not shown because no one was around to photograph me), which incorporated the neckline changes and better-drafted add-on straps. There’s no photos, but essentially, I just needed to pinch some fabric out in three places, which you can see here shaded in orange on my pattern pieces:

So I made those changes to my paper pattern, unpicked pieces 1 and 3 from the muslin, cut new ones out, and reattached them, bringing us to Muslin #3. And I was pretty happy with the fit, apart from a bulge above my right breast which I immediately knew the cause of and fixed it on the paper pattern.

Bridal Bodice Neckline – opinions needed!

I am very happy to report that my dress for the BurdaStyle book is completely, 100% finished, packed up in an airtight bag and ready to be FedExed this week. HOORAY!

I’m afraid that’s all you get to see until next year, to. Boo.

But it means I can now devote ALL of my sewing time to my wedding gown. So the first step is to attack the muslin. I’ve marked my waistline in green, and the possible boning positions in blue. Once I marked my waistline I realised exactly how short the bodice is so I’m elongating it all by an inch so the back and sides aren’t ending exactly at my waist. My waist is an inch higher than the standard measurements anyway so I think this alteration will help (note: I’m not short-waisted. My bust-hip measurement is standard, my waist is just shifted up a tad).

But I really, really need your help choosing the right neckline for this gown!!

Bridal planning update

Apologies but this is a bit of a “brain dump” post as I’m understandably a bit frazzled right now, with the BurdaStyle book deadline looming on top of wedding planning and everything else I seem to list every time I post (ahh, just thinking about it is starting to stress me out, sorry!).

So I haven’t done much tangible work on my gown since I last updated because I’ve been focusing on getting the BS book dress done since it has a more immediate deadline, but I’ve been doing lots of mental sewing on the gown. Which, you’ll remember, is half the battle for me. So I took an evening out to read (really read and digest!) through “Bridal Couture” by Susan Khalje and the OOP Palmer/Pletsch “Bridal Gowns—How to Make the Wedding Dress of Your Dreams” book (the former being way way more useful than the latter IMHO). I placed copious amounts of Post-It notes sticking out the edges at places I want to refer back to later.

I’m also really glad I ended up taking that PR online Underlining class a few months ago now!! Though I just looked to see if I could link to the Underlining class somehow, and I noticed Susan Khalje herself is teaching a “Wedding Gowns 101” class starting Aug 15. If it were a few months earlier, I’d have jumped all over it, but you need time to devote to the classes most evenings and I’ll need all the time I can get to work on my gown!

After reading through the two books I had everything mostly straight in my head about this dress, but the boning placement still puzzled me because my pattern doesn’t have any obvious vertical seaming to place the boning along, and all three examples in Bridal Couture had some sort of princess seaming. Luckily for me, it was easily solved on the PR messageboard and by this Susan Khalje article, so I’ve got a full gameplan in my head now for the dress!

Bridal Bodice update

When you last heard about my wedding gown, it was two years ago(!!) and I was leaning towards turning my Granny’s gown from 1949 into something with a cowl neck, deep back, and sleek lines, using Vogue 2965 as my starting point.

But recently I’ve been looking more closely at the fabric I’ve got to work with in my grandmother’s gown, and my recent cowl sewing adventure has reminded me that cowl necks need pretty huge amounts of fabric, can’t easily be pieced together, and on top of that, the silk satin in her gown is more of the heavyweight duchesse variety than something very drapey that would cowl nicely. And while I love a low back, it does make things awkward for bras and any sort of shapewear, too.

So I had a bit of a wake up call and told one of my bridesmaids to keep reminding me that “This is just one dress. It is not all dresses.” (thanks, Stacy!). Yes, I like cowls. But I also like other things, too. And I do not need to put everything I like into one dress!

Bridesmaids dresses – finished!

Both bridesmaids dresses for my September wedding are now finished! Since I’m sewing both of these plus my own gown, I stipulated that these had to be knit so that I could sew them early and my girls could feel free to gain or lose a few pounds without too much last-minute alterations hassle.

To refresh your memory, the three of us chose the Gant exclusive design dress from the Sept 08 Burda magazine:

The previous posts about these dresses spanned over a year (from our pre-illness, original wedding date), so to help you find them, here’s a handy list:

  1. Choosing the pattern
  2. Going fabric shopping and choosing their colours
  3. Tackling those pleated cummerbunds
  4. Finishing the first dress

Here are both dresses together, so you can see how nicely their colours will go together on the day: