Blog

A wool maternity coat – basting and buttonholes

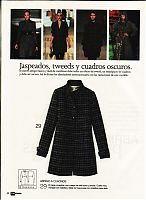
If you recall from last week, my next project is this maternity coat from the August 2008 issue of Burda, which I promised a very good friend:
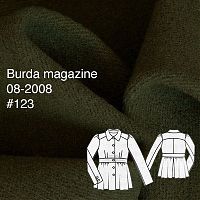

(The issue date is still wrong above – it is indeed in the 2008 issue…)

After we sorted out the fitting and design alterations (including a second, quick muslin fitting of just the upper bodice in the pub toilets on Saturday night!), my first step was to cut out all the pieces in the green wool and then again in the black cotton flannel I’d bought to underline the spongey wool coating and give it a bit more structure. The coating is wonderful, but I’m a bit concerned about it bagging out in places, and I wanted to give it some added stability as well as a bit of extra warmth (though if warmth were my primary concern, I’d call it “interlining” and attach it a bit differently!).

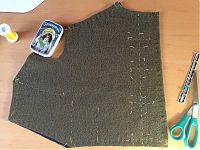
Here’s all the pieces hanging on the line in my tiny sewing room:

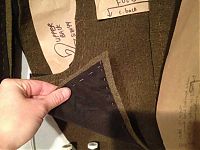
I then hand basted all the layers together around the edges of the pieces, plus through the darts, and then also marked out the placement lines for the five bound buttonholes:

A beginner's knit maternity dress

Just to make things absolutely clear – no, I am not pregnant!

But my very good friend (and beginning sewer!) Holly is, so I’m doing some maternity sewing for her over the next few months, and helping her to sew a few things for herself, too. We’ve already had an afternoon session converting regular trousers to maternity versions (and I’m thrilled to report that she’s since gone home and done a few of these herself, too!), but it’s down to me to start the “from scratch” garments.

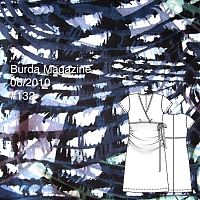
The first project was to make a “wearable muslin” of this Burda knit dress from June 2010. She picked this pattern out of a lineup, and it’s actually great for a beginner. The seamlines and construction are pretty straightforward, and you get a lot of bang for your buck with this, as there are two sleeve variations and two length variations!

I traced off all the different versions, and used the double tracing wheel I picked up in Budapest to even add the seam allowances on for her, too (something I never bother to do for myself, as I prefer my patterns without).

For this muslin I used some viscose jersey donated by Claire (Seemane) specifically for muslining purposes. The print is definitely too wild for me, but it might come in handy for Holly while she’s got a limited wardrobe. I don’t think it’s an ugly print by any means, and I could see her toning it down with a black or navy jacket or cardigan.

The Winter Coat

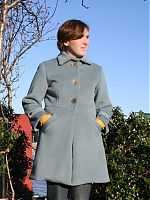
Hooray, my winter coat is finally finished! As you may have seen with all the coat sewing activity going on around the internet lately, making your own coat is no mean feat! While you’re perfectly able to take some shortcuts, it’s still a several week time investment no matter how you look at it. It’s for this reason that lots of us chose to sew them over the holidays, as it doesn’t feel like quite such a long ordeal if you’ve got several full days to devote to it at one stretch.

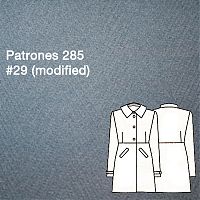
If you remember, I used Patrones 285 #29, but with the collar from #28 and major changes to the pockets so that I can easily put my hands inside while I walk to work (which I did today wearing it! yay!). After a muslin, the main changes I made were to lower the waist seam to match my natural waist, shorten and widen the front darts, add walking ease to the lower centre front, and change the pocket design.

I’ve already made a lengthy post about the coat construction and hair canvas interfacing, plus tons of HAWT handstitching action, so if you’re interested in the couture techniques I used or some interior shots of the coat shell, please click through before reading on…

The Winter Coat – construction

About a year ago I bought some gorgeous, ex-Burberry wool coating fabric from Ditto with plans to eventually make another winter coat. The muted turquoise wool has a patterned herringbone weave on one side but it’s also very thick and un-drapey but has the advantage of not fraying at all (almost like a boiled wool or Melton).

The fabric is so thick that I knew had to choose my pattern wisely, leaving out coats with lots of pleats or gathers that would’ve meant lots of bulk here.

As soon as I saw the Armani knockoff coat in the September Burda issue, I thought I’d found the match for my fabric, but as you recall, that pattern was just downright awful. So I started looking through my coat patterns again for something suitable, and Claire (Seemane) suggested I combine Patrones 285 #29 with some elements of the other coats in that issue, which is more or less what I ended up doing (though I need to change my tech drawing here to show the applied welt pockets I finally decided on rather than buttoned welts).

Pre-Christmas prep

Are you ready for some random sewing goodness? Let the randomosity begin!

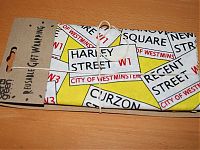
  • When I was at the bookstore on Brick Lane buying James’s birthday card, I couldn’t resist this reusable wrapping paper (okay, it’s just fabric to me and you!) with London streetsigns. I love that it’s a London fabric without being OMG UNION JACKS THE QUEEN TOWER BRIDGE! I figure I could use it as a lining like I did with that Japanese tea towel and my bolero jacket a few years back…

  • We were supposed to meet up with Pip and her boyfriend two weeks ago to celebrate Christmas, but we had to reschedule due to my swine flu, so I’m only just now able to sew up her present – a Nairobi bag made up in gorgeously soft red wine leather, bought in NYC from Global Leathers (I find it interesting that Americans would call this colour “burgundy”, whereas in the UK it’d be “claret”). I’m about halfway done and already I can tell she’s going to love it!

Winter coat shortlist

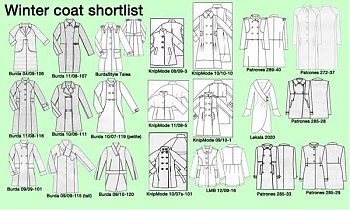
With the Burda/Armani coat firmly OFF my list for my winter coat (a few of you suggested I could change/fix/alter the pattern but sorry, my time is too valuable to throw after a bad pattern. I know when to cut my losses and choose a better one!), I’m now in the process of picking a different winter coat pattern for my luscious and very thick ex-Burberry wool coating.

Since I scan all of the “At-a-glance” pages for my pattern magazines and store these in a private online gallery, looking through these and creating a shortlist is much, much easier than wading through each and every one of my magazines! I went through the gallery, and when I found a coat pattern I quite liked, I took a small screenshot of it (on Macs you can Shift-Apple-4 to draw a small square and only capture just that area), and renamed the screenshot to the pattern issue and number so I wouldn’t forget where it came from. Then I pasted all these into one big image so I can see all my choices at once.

This is the same process I used to narrow down my wedding gown pattern shortlist, but I cleaned the collage up a bit nicer in Photoshop this time around!


(click to see it bigger)

The Burda meets Armani coat – muslin FAIL

I absolutely LOVE the Burda magazine September 2010 issue. Loved it from the first second I saw the technical drawings, and now, several issues later, I’m still not seeing much that tops it. I literally have 11 or 12 must-sew patterns from it, and one of them is the Tall coat, #118.

As you recall, when I was in New York, I saw an eerily similar coat in the window of the Armani 5th Avenue store, and this sealed the deal – I must make this coat using my super thick, ex-Burberry dusty teal coating that’s been in my stash since last winter!

I don’t make muslins for a lot of things, but when the fabric is expensive, or can’t easily be resized (like leather), or if there’s a lot of work involved before a fitting can be made, then I’ll grumble and moan and make a muslin first rather than waste my nice fabric (and time!) and get any fitting issues out of the way first.

Let’s get down to the instructions first – Burda’s instructions aren’t too bad on this one EXCEPT for the zippered inseam pockets – they are absolutely nuts, and account for a good third of the instructions for the entire coat. But the instructions are besides the point, because if you jam your hands into your winter coat pockets when you walk like I do, you really don’t want metal zipper teeth digging in to the backs of your hands! So leaving off the zippers not only saves you time, but makes for a much more usable coat.

Patrones spring coat

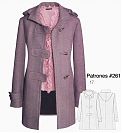
By now, you should be fully familiar with Patrones #261-17, the spring duffle coat I’m making in turqouise basketweave wool…

After all, first it won the public vote, then you heard about how I bulk fused the tricky wool, then you saw all about my muslin and the resulting fit alterations, then you saw how I dealt with the tricky hood seam allowances and finally, last week you got a chance to see the bound buttonholes and the finished shell.

I’ve been concentrating on assembling the lining (and the lining pocket) all weekend, and finally finished all the handsewing at Monday night’s moorings crafty club!

Patrones spring coat – finished shell

Are you thoroughly sick of the sight of the Patrones spring coat yet? Well, too bad, because it’s taking me forever!

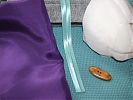
The good news is, I sailed smoothly over the speed bump that caused me so many headaches and delays in making my winter coat – the bound buttonholes. I’d already decided that with such a thick, loosely woven fabric that’s so prone to unravelling, that I’d use the satin bias tape I’d bought for binding the hood seam allowances to also make the bound buttonholes.

So I pressed the satin bias tape flat, cut it down to 1/2 inch wide strips, then folded these in half (right sides out) to make the buttonhole “lips”. After basting my ladder stitches on all the coat tabs, I did the usual technique of sewing these lips to the right side and cutting open the buttonholes.

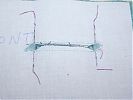
But here’s where I deviated a bit – since my wool unravels so much, I knew that trying to stitch those tiny triangles at the ends would just be an exercise in futility, so I pulled out some lightweight knit interfacing and cut out a tiny strip. I then pulled the triangles to the back and fused the interfacing over top to keep them out of the way:


(It’s a bit hard to see but the mesh white interfacing over the left and right ends is there!)

Patrones spring coat – hood and more…

On Saturday I went shopping for supplies with Johanna Lu while she was holidaying in town, yay! We hit up Goldhawk Road and MacColluch & Wallis so I was able to get the rest of the supplies I needed for the spring coat, as well as stock up on a few things I knew would be difficult to get online for the rest of the year, like quality interfacings (I knows it when I feels it, okay?). She had the forethought to bring a camera along shopping, so you’ll have to stalk her blog for the next few days to see us giddy in fabric mecca!

I was very disciplined on Goldhawk Road and only bought three fabrics (at the end of the list there) – grey corduroy, since I adore the cords at one particular shop there and I don’t think I’ll be able to go back before Fall, a red & white cotton poplin with stylised flowers that’s already earmarked for two projects, and my one impulse buy – a very cool lycra jersey with tons of overlapping stripes going every which way. Oh, and the lining for my Spring coat.

Speaking of that Patrones spring coat: