Blog

Inspiration from all angles

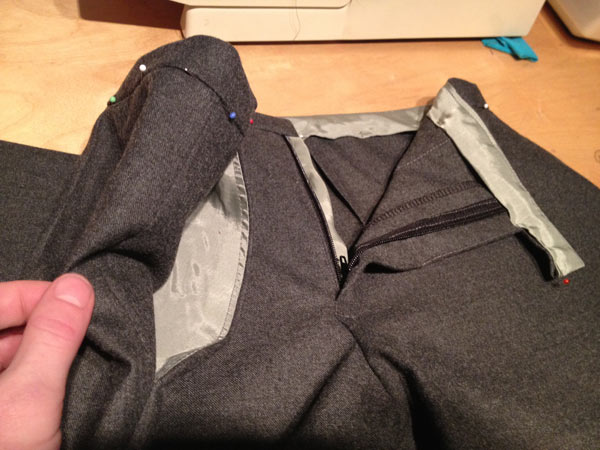
I’ve got lots of bits and pieces on the go right now, and I’m finding that I’m being inspired by lots of little things – not just from the fantastic last few issues of pattern magazines (hello, August Burda!), but also some supplies which have found their way to me, like this amazing laser-cut eyelet zipper from my friends Alex & Liz, bought at the V&A shop!

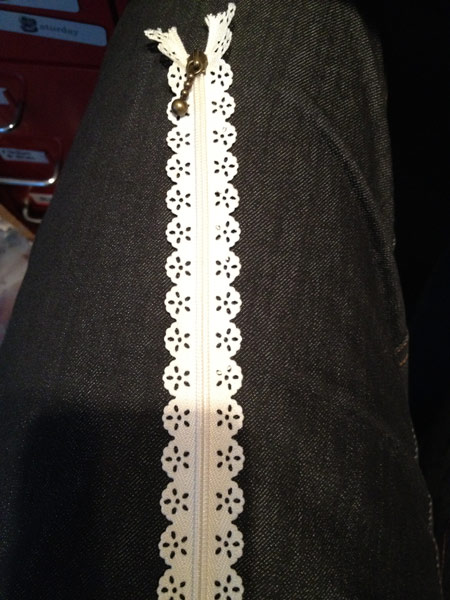
Mine’s skirt-length and now I totally want to make a pencil skirt with an exposed zipper just so I can show this off! After I got mine, I’ve since seen that they’re available on etsy in a bunch of different colours, too.

Not long after that, I was approached by the owner of Lots of Buttons asking if I’d like to try their shop for free. My initial reaction was that the prices in dollars surely meant exorbitant shipping to the UK (boo!) BUT as it turns out, all the orders are fulfilled in Hong Kong so the shipping is the same anywhere in the world (great for the Antipodeans, too!).

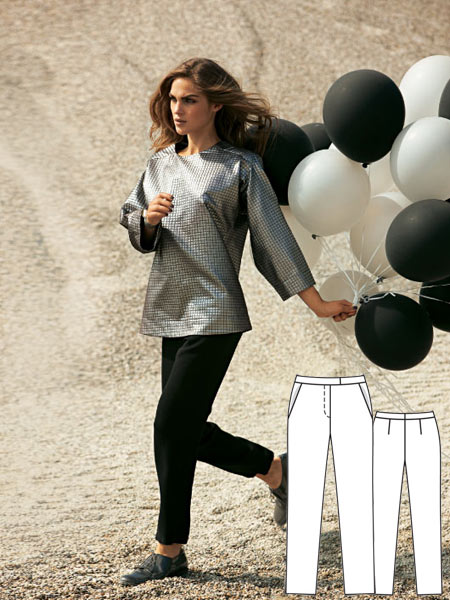
So I picked out some basic black horn buttons (just like the ones my stash was missing for my black knit trousers the other week), and some gorgeous overlapping metal buttons I thought would go really nicely on a jacket. All in, these would’ve cost me $10 total (with shipping), which is like half the cost I pay to get nice buttons in central London, with a travelcard cost on top of that!

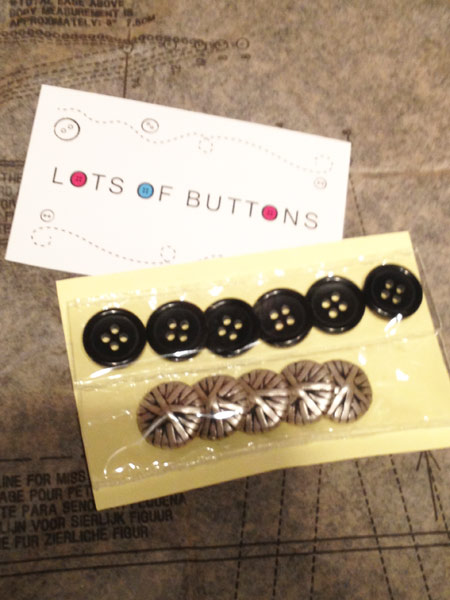
These arrived in 7 days, too, along with a discount code for my next purchase. I also really like that they seal off each button type in its own clear plastic bag, so you can see what’s inside without them all getting jumbled up together. Genius! So I went from being skeptical to totally pleased and very happy to recommend them in the space of about 10 days!

Swirled lines sheath dress – 2nd muslin

Thanks very much for all your feedback on my post regarding the design lines for my upcoming sheath dress – I decided to go with the top design, and save the bottom one for some later colour blocking (maybe in ponte jersey?).

Once that was decided, I sewed up that basic Burda sheath dress (which fit me very well, as expected), then while it was on my dressform I drew rough design lines on to match. After the rough lines were on, I cleaned these up with French curves while the dress was lying flat (these photoshopped ones are just free-handed on top since my black lines on navy blue fabric were hard to see in the photo!)

I then cut apart the Burda muslin along my new lines, and cut into the curves a few times to release any bumps. I then transferred these altered pieces onto a second muslin to test that all my new curves matched up well:

Design lines and ideas

I know it’s a cliché to say so, but I’ve been very busy lately! So busy that there was no sewing activity whatsoever last weekend (though I did cut and fit an awful lot of insulation for the new boat bedroom, attended two out-of-town barbecues, and raced a new 10km PB in the weekend available to me!). In two weekends’ time I’ve got a friend’s wedding and ever since we were invited, I knew I wanted to apply a Pattern Magic technique onto a sheath dress for this occasion.

Overall, I was disappointed by the June Burda magazine, but I saw dress #129 and knew it’d be a great starting point since I know Burda’s dresses fit me very reliably (and I’ve already raised the waist by 1 inch to make it perfect).

The technique I’m looking to apply here is one I learned on my Pattern Magic 2 course at Morley College, though it’s well documented in the second book, too. Essentially, you make a muslin of a basic block (in my case, I’m using this Burda pattern), draw design lines wherever you like, cut along those lines, and then release any lumps into the curved edges of the new pieces.

So thus far I’ve copied the tech drawing off Burda’s site, raised the neckline a bit, and removed all the darts in Photoshop (since mine will be incorporated into my new design lines anyway), then printed off a bunch of these empty tech drawings onto a sheet of paper.

The Donna Karan red vixen dress (Vogue 1280)

I don’t often sew Vogue patterns, but I am a massive fan of the Donna Karan patterns’ design and execution, so it’s no surprise that I added Vogue 1280 to my Wish List the second it was announced recently!

Happily, my mom saw there was a pattern sale where she lives in the USA and offered to buy a few patterns for me at US sale prices – she paid less than half the price for the pattern + shipping to the UK than I’m charged just in postage to the UK for the same pattern! I wasn’t planning on sewing a dress right now, but I got so excited when I saw Vogue’s numbered pattern marks for the first time (possibly in response to my complaints regarding Vogue 1259’s instructions), that this dress moved quickly up my Must Sew list.

Like all DKNY & Donna Karan Vogue patterns, this one’s a great mind puzzle to put together! It also has the joy and wonder of looking like a total mess until the very end, when it all comes together into a dress shape. I found it to be true to size, so go with your measurements, not some vague idea that all Big Four patterns have tons of ease. Most of the pieces are cut on the bias (not that it means much in a jersey!), and it hugs the body very closely. If you’ve got any lumps and bumps, though, this is not the pattern to hide them, and so you’ll probably be wearing Spanx underneath in addition to the strapless bra the bodice requires (Full disclosure: I’m not wearing Spanx in these photos!).

Hooray for the Vogue 1280 DKNY sheath dress pattern!

Even though I live in London, I grew up in America, and my family all still live there. A week or two ago, my mom saw there was a pattern sale coming up and very kindly offered to buy me a few if I wanted! There were two Vogue patterns on my Wish List – one was a Michael Kors knit dress that’s now OOP (and her Hancock’s didn’t still have it), but she was able to buy me one of the new DKNY Vogue patterns I was after, plus ship it to me, all for less than half the price we pay for Vogues in the UK on sale!

(Ever wonder what sad souls pay the full list price printed on envelope patterns? Yeah, that’s us. Little wonder I mostly sew with pattern magazines!)

So Vogue 1280 arrived in the post yesterday, and I immediately set about devouring the instructions and construction details of this.

It’s a really interesting, asymmetrical knit sheath dress with a characteristic (for DKNY) lack of side seams, so there’s a lot going on here!

Here’s a better shot of the tech drawing from the envelope. On Vogue’s site, the tech drawing is really too small to see that nearly all the seams are lapped, with a raw-edged piece of trim inserted, and then double-stitched (hello, coverstitch!) on top.

The Blue and Black Burda February sheath dress

I’m feeling pretty good about the past few issues of Burda magazine. For a while there (2010, I’m looking at you!) they really seemed to be only printing boring, shapeless and awful patterns, but I’m glad I stuck around because the past few months have really been a return to form, as far as I’m concerned.

There were quite a few patterns I want to make from the February issue, but only one demanded I drop everything and Sew It Now, the colourblocked asymmetrical knit sheath dress #117:

I know a lot of people complain about tracing Burda patterns, but I seriously don’t have a problem with it. Most patterns take me about ten minutes to trace, I have the pattern sheets on top so it’s not difficult to see the lines, and I do a few at a time.

This dress may have the illustrated instructions for this issue but WOW was this a total bear to trace! It’s printed in red lines, but this sheet also contains the “easy”, pink shaded pattern, so there are multiple points where you need to trace red lines over pink shading. Add to that the irregular shapes of the pattern pieces and you’ve got yourself a headache.

If you can get through the tracing pain, though, you’re really in for a treat, because the tracing took longer than the cutting or construction combined. I sewed this up last Friday night after work and wore it out to a friend’s birthday the next day!

Upcoming January sewing

I’ve finally emerged from the craptacular flu (which then turned into bronchitis) that I’ve been under since Dec 28 – thank you for all your well wishes! For me, it really feels like the new year, 16 days late!

The Ruby Slip was my first garment of 2012, but my second and third aren’t far away…

Grey flannel trousers

Just before Christmas, I met up with Claire for lunch and she gifted me a massive length of wonderful dark grey flannel. It’s so soft and lovely that initially I thought a dress, but then realised I’m likely to get much more wear out of a really chic, comfortable pair of dress trousers. So on Friday night I traced and cut Burda Jan 12 #122, mostly because the issue was handy, but also because they looked to be a great basic. These have the illustrated instructions for this issue, but I could sew trousers blindfolded by this point, so the instructions didn’t make much difference to me.

I sewed this on and off over the weekend and nearly completed these despite hardly being at home. As a nice tie-in to my previous garment, the pockets, fly underlap, and waistband lining are all done in the pale green silk leftover from my Ruby Slip.

The silk chiffon maternity maxi gown

I finished Holly’s silk gown on New Year’s Eve, so this is officially my last project from 2011. If you recall, it’s Burda 08/2008 #125 and is one of the designer maternity patterns from this issue (and in my opinion – a really nice maxi dress whether you’re pregnant or not!).

We muslined the bodice portion of this (minus the drape pieces) back before Christmas, and made a few changes: taking a few tucks out of the neckline here and there, and increasing the bust space on the standard size 44.

I totally missed the chance to finish this for her Boxing Day birthday, but I figured I’d be still in time for any January parties before the birth in late January, and we were even scheduled to go over for dinner last Friday, where I was going to bring the dress along and sew up the hem on my little red machine after we ate (the hem is just raw here, as I can’t do that without her wearing it).

Burda's Roland Mouret "Macha" knockoff dress pattern – detail photos

First of all, thank you all so much for all your comments and praise on my Charcoal pinup dress! I knew I really liked it, but it’s nice when so many others agree.

One thing that I hadn’t realised in the magazine discussion, nor sewing, nor wearing it out, however, is that this dress pattern is a very close knockoff of the Roland Mouret Macha dress, which was shown in his Spring 11 RTW show!


(Photo from Style.com)

Really, the bodice seaming is all identical, but there are a few differences:

  • Burda’s pattern is for wovens, RM’s dress is a stretch woven
  • Burda’s has long sleeves, RM’s is sleeveless
  • Burda’s has a back V neckline, RM’s has a square back neckline
  • Burda’s is princess-seamed in the skirt, RM’s appears to be one panel in the skirt
  • Burda’s has a centre back invisible zipper, RM’s has a centre back exposed zipper

The charcoal pinup sheath dress

I feel like this post should have a warning, like those awful, dated jokes – Dangerous curves ahead! But to be honest, I’ve been running like a mad woman for the past few months, finally running much faster and further than I ever did before I got ill, so I’m relishing the chance to show off my running body right now*.

This dress was in the Sept 2011 Burda magazine, but it’s also available to buy as a download pattern on Burdastyle.com if you missed that issue (or believed the blog hype that it was a bad issue, gasp!). I really loved this pattern from the second I saw it, and all I really needed was a little nudge from BurdaStyle and I was totally sold on making this as my double-duty James’s birthday dinner and Christmas party dress.

Though on reflection, it might be a bit too sexy for my office party.

As this was a close fitting sheath with a non-stretch fabric, I opted to go right ahead and make the only fitting alteration I ever make with Burda patterns, and even then it’s only occasionally – I removed 2cm above the waist line across all the vertical panels so the waist of the dress is more in line with my own.