Blog

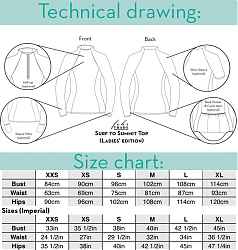
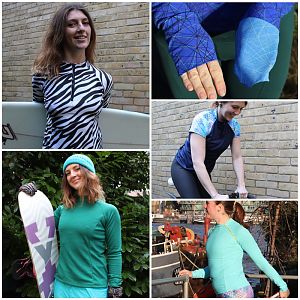
On sale now – Surf to Summit Top pattern for men and women

It’s finally here! After months of hard work, dozens of pattern revisions, ten sewn samples, three athlete-models, and meters upon meters of spandex, the Surf to Summit Top is on sale now!

Both the men’s and ladies’ versions feature princess seams, side panels (so no side seams!), your choice of long or short raglan sleeves, optional sleeve mitts for keeping your hands warm without fiddling for gloves, a tall integral collar to keep your neck covered, and your choice of two hem lengths. An optional half zip and back cycling-style pocket are also included.


Click any image to make it bigger!

This pattern truly does cover all seasons and a multitude of sports – everything from a rashguard for surfing, to a winter base layer for skiing! Plus you can make a traditional cycling jersey with it, and I absolutely love it for winter running.

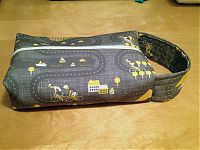
A Tour de France inspired box bag

Today is James’s birthday!!

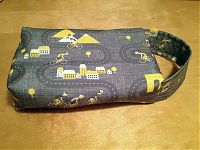
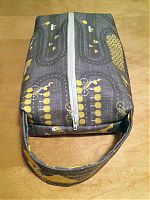
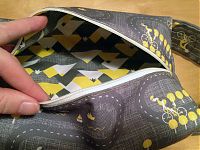
I recently noticed his dop kit (toiletries bag) was getting a bit ratty, and I thought it might be nice to make him a replacement, and I stored the idea away in the back of my brain for a while. Then I saw that Spoonflower were having a BOGOF sale on all fat quarters, so I jumped at the chance to buy him some nicely coordinated Tour de France fabrics, since he loves Le Tour!

Since you could mix and match the base fabrics, I bought one fat quarter of “Vive Le Tour de France!” printed onto recycled eco-canvas for the exterior, and a fat quarter of “Les Montagnes” on quilting cotton for the lining. The colours are nice and manly, the prints coordinate perfectly, and it was a pairing I really hoped he’d like.

I then went in search of a good, free boxbag tutorial that wouldn’t use more than a fat quarter, was lined, and looked good, and I settled on my friend Stacy Sews’ free box bag tutorial, which also comes as a pdf if you’d rather view it on your tablet as you work (like me!)

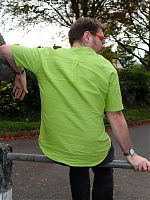
A Lime Linen Men's Shirt

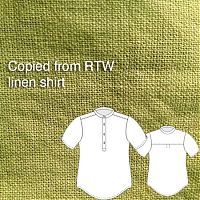
James has a black linen shirt from Muji that he utterly loves. He’s worn it very nearly to death over almost ten years, though, with it rather faded and with a hole worn in in one place. So he asked me if I could copy it, as it’s a design that he’s never been able to find it shops again.


I’m so proud that my Illustrator skills are such that I can whip up a tech drawing like this in a few minutes now!

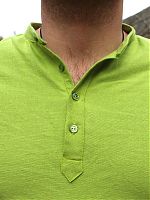
It’s an over-the-head design with a front button placket, stand collar, back yoke, and short sleeves with little button tabs on the sleeve hems. The only change I made from the original was to introduce a small pleat at the back yoke, as I just think men’s yoked shirts look weird when they don’t have them, plus it gives a bit of wearing ease back there.

I traced out his existing shirt with craft paper and my serrated tracing wheel, and made a quick muslin, which miraculously needed no fitting changes! Then it was onto the first real version, made up in a lime-green linen-blend mix from Ditto which he chose when we were in their Brighton shop earlier this year.

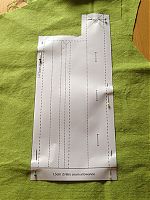
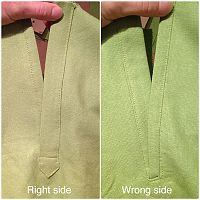
Plackets always tend to intimidate me as they seem like a bit of witchcraft – how can this weird shape turn into that in just a few steps?? So I put off sewing it, until I remembered that I’d scanned and digitised the placket template from David Page Coffin’s excellent “Shirtmaking” book. This is one of my clever-er ideas, as it means I just just adjust the width and length of the placket in Illustrator and print myself off a fresh template. Because obviously the dimensions for sleeve plackets for men’s shirts are of a different scale than the neck placket here!

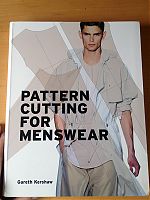
Book Review: Pattern Cutting for Menswear

Unfortunately, menswear really is the ugly stepchild of the fashion industry – there seem to be about two menswear books for every ten for women, plus there are hardly any commercial patterns out there for men (and if there are, 90% of the time it’ll be that same button-down shirt I’ve seen a million times, argh).

The Aldrich book seems to be the de-facto standard for menswear drafting as far as I can tell, but I tried her teeshirt draft for men and hated it so I’m loathe to buy it to test the rest, really. Perhaps it’s the standard just because there are so few to choose from and not because it’s particularly very good? So I asked for (and received!) this book instead for my birthday, as I’d love to draft more menswear for James and possibly for future patterns, too.

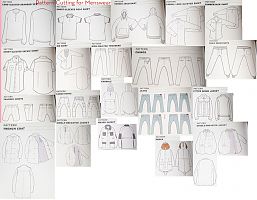
Now I haven’t actually tested the drafts in here yet (though I fully intend to), but I really like a lot of things about this book. Most obvious is that it’s a modern menswear book – instead of just covering the basic tailoring styles, it shows you how to draft things like hoodies, jeans, and parkas on top of the more standard jacket and button-down shirts. There are 20 different styles in all, with instructions on how to adapt the basic blocks to match the given style. So this is more like how the Japanese pattern books do things, only a bit easier to follow than the standard Pattern Magic “instructions”!

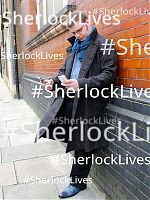
The Sherlock coat

Sewing a coat is always a big accomplishment, but this coat in particular has been a long time in the making. I first told James I’d finally make him a coat like Benedict Cumberbatch wears in BBC’s “Sherlock” for his birthday back in early December. I drafted up a pattern using the details provided in this livejournal post, then made a muslin for him later that month. With only a few tweaks needed for fit and style (I made the lapels too big, for starters!), I then moved on to purchasing the wool coating, cotton flannel underlining, and black acetate lining.

But this is also where the first delay came in, as he wanted a black wool coating with faint blue and brown checks from Crescent Trading, who turned out to be closed over the full Christmas period, when I was hoping to get a lot of the work done. All of the above are detailed more
in this “progress report” post from January.

I then had more hurdles involving the hem bubbling (which meant I had to baste it in place, flip it back wrong-side out, handstitch, re-press, etc), waiting for some woman on Etsy to make more replica buttons (which we finally gave up on and just made our own with gold enamel paint), and getting the right upholstery thread to do all the buttonholes.

But it’s finished, it looks fantastic on James, and the proportions are really flattering on him, too! So the lengthy making process shall soon fade away in the light of the finished coat. He definitely prefers it open (as dos Sherlock himself), but it can be buttoned up in the coldest of days, too:
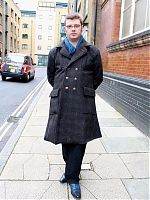
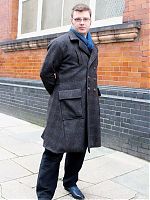
It’s a very warm coat, having underlined the body and sleeves in flannel, a trick I picked up in previous coats to stop the wind.

I can’t take the credit for these, as James was having fun with photoshoot ideas!

The Sherlock coat – progress report

I mentioned briefly back in December that, for James’s birthday, I gave him the promise of a custom-made coat in the style of the one Benedict Cumberbatch wears in Sherlock. Or as it will henceforth be known, “the Sherlock coat”.

A few others online have made this coat (including a few FehrTrade readers, hello!!), but I found the most helpful resource to be this livejournal entry from a lady who sketched and measured a lot of the details after analysing screen grabs. This was a big help in taking James’s TNT short jacket pattern and adapting it to look more like the coat on screen!

I first made an approximation on his paper pattern and sewed up a muslin. From this the only real fitting problems were that the upper back was too tight, and the Centre Front needed to be shifted by about an inch, but it was otherwise fine. I guessed a bit wrong on the collar and lapel shape though, but it was fairly easy to just draw a nicer shape onto the muslin itself and transfer it to the pattern.

Once the muslin was settled, I then bought the wool coating (delayed a bit as Crescent Trading were closed over the holidays) – not the exact black and grey small houndstooth used in the original (simply because I couldn’t find any locally), but instead a black/grey/brown check which still had the same feel. I also bought the black acetate lining at the same time, but the black cotton flannel for underlining came from Minerva.

I then settled in for the mammoth task of cutting out all the pieces in wool, underlining, interfacing, and lining, then fusing the crap out of everything that needed interfacing. With two patch pockets (and flaps), plus two welt pockets, two back belt pieces, sleeve cuffs, and a collar, (not to mention facings!), there was a good day taken up just by fusing alone!

The reversible disco jacket

I don’t often sew for James (preferring to fill my own wardrobe instead!), but every now and then he either sees something online that he’ll take inspiration from, or have a fully formed idea in mind that he’d like me to bring into reality. So this one is another fantasy jacket, this time modeled heavily on Betabrand’s reversible smoking jacket.

When we were in Paris in March, he bought a wonderful wonderful wool/poly blend corduroy at the Tissues Dreyfuss Coupons shop for €10 total (a complete bargain!) as well as some red chinese brocade to use for the other side.

I started sewing this when we were in drydock in April/May, then I stalled at the bound buttonhole stage since my little red machine isn’t great for precision jobs (no speed control!). Then the pressure was off during summer, but the cooler weather meant I really did want to finish it for him!

Even better – James surprised me buy buying Betabrand’s “open source” disco fabric, so now the jacket changed slightly in that the reverse will be PURE DISCONIUM!

What I’ve made here is the ultimate day-to-night jacket!


(Thank you to Kerry for the photo on the right!)

I started with his last fantasy jacket as the pattern base (which, in turn, started life as Burda 10/2008 #134) since it fit him really well, then James had a bunch of style changes to make to this one:

Let the disco begin!

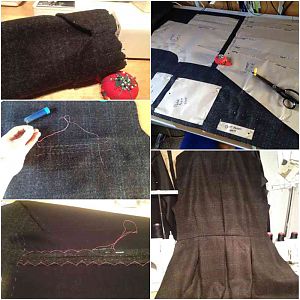
Because I’m a good wife, I promised James I’d make his reversible smoking jacket after I’d finished my peplum top (photos coming next week, sorry – it’s been impossible to organise a photoshoot around both our social schedules!). This week has been rather busy, even by our standards, but I did get two evenings to work on it, and so far I’ve completed the entire corduroy shell (including bound buttonholes and no less than three welt pockets!) and moved on to the interior. Or, because this is a reversible jacket, I suppose it’s just “the other side”.

The other, disco side.

If you recall this is Betabrand’s disco fabric and it seriously is as bright and loud as the photos on their site suggest. I had to cut it with the black side facing out just so I wouldn’t go dizzy cutting it!

Coming up… peplums, sweat & booze, disco and smoking!

Lots of things going on at FehrTrade Towers, so it’s time for an update roundup!

Peplum top

After my last post outlining the lining instructions, there will be no points for guessing that this is coming along shortly! I’ve just got to handstitch the hem and the bottom of the lining and it’s finished, hurrah. Perhaps if I’m speedy I can wear it to the V&A Ballgowns exhibit meetup Karen is planning?

Bacchus half marathon costume

As part of my preparation/reward for my marathon training, I signed up to run the Bacchus half marathon this weekend. Not many people are familiar with this race, but it’s been rated exceptionally highly on Runner’s World, and the clue might lie somewhere in the description: a half-trail, half-road, fancy dress (costumed) race through a vineyard in Surrey with wine tasting every 2 miles, plus a free glass of wine and hog roast at the end. See why I signed up??

I’m regularly running much further than half marathon distance in my training runs, so even though this is only my second half marathon, I’m not that concerned about the distance, so instead I concentrated on the costume, making sure it’s entirely wicking and running-friendly!

I’m sure it will surprise none of you that I’ve also made another Jalie running skirt. Or, err, to be precise, two more, since I made another black one in parallel with my Bacchus one and forgot to photograph it! And a top based on my knit sloper (which I’m still tweaking after running in my sequin top for a few months now).

The John Deere shirt

So following on from my high class, designer escapades last week, I’ve now got something a little more, err, salt of the earth to show you. I’ve taken to calling this the “Appalachian Wedding Shirt” (and being from Perry County, PA, I’m allowed to say that!), but it’s also a gift of a gift, and I love when I can do that.

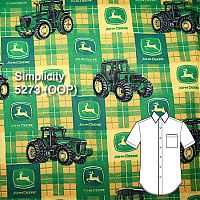
The (officially licensed!) John Deere quilting cotton was a gift from my friend Sharon, who bought it at her local Amish fabric store and presented it as a gag gift in my stack of fabrics that made up our wedding gift. John Deere is a completely unknown brand amongst my circle of friends in central London, but we knew our friend Simon would love this, and he travels all around the world on business so we knew it’d get seen a lot, too.

I paired this with Simplicity 5273 (now Out Of Print), which I’ve made many, many times for James in various guises and it’s my go-to pattern for a quick and easy button-down casual shirt for him.

You may remember Simon from the quickest pirate coat ever (and yes, he still wears it!). But this shirt has been a mental project for almost a year now, since Simon was overheard at our wedding complaining to other friends how “it’s not fair that James just picks out any fabric he wants and Melissa makes it into a shirt for him!”. ha! So we thought this would be perfect for him…

James’s first reaction when he saw the finished shirt was “It’s horrible! Simon will love it!”.


(Apologies for the mobile phone photos!)