DIY Wedding Fascinator – in progress

The Gown is progressing nicely, the shoes are bought and are being broken in little by little (while doing such glamorous tasks as watering the garden and taking out the rubbish!), so it’s now time to focus on my hair. In the past I’ve made fascinators (First in gold and then in silver) with a comb base that worked well for my long, thick, and straight hair, but post-chemo my hair is only two of those things so I’m using a headband for the base of this fascinator. In some strange twist of Life Imitating Art, my hair looks almost exactly like it does in the wonderful cartoon of us drawn by John Allison way back in March when I had barely any hair at all!

It appears that my “How to Make a Fascinator” tutorial vanished off BurdaStyle during one of their site moves, so I’m really glad I saved it as a Pdf a while ago so you can download it here now!

In the past my construction technique mostly centred around the glue gun, but for this one it just felt a bit wrong to do so when the rest of the ensemble is full of couture techniques. So for this base I used two teardrop shaped pieces of blue wool felt (the only colour I had on hand), with one of them stiffened with the ultra-rigid interfacing I used on my sun hat. I then covered this felt with a scrap of the vintage dress satin, stitched on the underside to prevent any puckers at the edges. You could omit this step if your felt matches the colour of whatever you’re covering it with, but the blue kept showing through the first few layers of feathers so I needed the satin layer.

I specifically chose a thin headband that had a fabric covering around it so I’d have something to anchor my stitches to, so keep this in mind while you’re shopping, as it’d be difficult to sew onto an all-plastic band (in which case you’re probably better off using glue). I then sewed the satin-covered base onto the headband, making sure my stitches went around the band each time for strength. Since the top was being covered in feathers, I didn’t bother to hide my stitches on the top side.

Once the decoration attachment is all complete, I’ll stitch the other blue felt piece to the underside of it all to hide the stitches (and band) and create a bit of grip on my hair.

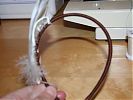
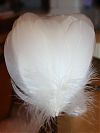
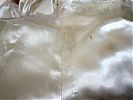
Here’s the fascinator with just the white goose feathers attached:

Sewing these onto the base was way easier than I was expecting. I just took 2 or 3 stitches over the central portion of the feather near the base, and that was enough to keep them secure. I’m leaving them unattached at the tips because as the headband stretches whilst worn, the feathers stay close to my head anyway.

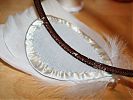
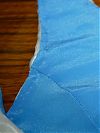
Here’s the underside so you can see my stitches and that super-stiff interfacing:

DIY Wedding Gown – Fitting

Pip came round last night for dinner, drinks, holiday food exchange (French cheese from me and Greek nougat from her!), and her final fitting on her bridesmaid dress.

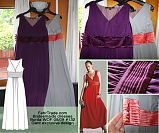
If you cast your mind back to April and May, her gown is the long, purple, silk jersey Gant exclusive design gown from the Sept 2008 Burda magazine.

I’d completed the gowns back in May, but I left off the tiny covered buttons on the cummerbund and finishing the hem until closer to the day so that they wouldn’t have to worry about gaining or losing a few pounds, or deciding on different shoes before now!

Happily, Pip’s gown fits her perfectly, with minimal overlap at the cummerbund, and really her hem was just about perfect with her chosen heels. But then we realised that if she switched to her comfort flip-flops on the dancefloor, the hem would drag, so I’m going to pull up the hem by an inch.

Then Pip wanted to see me in my gown, and since I hadn’t tried it on since the skirt was attached, I felt it was a good idea. But even though I was capable of wrestling into the boned bodice before, it was proving impossible (and more than a little claustrophobic) with the attached skirt. It was apparent that I had to remove the brass bar at the top of the zipper to allow the top to fully open and give me extra room to squeeze into the gown. I’d thought I might have to, but I kept it in until now since it wasn’t a problem. So now I’ll just need to add one or more hook and eyes to the top of the zipper to keep it all in place.

DIY Wedding Gown – attaching the bodice and skirt

Finally I can give you another progress report on the wedding gown! Don’t worry, as you can see below, I’ve been continuing to work on it on my weekends and Wedsnesdays, so I’ve got a lot of progress to cover!

For the first time I got to turn my attentions to the skirt, which is exactly as it was when it was attached to Granny’s dress, albeit separated from the bodice at the (very gathered) waist seam. But there was a prominent blue stain in the centre front (CF) panel at about thigh-height from the blue tissue paper it was wrapped in for 60+ years, so the first step was to unpick and remove that entire panel. I then moved the two triangular sections that had been on either side of it together to form a new CF:

I actually prefer the way these two look together, forming a beautiful triangular, almost art-Deco detail at the CF!

But back to the bodice, where I had completed prickstitching along the entire neck and arm edges. I just free-handed this without my post-it guide and I actually think this looks better than my zipper insertion!

Bridesmaids dresses – I pleat the fifth

While I’ve been showing you all sorts of books and magazine reviews and drafting up free bag patterns for you, what’s been going on in the sewing room, I hear you ask! Well, I set aside April and May to sew my two bridesmaids dresses, and after a long muslin period, I’ve been getting stuck in with the most time consuming portion of the dresses first – the pleated, silk satin (charmeuse) waistband/cummerbunds.

If you recall, I’m sewing the Gant exclusive design dress from the 09/08 Burda magazine:

The fabrics were bought over a year ago, so I fished out the bag and got to work on the reeeeeeeally long pleated sections using Burda’s magazine instructions (which are surprisingly helpful) and a bit of info from my The Art of Manipulating Fabric book (thanks, Cindy!). These are knife pleats, one centimeter apart, and Burda called for seven pleats down the band, but after my test piece, it looked a bit sparse at the top and bottom edges, so I decided to go for eight pleats in the final versions.

So in order to help any of you attempting this on your own (and sadly, a Perfect Pleater is way too narrow to help me here), or those of you wondering why professional designers outsource their pleating to professional firms, here’s what’s involved…

How to pleat

Step 1 – On the reverse of the fabric to be pleated, mark chalk lines exactly 3cm apart, one for every “mountain” pleat.

The LMB draped dress – muslin

As good as my word, I sewed up a muslin for my birthday dress (next week, birthday fans!), which will be the draped jersey dress from the Feb 2010 La Mia Boutique magazine, #6:

I sewed up the muslin in a viscose jersey, chosen for its very similar draping to silk jersey (with the bridesmaids’ dresses also in silk jersey, I bought TONS of this!), but it is pretty thin and see-through so it’s really only ever going to be good for muslins. After sewing a size 44 in the turtleneck and finding it quite roomy, I decided to go with a 44 here, too, even though I should be a 46 according to their size charts. This is sewn up exactly as per their paper pattern, with no alterations.

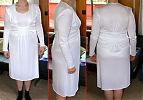
Here’s the front, side, and back views of the muslin:

Vintage wedding gown detail photos

My grandmother’s wedding dress arrived safely on Friday! I person, it’s absolutely jaw, droppingly gorgeous, even 59 years later. The preview photos I drew the technical drawing from didn’t do it justice, so I’m hoping these photos on James’s DSLR will help to show some of the amazing vintage details.

The dress is entirely silk satin with no lace, embroidery, or beading (just from a mesh panel around the neckline), and the weave of the silk is still perfectly and soft and so very strong still. Granny told me she bought this in a shop on South Street in Philadelphia in 1949, but I’m afraid I can’t tell you the designer as there’s no label and she’s long since forgotten the details. But the workmanship speaks for itself, and it’s very interesting for me to see that they’ve not wasted any silk where it couldn’t be seen – the mesh fabric is used for all facings, the seam allowances are only 1/2 inch, and there’s no lining.

Laid out on our table:

My bias silk 40th birthday gown

Happy 40th birthday to me! Since it’s a big birthday year I kinda felt like I just had to celebrate big, too! So we rented the whole of a private members cocktail bar near Kings Cross, invited a bunch of people, laid on pizzas, and let the rest just happen! Every year I like to make myself something special to celebrate my birthday, and I felt like I should sew a big, glamorous dress for myself to feel like a total star at the party, too.

I happened to have four meters of gorgeous copper-coloured silk satin (charmeuse) in my stash which I’d bought from Truro Fabrics back in 2015 with the intention of sewing a gown for the World Transplant Games gala dinner in Argentina. But I didn’t quite have enough time to sew it before we left, and the silk has been in my stash ever since. I still had the receipt in with the fabric, too, and the price reflects the incredible quality of this silk – I’d paid about £75 for it.

Dutch sewing pattern magazine roundup

A few weeks ago J and I took a long weekend away in Amsterdam, but the majority of these patterns actually came from a different trip he’d made for work a few weeks earlier. It turns out that the newsagent inside Rotterdam station is a haven of sewing pattern magazines, who knew?? So rather than do a post on each of these, I thought I’d pull out my highlights, and take the chance again to explain how accessible the pattern sheets and instructions are for non-Dutch speakers…

Listen to me on two new podcasts!

For the record – I freaking love listening to podcasts. I listen while I sew, walk around London, and before I go to sleep some nights. I mean, my last job was even at a podcast company!

So I was super excited when two new UK sewing podcasts launched recently and even MORE excited when I was asked to join them for a chat! And then out of sheer coincidence, both episodes ended up going live this week so you all have got no excuse for not hearing my funny trans-Atlantic accent all weekend long! 😂

Happy 2018! (My Year in Review)

Happy fresh and new baby year, everyone! I always like to celebrate the first of the year with a look back at the year that’s just completed – this gives me a chance to reflect at the things I’ve accomplished, the garments I’ve made, and challenges conquered. As is traditional, I find myself starting 2018 with lots of great stuff on the horizon but unable to talk about it (this time last year my two big secrets were my Threads article and my book deal, so you’d better believe 2018’s secret project is a good’un!) so you’ll just have to trust me that the outlook for 2018 is rosy indeed!