Blog

PB Jam Leggings – invisible pocket tutorial

One of the favourite features of my PB Jam Leggings pattern is that there’s a secure, inner pocket at the upper back to keep things like your phone, keys, or gels handy while you’re working out. While I was developing the pattern, I decided to make this pocket one layer, and use the exterior of the leggings as the other side of the pocket, sealing off the bottom with topstitching.

But sometimes you may not want any topstitching visible from the right side, so to do this, you only need one extra piece of fabric and a few short steps. Making the pocket invisible from the outside will only add about 5 minutes max onto your construction time, but if your fabric is thick, definitely consider cutting your pocket from a thinner lycra!

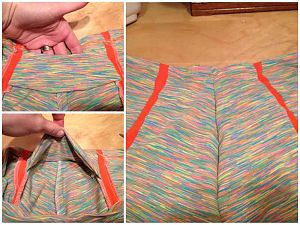
Here’s the finished invisible pocket on my latest “rainbow sherbert” pair I’ve just finished!

Before you start…

When you’re cutting out your fabric, cut two pocket pieces instead of just one.

Step One
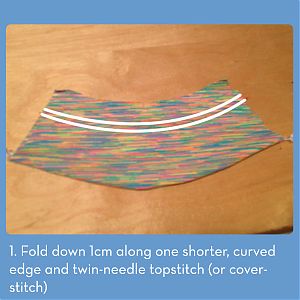

Fold down the shorter, curved edge of one of the pocket pieces and topstitch with a twin needle or coverstitch (or, alternatively, finish with narrow elastic or FOE)

Step Two
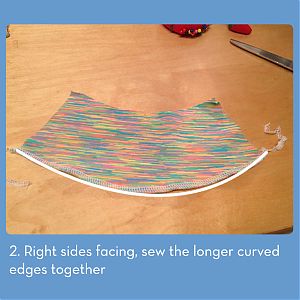

With right sides together, stitch the longer, curved edge of the two pocket pieces, and flip right side out (note: if you’re zigzagging this seam, you’ll want to trim the seam allowance and/or clip the curves to get a smooth seam)

The Sherlock coat – progress report

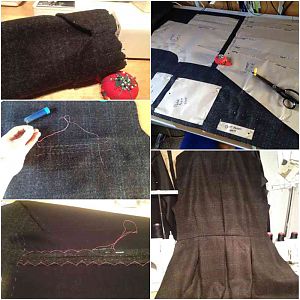
I mentioned briefly back in December that, for James’s birthday, I gave him the promise of a custom-made coat in the style of the one Benedict Cumberbatch wears in Sherlock. Or as it will henceforth be known, “the Sherlock coat”.

A few others online have made this coat (including a few FehrTrade readers, hello!!), but I found the most helpful resource to be this livejournal entry from a lady who sketched and measured a lot of the details after analysing screen grabs. This was a big help in taking James’s TNT short jacket pattern and adapting it to look more like the coat on screen!

I first made an approximation on his paper pattern and sewed up a muslin. From this the only real fitting problems were that the upper back was too tight, and the Centre Front needed to be shifted by about an inch, but it was otherwise fine. I guessed a bit wrong on the collar and lapel shape though, but it was fairly easy to just draw a nicer shape onto the muslin itself and transfer it to the pattern.

Once the muslin was settled, I then bought the wool coating (delayed a bit as Crescent Trading were closed over the holidays) – not the exact black and grey small houndstooth used in the original (simply because I couldn’t find any locally), but instead a black/grey/brown check which still had the same feel. I also bought the black acetate lining at the same time, but the black cotton flannel for underlining came from Minerva.

I then settled in for the mammoth task of cutting out all the pieces in wool, underlining, interfacing, and lining, then fusing the crap out of everything that needed interfacing. With two patch pockets (and flaps), plus two welt pockets, two back belt pieces, sleeve cuffs, and a collar, (not to mention facings!), there was a good day taken up just by fusing alone!

A note on sizing…

Thank you all so, so much for your kind words and enthusiasm on my pattern announcement! It’s been literally months in the making and it was totally nerve-wracking to hit the Publish button.

Some of you commented on the XS size not being small enough, however, and I wanted to talk you through the background on this.

As we all know with multisize patterns, you can only have a limited number of sizes. Each size you add on must be graded (which is no mean feat!), then double-checked, adjusted, sewn up, and all the various trims must be calculated as well. For my first collection, five sizes seemed a reasonable number without biting off more than I could chew. I have huge respect for companies like Jalie that create their patterns in an epic amount of sizes, but that’s not something I’m qualified enough to do right now (nor am I particularly interested in designing for children)!

So I have to make choices. For me, I feel very strongly about supporting Plus sized ladies to exercise. I’ve had conversations with Plus sized fitness bloggers like Fattymustrun about the absolute lack of exercise gear for size 16+ in RTW – companies may say they offer it, but in reality, it’s almost impossible to actually buy, and when it does, you usually only get the choice of black (or worse, pink!). So when it came to choosing between offer one size smaller or one size larger, I made the choice to offer one size larger, so that larger women can have the opportunity to wear some fun exercise clothes, too.

You may think, “well, it’s no extra room on the pattern sheet to add another smaller size!” but it’s nowhere near that straightforward. Multisize patterns aren’t exactly like Russian nesting dolls – the way patterns are stacked to allow people to cut between sizes if they wish, there are multiple places where the smallest size line is actually outside the largest size!

Introducing… FehrTrade patterns!

I promised you all a big announcement this week, and my big news is that I’m releasing my first sewing patterns at the end of this month! I’m focusing on exercise gear, and the first two patterns are super versatile!

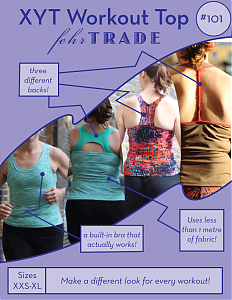
The xyt Workout Top


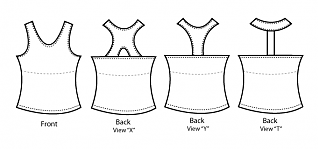
This is a pattern for a close-fitting, sleeveless workout top with front scoop neck, and choice of three upper back designs. An optional built-in bra is included, and neck and armhole edges can either be finished with hidden elastic or bound using a coverstitch binder.

You might see now why I named it the “XYT” – each of the three back variations forms the shape of the letter! The T back in particular has so much scope for variations as the vertical part can be any sort of fancy trim in your stash – lace, sequins, fishnet, fancy elastics, etc…

I absolutely love the built-in compression bra I’ve developed here, too – I’ve never had a RTW one work for me, but these are supportive enough for my B cups to run in, and some of my pattern testers with larger busts have had equal success with only a small FBA!

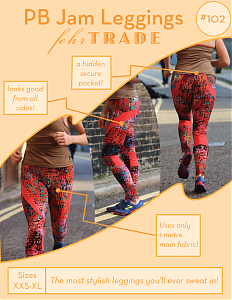
The pb Jam Leggings


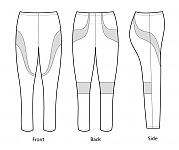
This is a pattern for close-fitting, workout leggings with contrast swirl design on the upper front thigh leading to the upper back. There’s a hidden pocket inside at the upper centre back, perfect for gels, keys, or your phone, and contrast panels at the back of you knees are perfect for mesh fabrics. An elasticated, high-rise waistband means they won’t shift around as you move, either!

You may recognise these from my mocha running top photos earlier this week – these have become my favourite leggings ever in a very short amount of time, and when I wore them to my running crew I had several people begging to buy them off my body, no less! The design lines carry around the sides so you look good from all angles, and the hidden pocket in the centre back is sized so you can stash your phone, gel, or keys without having to carry anything.

Roundup of updates

I appear to have found myself again in the position where I’ve been doing an extreme amount of sewing and sewing-related activity, but I can talk about only a small portion of it, and I don’t have any proper photoshoots for the things I can talk about… Bad, Melissa, very bad!

So consider this a little roundup post to let you know what I’ve been up to, until I can get my act together properly…

Silver cowl top

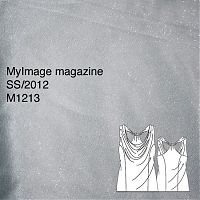
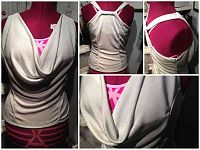
I cut out this MyImage cowl top pattern before we went to Mexico, thinking I might have enough time to quickly sew it up before we left. I would’ve, too, if I hadn’t decided I needed to make a quick travel bag. So it was waiting for me when I got back to cold, grey London, mocking me with its sleeveless-ness. I finally just sewed it up so I could have the space back in my sewing room, though I’m afraid I won’t really get to wear this until next year.

I made it out of some absolutely glitter-tastic jersey I bought at Tissue Reine in Paris a few years back, and I recall it was on the pricey side. It also left a trail of silver all over my sewing room… Boo.

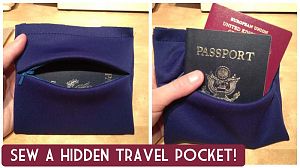
A hidden travel pocket tutorial

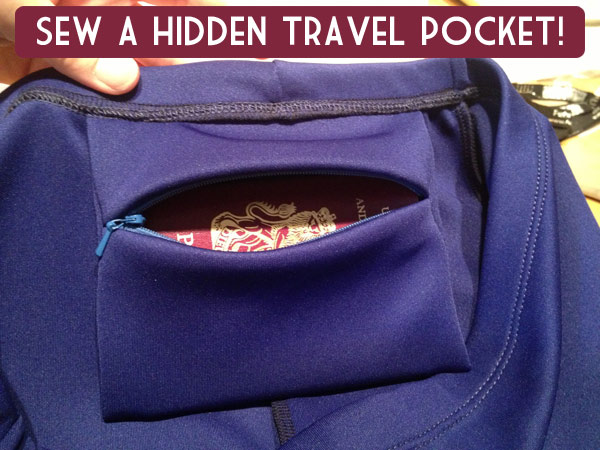
We’re travelling to Mexico in a few weeks, and I decided I should probably have a money belt to keep my passports and spare cash secure while we’re there, especially since we’ll be staying in mid-range hotels and travelling by coach. But the money belts available to buy are all really uncomfortable-looking, made of either rough fabric that will get soaked by sweat, or plasticky fabric that will stick to your skin, and with chunky buckles that will dig in over the course of a day.

Since I’m sewing a bunch of bottoms for my trip anyway, I figured there must be another way, so I had the idea to draft up a simple zippered pocket that attaches onto the waistband and hangs discreetly inside. It can be accessed easily in a private place (like a toilet stall), but not easily seen or pickpocketed, and the zippered opening means its contents aren’t going to just fall out, either.

I’ve added this pocket into my recent travel skirt, leggings, and Hummingbird skirt already and I’ve worn these around London to test drive them successfully!

You can choose to either permanently sew the pocket into the waistband of your skirt or trousers, or you can use snaps to make it removable at the last step, like I did for my leggings.

It’s sized to allow a standard passport to fit through the zipper, plus some emergency cards and cash and other small items you want to keep on you at all times, but that don’t have to be readily accessible.

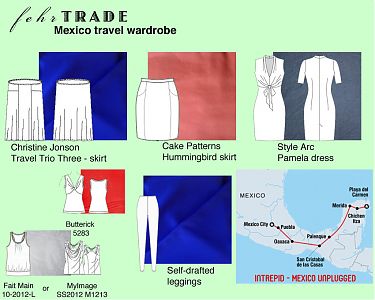
My Mexico travel wardrobe

I’ve made a few mentions of it over the past few weeks, but James and I are off on a grand holiday to Mexico at the end of September! We’ve been talking about going for years and we’re so excited to have finally booked everything. We decided on the Intrepid “Mexico Unplugged” trip since it stops everywhere we want to go, is a small group & eco company, and provides the perfect mix of taking care of booking hotels and transportation, but doesn’t tell us how to fill our days. Which will mostly be filled with eating and visiting ruins!

Anyway, as this is a different sort of holiday than the past few we’ve gone on, and I have a few weeks left to prepare, I thought I’d share with you the few pieces I’d like to sew before we leave…

As you can see, I’ve included lots of bottoms as those are what I’m most in need of right now after losing weight for my track race! My tops still fit reasonably well, though so I’m happy to just bring along ones I’ve already made to pair with them.

I’m hoping to sew:

(I’m cheating a bit by posting this after I’ve started sewing – two of these are done already!)

Plus if I can fit them in before I go, either of the two workout tops from my SS13 Sewing Ideas, or the jeans which I keep delaying

The current Sewing Queue

I’ve found myself at the end of yet another extraordinarily busy week, one where we’ve been out pretty much every single night, and we’ve had a friend over from the States, too. However, I have managed to make progress, albeit slow, on my swirl sheath dress in a series of 10 minute segments snatched here and there.

Since I bought my silver stretch lining fabric on Goldhawk Road last Saturday, I’ve managed to sew and press all the darts (the lining uses the original base pattern so no swirls inside), attach it to the facings, sew the side seam, and attach it to the invisible zipper.

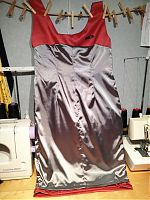
Here’s the back of the dress hanging flat in my sewing cave:

I did the lining hem by machine, but the coral fabric hem needs doing by hand, possibly in the car this weekend. The right side strap also needs a little bra keeper snap strap to keep it in place as it’s a pinch too long. Otherwise it’s done!

It doesn’t quite fit as well as the muslin did when I made it last summer though, but that’s down to me rather than the pattern – I’ve got a big track race next weekend in Sheffield for the British Transplant Games and my trainer has put me on a training diet to shed as much excess weight as possible before the race, as this translate directly into seconds on the track.

She and I were both taken aback by how successful this has been – I’ve lost 4cm (1.5 inches) off my waist and hips and 4.5kg (10lb) in four weeks! If it wasn’t for the hours of running up hills I’d suggest she sell it as a diet plan (the running would reduce its popularity somewhat!). And really, don’t be concerned, as I’ve been stuffing my face with fruit and veggies and lean meats pretty much continuously all month, so I’m not on some idiotic juice cleanse starvation diet or something.

The downside of this is that all my trousers and skirts are hanging off me (my poor Beignet skirt has a cinched paper bag waist now!) and I’m in desperate need of new bottoms. I was planning on sewing up a few pieces for our upcoming Mexico trip next month(!!) but now it’s clear I need to sew as many bottoms as possibly and just pack tops I’ve got already.

I’m still mentally putting together a nice travel wardrobe plan (which I shall reveal in good time), but my immediate sewing plans are thus:

A Big Weekend for Sewing

I had an uncharacteristic free weekend – no races and not much planned, so I ended up getting lots of sewing bits done!

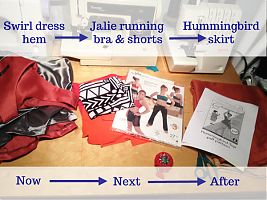
Sewing room clear-out

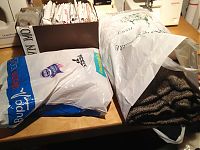
I’ve only got a small (temporary) sewing cave, and I’m a very tidy, organised person, but I’d let it get a little messy and it was feeling crowded, so after my two hour hill run on Saturday morning, I came back and had a bit of a clear out. I filled a full black bag with rubbish, but here’s what I pulled aside to swap at the Goldhawk Road meetup on Saturday!

Yes, you could be a good home to some pattern, pattern magazines, books, craft kits, or fabric that once lived on board! Now, if I can manage to be good and not fill up the space with things I pick up in the swap or fabric stores…

Skylight cover

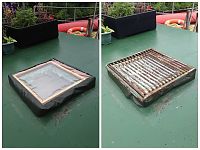
Remember the last time I made a skylight cover (strangely, I see last time I was sewing jeans alongside it, too!)? I’d only ever made them for the back cabin, where the skylights are peaked, with windows that open like wings, but on the front deck, the skylights are flat and require grills that fit overtop for safety and security.

We had a joiner make a gorgeous new cover for the skylight over our bedroom, but it’s been shamefully covered in tarpaulins for the last few months while I procrastinated swearing my way through sewing another.

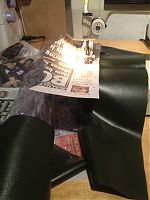
Even with a walking foot, the clear plastic is a total P-I-T-A to sew because it sticks to the machine bed, the foot, is stiff and rams into everything, and is generally just awful.

This time around, I got so sick of the stickiness that I grabbed a “newspaper” (tabloid left from our joiner) and ripped off pieces to go underneath and also under the presser foot.

This surprisingly worked rather well, and the newspaper just rips out easily afterwards. Worth remembering if a) you don’t mind newsprint on your fabrics, and b) like me, you never have tissue paper lying around

It’s not my best work, but it’s done and will allow more light into our new bedroom!

Jeans muslin

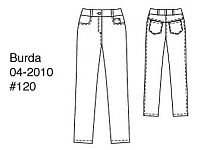
If you recall, I decided on a Burda pattern for my non-stretch denim so I sewed up a quick muslin of that on Saturday after my skylight triumph.

The triumph was short-lived.

Honing in on a jeans pattern

Even though I finally finished my pink trousers and lace teeshirt I mentioned last week, it’s been so hot and sweaty that I haven’t quite managed to do a photoshoot for them yet. Everything’s written so as soon as I do, you’ll get to see how great they are, honest!

I also managed to cut out a Kwik Sew exercise top, but not start sewing it yet, but what I really wanted to talk about today is the ongoing process in deciding which jeans pattern to use as a match for some heavyweight, non-stretch denim in my stash. So when I say that I’m “always thinking two projects ahead”, you now know it’s the truth!

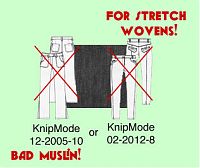
If you remember back to my Spring Sewing Ideas, I had two different KnipMode jeans patterns that I thought I might use:

However, I found out soon after that the 2012 KnipMode one was for stretch wovens, which dis-counted it for this particular bout of jeans sewing.

The 2005 one looked very promising, but when I made a muslin of it the look was not good – ill-fitting in the waist and hips and way too wide in the legs. I’m sure I could fix it with plenty of time and patience, but with such an enormous pattern stash it just wasn’t worth pursuing further!

So I went back to the drawing board, otherwise known as my online pattern catalogue, and had a look through all the magazine issues I’d tagged “jeans”. This was a lot! So as I flipped through, I took screenshot segments of the ones I liked the look of, and renamed these files with the brand and pattern number, and shoved them in a special folder.