Stamps: Designs, sizes (offered patterns and how they compare to Burda), language, pattern sheets, availability Manequim Moda Moldes […]
A handy guide to Brazilian sewing pattern magazines
A black and brown lacey lingerie set (and exclusive freebie!)
I think it was inevitable that I’d need a quick and fun distraction from all my pattern drafting and muslins, and nothing spells “quick” and “fun” like lingerie! Seriously, if you’ve never sewn lingerie, you won’t really understand the appeal, but playing with tiny bits of lace and trim is just so creative and rewarding, especially for ladies like me who really aren’t into embellishment elsewhere in their wardrobes.
Since it fit so well before, I used the same modified bra pattern from my purple hearts bra, though this time I used black, pushup foam cups and the black/brown Alice lingerie kit from The Sewing Chest.
The first step was to cover the cups with the rigid lace. The lace in the kit was 50cm long, with two scalloped edges, so I aligned a scalloped edge along the top of the cup, then pinned and smoothed and made a few needed pleats in order to get it looking nice. If the lace or covering material is stretchy, then you don’t need any pleats in it, but as mine was rigid, a few small pleats were necessary towards the bottom.
Here’s the covered and uncovered cups:
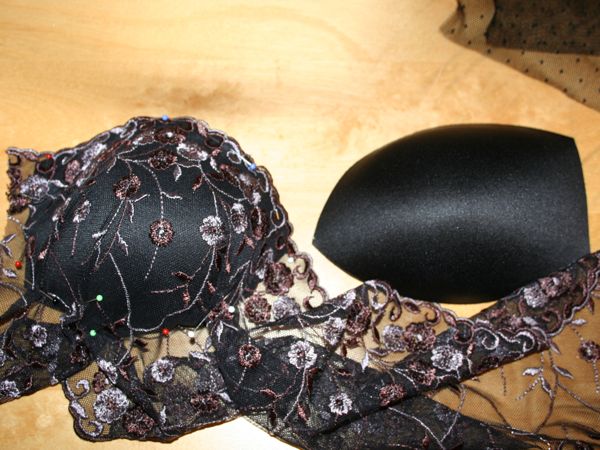

Then I did the same with the other cup, though I had to use the opposite scalloped edge so both cups were symmetrical. In bra making, symmetry is king!!
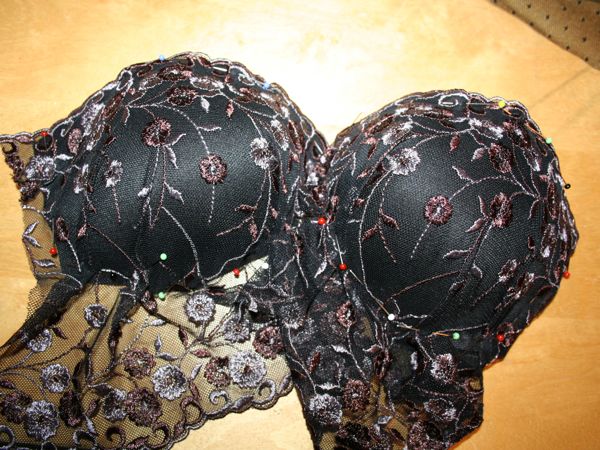
With a wide zigzag stitch, I basted the lace around all the edges and trimmed the excess. I actually went back later and added some stretched, narrow elastic on the inside of the top of the cups, but I’d recommend actually doing this, or applying FOE (foldover elastic) to the upper cup edge before stretching the lace over your cups to avoid a second line of zigzagging over the lace. Even if you think your cups are sturdy enough to not need the elastic, it really makes a difference in keeping the top of the cup close to your body and not getting any gaping.

A functional KitchenAid mixer cover
Back in March, I joined the ranks of the middle class aspirational home cooks when James bought me a KitchenAid mixer for my birthday. I asked for (and received!) yes, a white one, because, while I like the red ones, they’re totally not worth £100 more just for the colour! Anyway, we were finally able to rearrange our tiny galley space to accommodate it so I finally broke it out of the box to make macarons last weekend.
The macarons were a resounding success (I also discovered the sole thing on earth that’s tastier than macarons – macaron batter!), but the only storage space for the mixer is out in the open, so I needed to sew a cover for it, lest I have to wash the dust off it every time I want to use it!
I was feeling supremely lazy, so rather than measure it myself, I just used the
tutorial and pattern here to sew up a really quick cover.
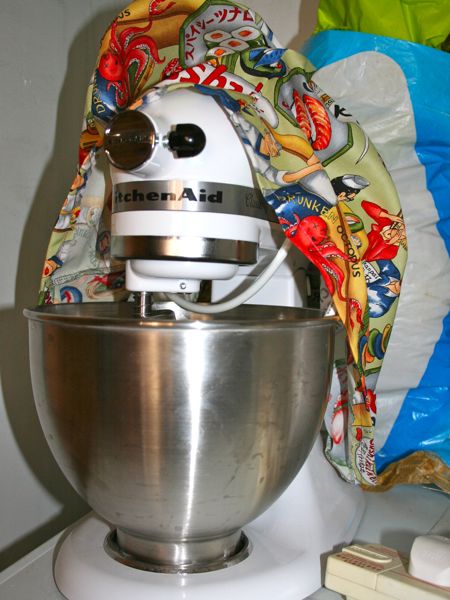
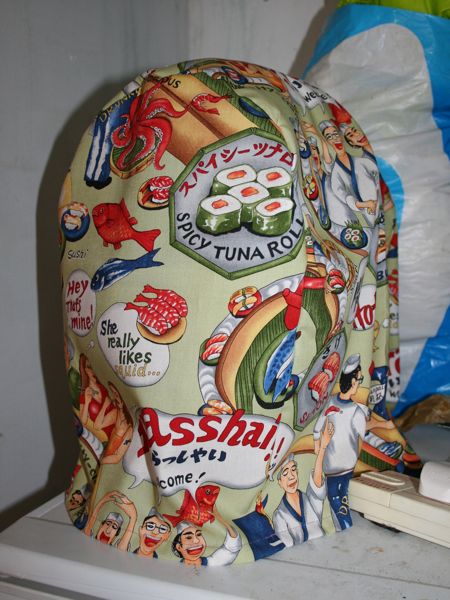
I made a few changes from the above site, though, the main being that mine is not quilted (it’s not like the mixer needs to stay warm!), and mine has a seam at the top since my print is directional and I didn’t want upside-down people on one side.
Muslins, muslins everywhere…
…but not the time to sew!
I’ve had an incredibly busy week and weekend, between my whirlwind social life, an influx of new work at the office, hardcore boat DIY, moorings duties, and keeping up with my running, so I’ve hardly had any time to step foot in my sewing room, let alone sew! It doesn’t help that pattern drafting moves at a glacial pace as compared to just tracing off a pattern and sewing it up!
If you remember, I’m using Pattern Magic and the Bunka draft to revisit pattern drafting. So far I’ve made my bodice sloper and drafted up this variation from the first Pattern Magic book, “Tying a Bow D”.
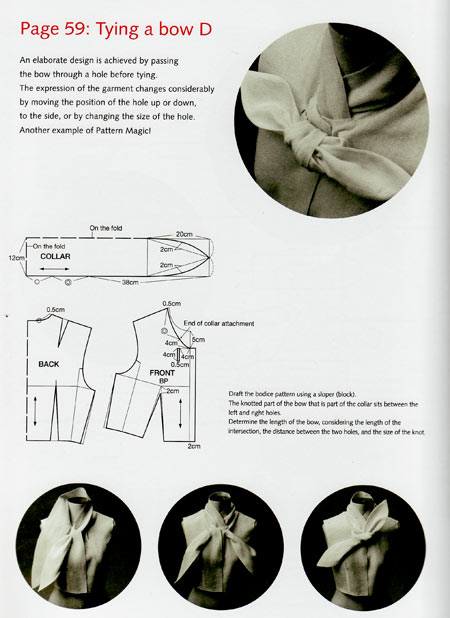
This is one of about five designs across the books that I’d really like to make, but it’s also by far the simplest draft so I thought it’d be a good place to start. The only difference is that I want to a dress from this instead of a blouse, so I’ve also drafted up a skirt sloper and am just now starting to match up the darts to the bodice and insert some flare to make it usable for a nice shirtdress.
A silk chrysanthemum Sorbetto blouse
Every now and then I mention a few people from my personal life when they enter into my sewing world for whatever reason, but regular readers will probably recognise the name of “Neighbour Helen” more than most. As a neighbour, close friend, and convenient fashion industry alumni, she’s helped me assess muslins, balance proportions, learn how to rotate darts, and she even drew the amazing illustration for my free ruffled wristlet pattern!
So I was very saddened to hear that she and her husband are moving their barge to France in a few weeks’ time, to travel through the French canals for the foreseeable future (ok, saddened and jealous!). Since it was also her birthday, my gift to her was to make her a silk blouse of her choosing.
She chose the gorgeous chrysanthemum silk that was leftover from my blouse and I even let her try mine on, but she felt my top was too blousy for her and requested a simple shell instead.
So I turned to the new (and free!) Colette Patterns Sorbetto top!
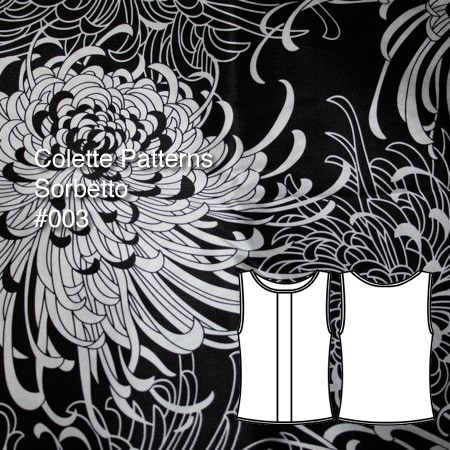
I made a few changes, though – the most obvious is that I eliminated the central pleat (which would have been too busy with the large scale print), and I lengthened hem by 3” as others said this came up short.


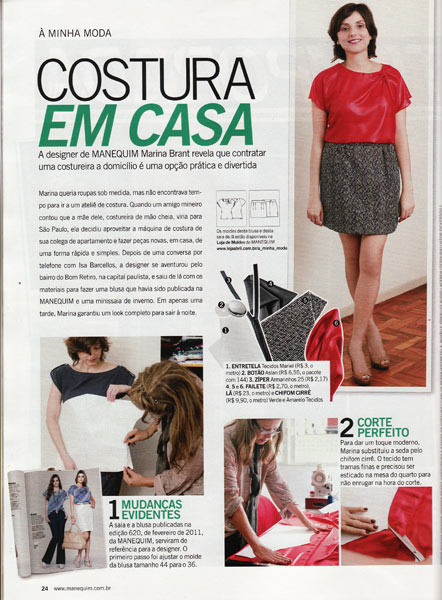
Manequim July 2011
Hooray, the latest issue of the Brazilian pattern magazine, Manequim, has arrived! Even though our seasons are reversed, I’m finding plenty of styles in this issue that work well for English summers, even moreso than Burda magazine, which is aligned with our seasons (though is anyone else excited to see the return of Burda’s designer patterns? There were actually TWO patterns in the July issue that I’m tempted to make. Please oh please let this be the end of Burda’s slump!).

Manequim have started doing a little section at the front where they get a seamstress to help a poor damsel in distress to alter a Manequim pattern from a few months ago to suit their needs. I let out an audible squeal when I saw that this damsel loves my blouse so much she wanted help grading it down to a size 38! The skirt is apparently from an earlier issue, too, but it clearly didn’t make much of an opinion as I can’t recall it.
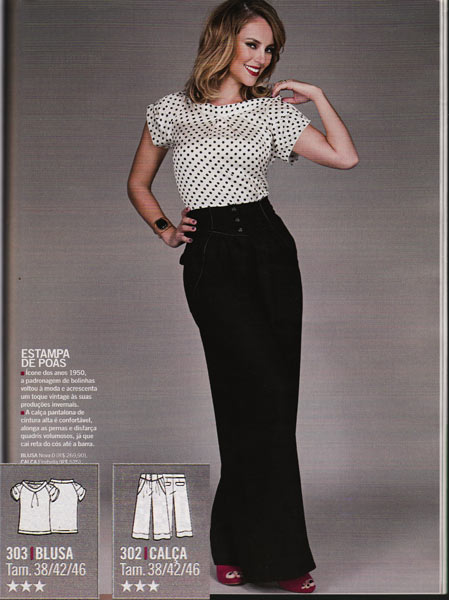
First off, I really like this blouse and the trousers here – it’s hard to see, but the trousers have a high-waisted band with piping that really reminds me of the waistband on my tuxedo trousers (which are stored safely in a garment bag now while we build our new bedroom and wardrobe). Both are offered in multiple sizes, too.
Revisiting pattern drafting and the vintage tab dress muslin
Remember the vintage dress pattern I graded down to my size a few weeks ago?
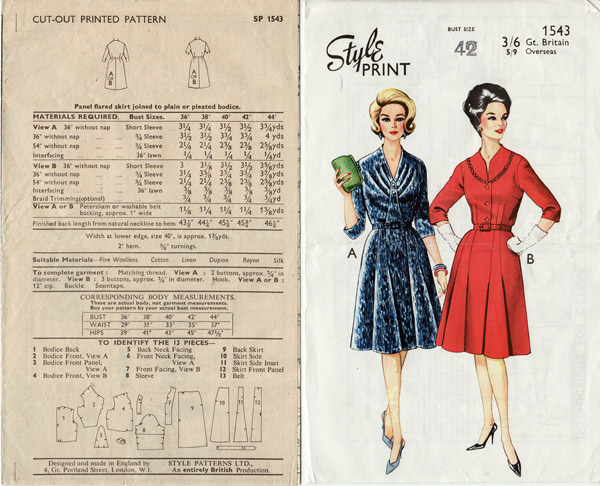
Well, I made up a muslin with my grading changes in place, and though I didn’t get any photos of it on me, I did get some on Susan. I realise that diagnosing fit issues on a dressmaker’s dummy is particularly futile, though, so you’ll just need to take my word for it!
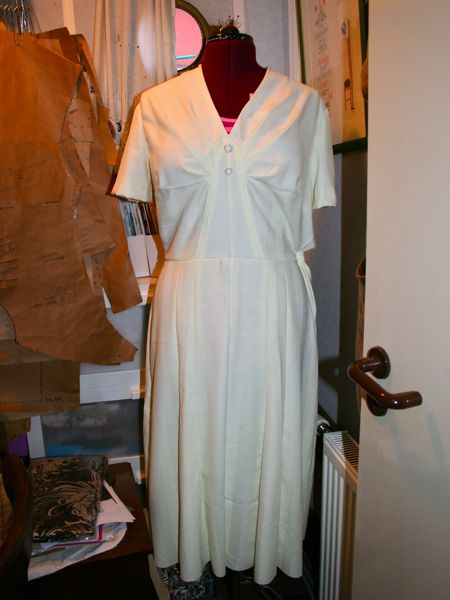
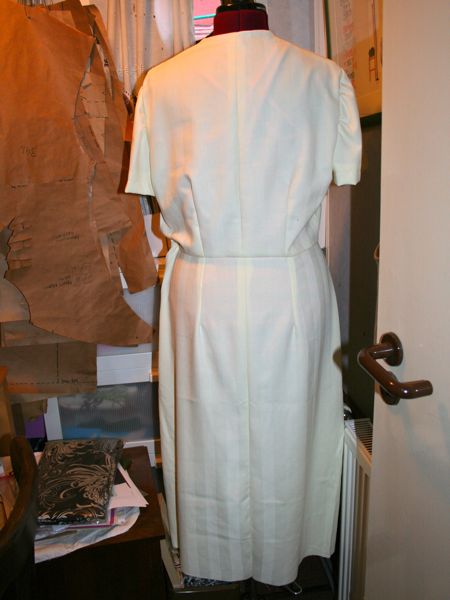
On first glance, the worst issue is that there is way too much fabric in the upper back, but also I think I may need to raise the waist seam by an inch, and narrow the shoulders by an inch or so, too.
The skirt length is d-o-w-d-y so I’ll need to shorten all those panels, too (happily I’ve got a “lengthen or shorten here” line on both the bodice and skirt pieces).
While the sleeves themselves fit nicely, there is an unholy amount of excess ease in those sleeve caps, omg. So I’ll need to shave down those caps to take a good few inches out of there.
It wasn’t necessarily the list above that made me lose enthusiasm for this dress, but I can’t really put my finger on what it was. But it turned out that doing all the boring grading reawakened in me a desire to conquer pattern drafting, which I dabbled in when I received “Metric Pattern Cutting” by Winifred Aldrich last year, but didn’t get far.
The silk chrysanthemum blouse
As I discussed in my post on “pedestal fabrics” last week, I’ve had a ridiculously gorgeous silver and black chrysanthemum print silk in my stash ever since AllisonC gifted it to me two years ago when I was about to go into hospital.
But I’d brought it out again recently and thought about how I’d best like to wear it and I decided that I love and wear my silk blouses so much (and my birthday blouse in particular!) that I should sew this into a blouse to get the most wear and love out of this “pedestal fabric”!
In this case I chose to use the same pattern as my birthday blouse, Manequim Feb 2011 #158, because it fits great, I love the style, and I knew it worked well with a drapey silk.
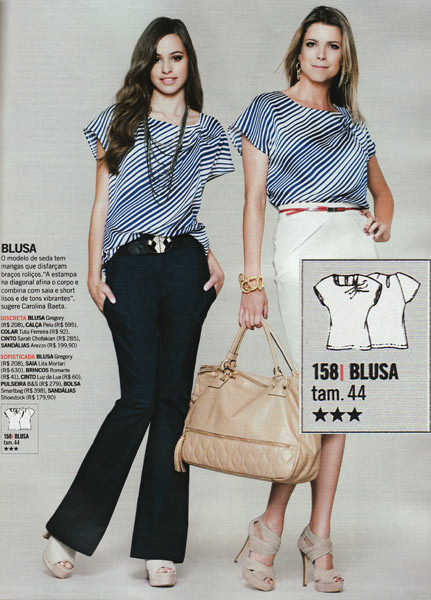

You know what? I am so happy I took the plunge and cut into this fabric, because I just adore this blouse!


Manequim June 2011
If you’re reading this and sweating, then you may wish to imagine yourself instead in chilly Rio de Janeiro for the latest instalment of Manequim magazine. Brrrr along with me now…

First up is a rather useful two-page spread on how to customise your accessories with fur. I quite like the idea of adding fur to existing gloves, though the way they’ve added it to a dress here seems strange. Surely it’s better to create a detachable fur collar, a’la this coat tutorial?
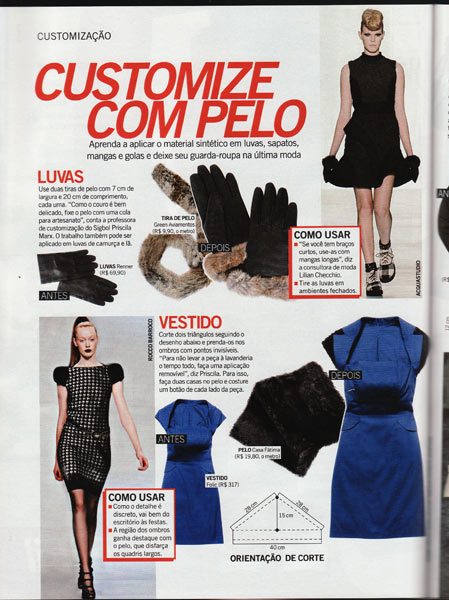
I really like the dress on the left, with its cool peplum side panels and the wide, cross back straps:
KnipMode July 2011
Once again I’ve been a bit slow in reviewing this month’s KnipMode and Manequim magazines, but I’m only just now emerging from beneath the pile of pattern magazines. I got a bit overwhelmed there with my haul from France and my friend’s haul from Brazil, and I think I’m going to keep my pattern buying to the bare minimum for a few months so I can process through what I’ve got. So you’ll continue to see my monthly KnipModes and Manequims since I subscribe to those (I also still subscribe to Burda, but they’re less exciting and already heavily posted about online anyway) but I’m going to try not to buy anything more until the Fall Patrones issues emerge in a few months.
But KnipMode are still very much in the height of summer, and this is the vacation issue…

Ooh a swimsuit! It’s a bit more basic than the designer one featured last summer, but it’s still very wearable, and with the separate cups, it’d be very adjustable for larger busts.