Sewing Indie Month is back again so you can look forward to a whole month of fun interviews, tutorials, pattern sales, and sewing contests (with a ton of prizes!) throughout the month of September. Just like last year, when I interviewed Hannah from Sinbad & Sailor and you got a great tutorial from Heath Lou hacking my XYT Workout Top into a maxi dress, you’ll get to read some great, different content from my usual sort, starting off with this fabulous tutorial by Amity of Lolita Patterns. You may recall that I pattern tested her Sugar Plum dress a few years ago (and I still wear it!), plus we got to meet up when she visited London a while back, too. So read on and see how she adapted my PB Jam Leggings pattern to have wider legs and a yoga-style waistband, too! – melissa
I was so lucky to get paired with Melissa for the tutorial post for SIM. While my life before baby was filled with court visits (I was an attorney) and professional wear, my new mom life incorporates a LOT of yoga pants. Casual wear is my life now! So it was unbelievably perfect to get paired with Fehr Trade patterns.

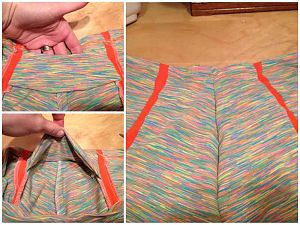
For my tutorial I turned her very stylish PB Jam Leggings into yoga pants! This required a different and thicker waistband, and a widening of the legs. Can I just tell you that my pants turned out amazing?!? I was going to just go black pants with the gray houndstooth contrast but at the last second remembered I had some orange stretch piping I had bought for a project but had since bought a different shade of orange. This piping made the pants. Literally. The piping looks so amazing I have worn these pants 4 times already and I’ve only had them made for a week!

I’m here to share pictures and a tutorial on how I transformed the PB Jam leggings into yoga pants. To do this, I used a pair of yoga pants I loved to see how wide I wanted each part of the leg.
Wide leg alteration

Excuse the dog hair—such is the life with three dogs 🙂
The bottom of the leg was 10 inches.

In between the knee and the hem was 8 7/8, and the knee was 8 5/8. I took these measurements and wrote them on the diagram so I could compare and make sure I didn’t forget them. I also measured the inseam and how far down the knee began from the waist. These are all helpful measurements when altering the pattern to match the yoga pants we are copying from.

Now keep in mind, these are all just one side of the leg (so the entire circumference would be twice the measurement) and also do not include seam allowances. But this measurement is perfect because the pattern pieces work this way.

