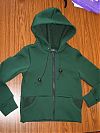
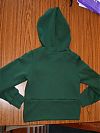
Mini me!

After the success of my green Patrones hoodie I thought that I’d make something similar for my nephew Logan’s birthday using the same fabric. I liked the look of #7 from Patrones Ninos 271 (Patrones magazine is normally all womenswear patterns, but they have two special childrens issues each year).

Even though it’s modelled on a girl here, it’s definitely a unisex style, and I thought the dark green sweatshirting was definitely more of a boy colour anyway, and this was much nicer than the other styles for boys his age in this issue. So I sewed this up on my overlocker in a few hours, and now it’s off to the post office in time for the big day! Unfortunately my would-be model neighbour girl has gone away for the past few days so I’m limited to a flat photo until Logan wears it himself…

An asymmetric swimsuit

It’s been a while since I’ve had to write a negative pattern review but hoo boy, this one’s a doozy. The thing is, I ended up with a finished swimsuit that I really like and feel great in, but that’s in spite of this pattern, not because of it. I significantly redrafted all the pieces and relied heavily on another blogger’s instructions in order to get to the finished result.

I’m not even sure how the Edgewater Avenue “Marley One Piece” pattern came on my radar, tbh. I’ve never heard of the brand before, but they seem to specialise in swimwear sewing patterns and this particular one was on sale for $5 for a limited time, so I bought it.

Sewing the Cos “Made By You” Men’s Shirt

As I mentioned in my earlier post showing off this shirt as well as the women’s shirt, this post is to outline how to construct the Cos “Made By You” men’s shirt so that others in the future can construct it in spite of the very sparse video instructions provided with the pattern. A lot of this information may be a repeat of the women’s shirt post since the kits are very similar in structure, right down to the fabric and packaging provided.

My Cos “Made By You” Men’s Shirt

My goal for January was to sew both of the Cos “Made By You” shirt kits, and even though it’s February now, I am pleased to report that I did indeed finish both in January. I’ve already told you all about the Women’s Shirt, so today I want to show off the Men’s Shirt.

Now, they’re labelled “women’s” and “men’s” but to my eyes they’re really fairly gender-neutral, so I bought both kits intending them for myself (hence why I bought a larger size in the women’s, assuming the men’s was drafted a bit bigger). I’ll go all in on the construction and the kit itself in a separate post later this week (like I did with the women’s), but for now, let’s just have a look at the finished shirt!

Sewing the Cos “Made By You” Women’s Shirt

Earlier this week I showed you my finished version of the Cos “Made By You” women’s shirt kit with the promise of giving far, far more details on the kit itself and some construction instructions so strap on in! This is a HEFTY brain dump intended to help others who’ve bought this thinking they were getting a full sewing pattern, or who bought it and no longer have Cos’s video online to help. Or frankly, if you’re just intrigued about what a high street shop thinks a home sewing product should be!

My Cos “Made By You” Women’s Shirt

Back in November I caught wind that the high-end high street shop Cos were selling sewing kits for two of their classic white shirt designs. Coincidentally, it was right after Black Friday so I managed to buy both with a hefty discount, purchasing size M/L for the women’s and size S/M for the men’s (the RRP for each kit is £29/€35 but I think I paid less than £20 each). Now, Cos label these as “women’s” and “men’s” but to my eyes they’re really both unisex designs, so I’m sewing up both for myself! I decided to dedicate my January sewing to tackling these kits, starting with the women’s one (as voted by my Instagram followers), so this post is to show off the finished shirt!

My vintage-inspired BIRTHDAY merino cycling jersey

Happy “over a week late but still my” birthday to me!! If you aren’t following me on social media (I mean, why not??) then you may have missed the absolute frenzy of renovation/building work that’s been taking place over the last few months. In November and December, the builders made us a new kitchen, bathroom, and utility room, and then after a short break, have spent all of February and May creating our Saloon (bright living/dining area, where these photos were taken!) and Snug (dark living room) and corridor. Considering these didn’t even have finished walls or subfloors (or lighting!) when they started, the transformation has been incredible.

But it does mean that for infection control reasons, I couldn’t be anywhere near them while they’re here working (we have a very small but self-contained back cabin we stay in). We’re grateful to be in this position, but it severely limits my sewing time before you even consider the sheer amount of dust, lack of cutting table, fact that large sheets of plywood and doors would randomly block access to my sewing room and omg did I mention the dust?!? So my planned birthday make was not finished for my actual birthday this year, which just happens some years! And it doesn’t diminish it in the slightest.

Men’s Surf to Summit Top pattern – now layered!

Yes, we’ve carried on with our regular updates and now the Men’s edition of our ever-popular Surf to Summit Top pattern joins the Ladies edition in being layered! Woop! The Ladies edition has been layered for a while, and our Lightspeed Leggings pattern was the first to be layered from launch, so it was a great opportunity to update this one, too, so it’s even easier to sew some great winter activewear for the men in your life.

A green merino Astoria sweater

I’ve been a subscriber of Seamwork magazine since issue one back in December, and can I just say that they are killing it with the digital format, pattern bundling, and freemium vs add-on price point? Seriously, this is the future of not just sewing magazines, but magazines. I’m proud to be both a subscriber and a contributor (look out for more of my writing in the June issue!), to be honest! When I saw the cropped “Astoria” sweater in the April 2015 issue, I just knew I was going to sew it! The nice thing about Seamwork (which is made by the Colette Patterns team) is that subscribers get both patterns on the 1st of the month, but if you’re dawdling and don’t notice a great pattern until someone like me sews it up a month or two later, you can still go back and buy the pdf pattern on its own (and they include Copy Shop versions, too).

All the Seamwork patterns are designed to be sewn in an hour, and, just like the Oslo cardigan I made back in January, this one came together in a single evening. Also, I appear to only make Seamwork patterns in wool jerseys, ha!

I couldn’t believe my luck when this pattern appeared, as I’d just bought some gorgeously soft green merino wool jersey at Mood in NYC mere days before! I’d only bought 2 yards (which I’d regretted once I got home!) for $18/yd, but happily there was enough there to cut the long-sleeved version of this plus still have enough leftover for a winter running buff.

I made size Large since my waist and hips corresponded best to that size, though my bust is a Medium on their chart. At first I made size Large with no alterations, but I wasn’t 100% sold on the fit. It took a whole day of me wearing it to decide that it’d be better with the sides taken in by 2cm (an inch) on each side. In hindsight, I could’ve gone with the Medium, I think.

So I cut off the hem band, took in the sides from the armpits down (taking off the same 2cm from each of the hem band seams, too!), and overlocked the hem band back on, this time with only the minimum seam allowance to avoid shortening the hem any more than necessary. And the fit is waaaaaaaay more to my liking now!